

Apps & Projects
On this page
Twigex Business Apps and Projects is a modern, multifunctional platform that helps organizations and teams structure their work, manage projects, build task workflows, and collaborate effectively.
But it’s more than a project tool - Twigex works like a no-code app builder, letting you design your own business apps and tools using tables, fields, and relationships.
You can create complete internal apps, such as:
- A simple CRM to track leads and clients
- An invoicing system with statuses and due dates
- A stock or inventory table to monitor quantities
- A service or ticketing board for requests
- A contracts or orders database
- A partner directory with linked roles and documents
- Custom HR records, onboarding steps, or equipment tracking
Workspace
A workspace is the main place where you organize your projects, tasks, data tables, and team members. Each workspace is a separate environment with its own structure and users.
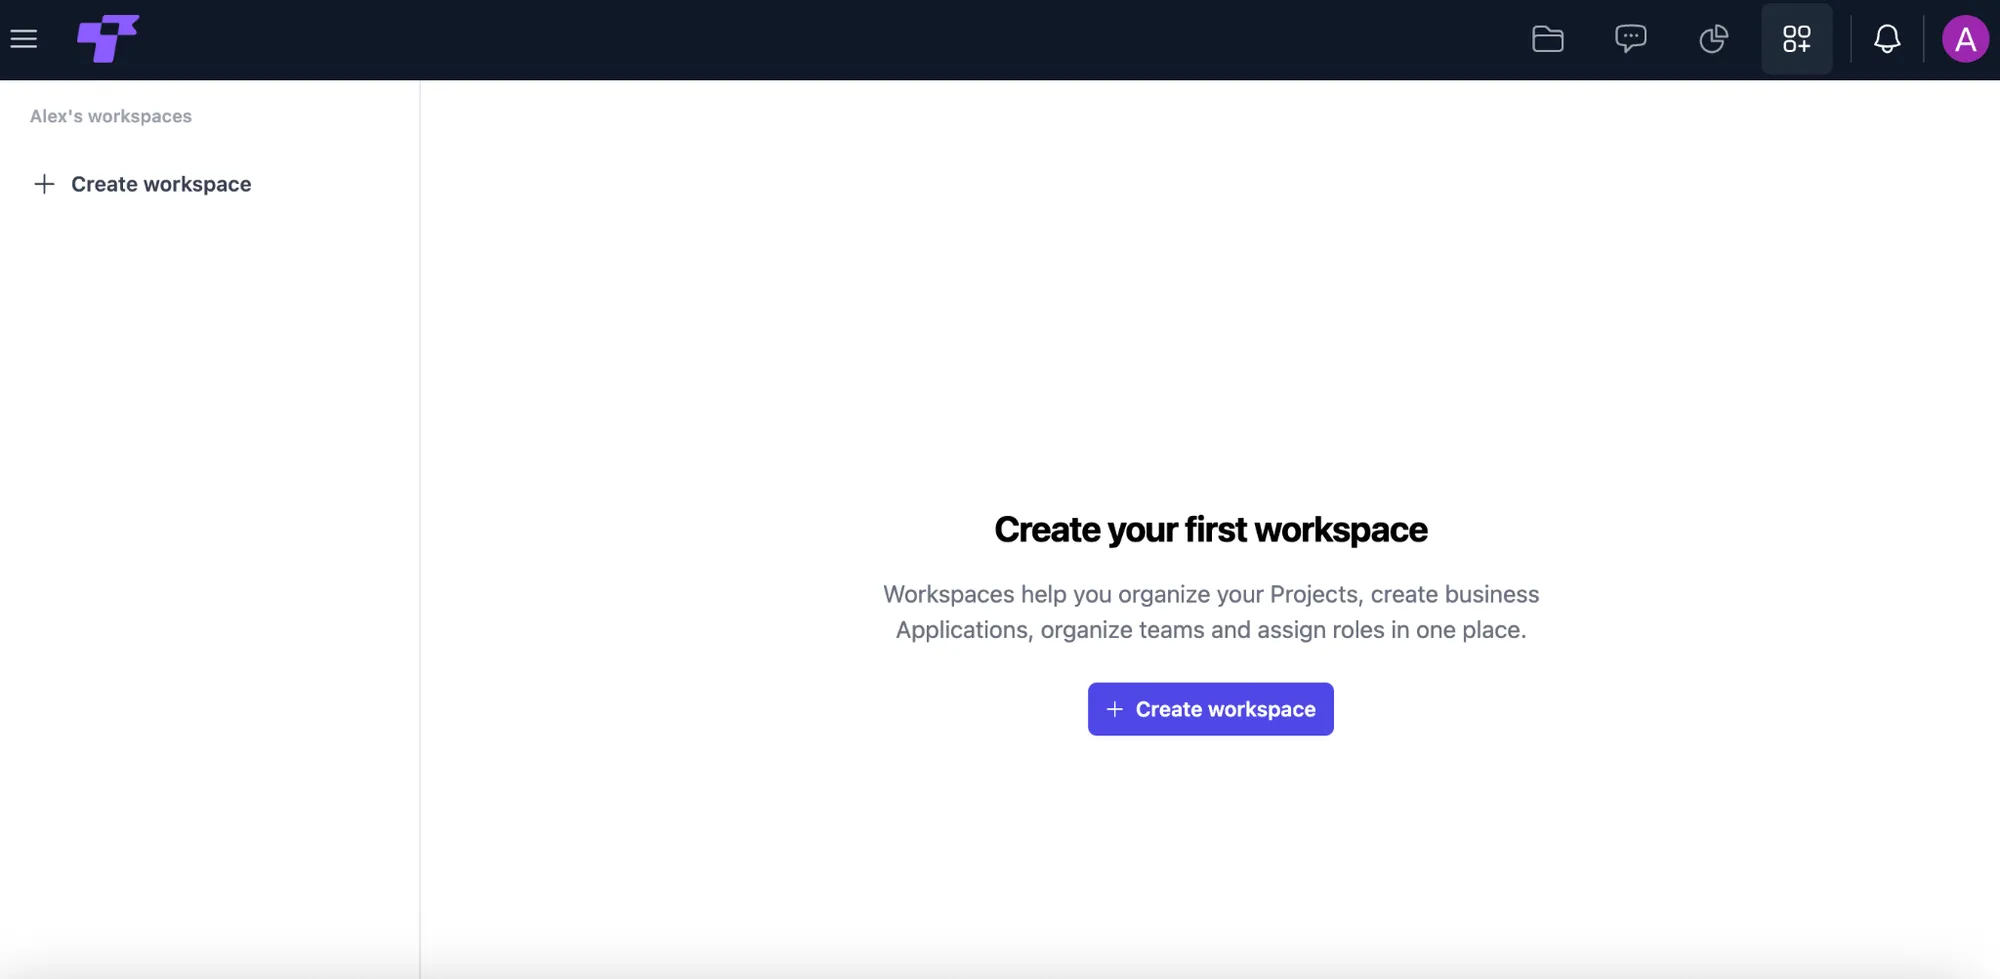
Workspaces do not share data with each other, so all related projects should be created inside the same workspace.
Create a new workspace
When you open Twigex Projects for the first time, you’ll see a clean page inviting you to create your first workspace.
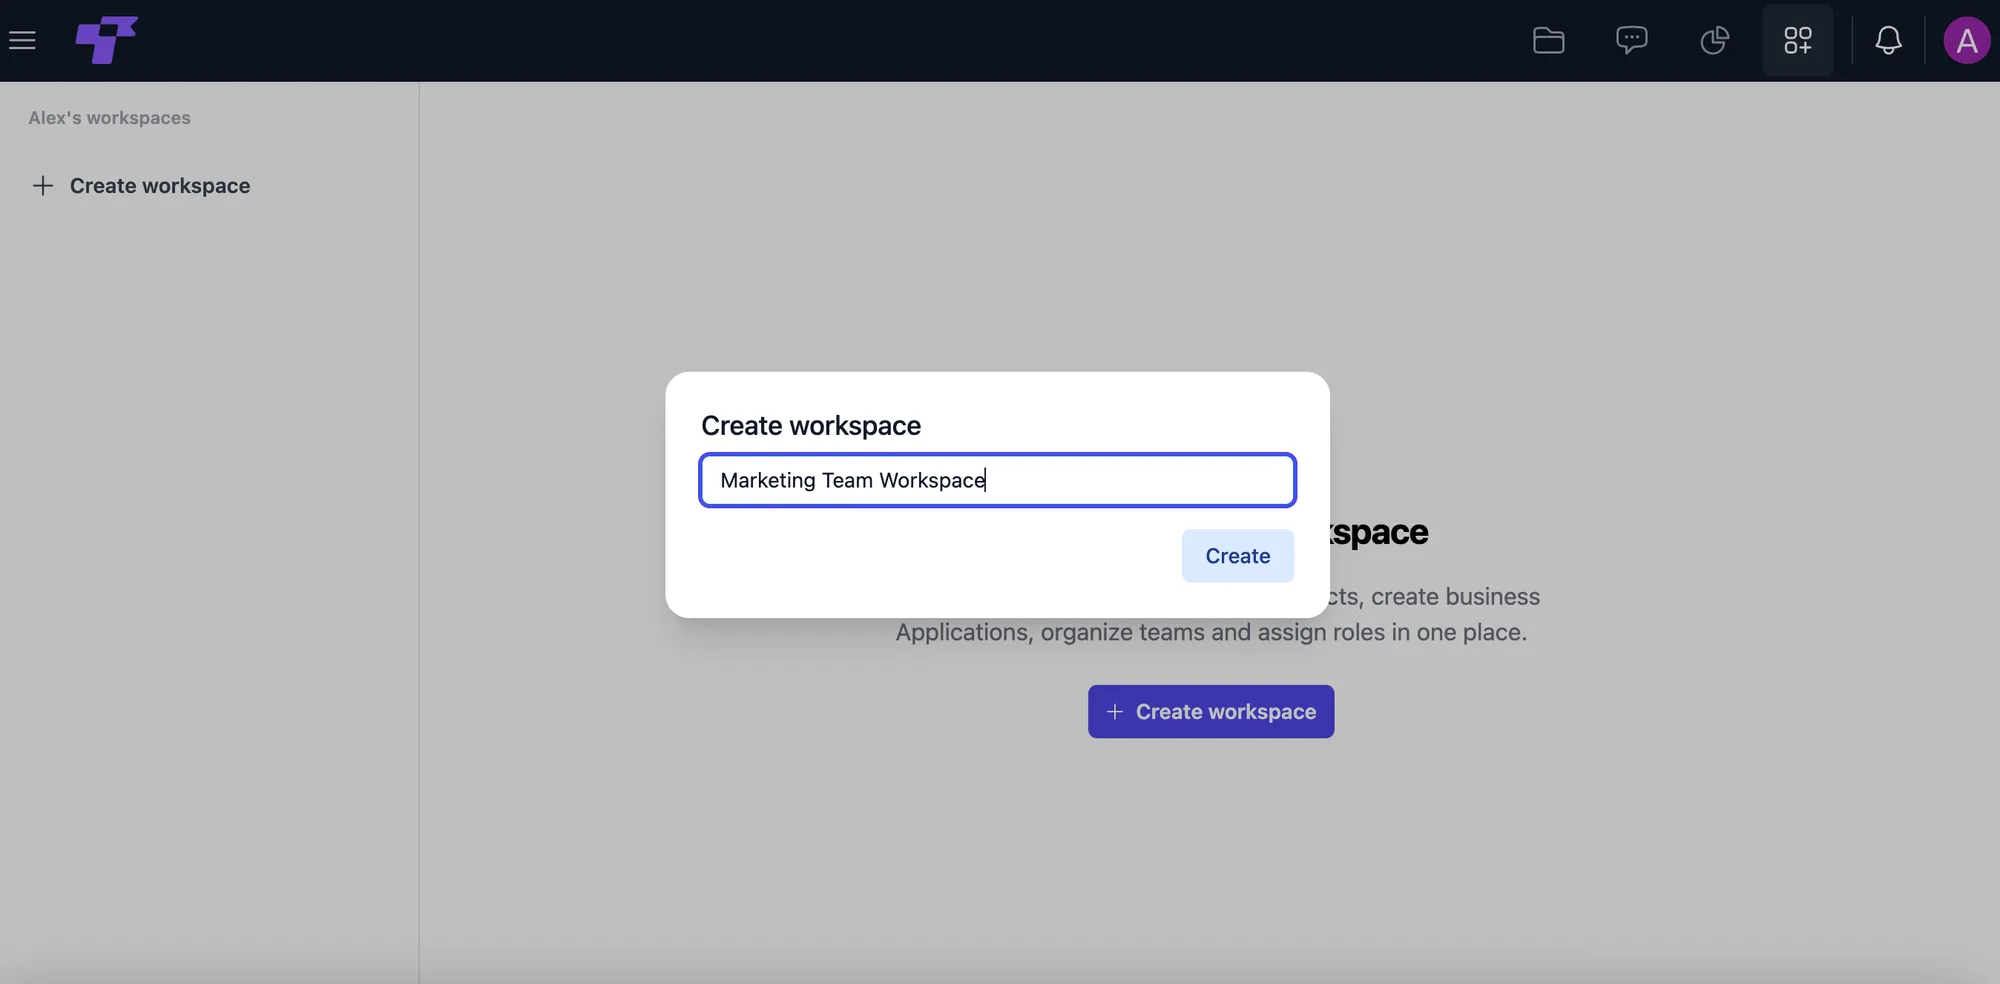
To create a workspace:
- Click + Create workspace in the left sidebar or the main button in the center.
- Enter a name for your workspace (e.g. Marketing, Client Work, Product Development).
- Click Create to confirm.
A workspace contains its own folders, tables, views, and members. You can always create more workspaces later.
Add users to a workspace
You can control who has access to each workspace by adding or removing members. Every workspace can have its own team with its own roles.
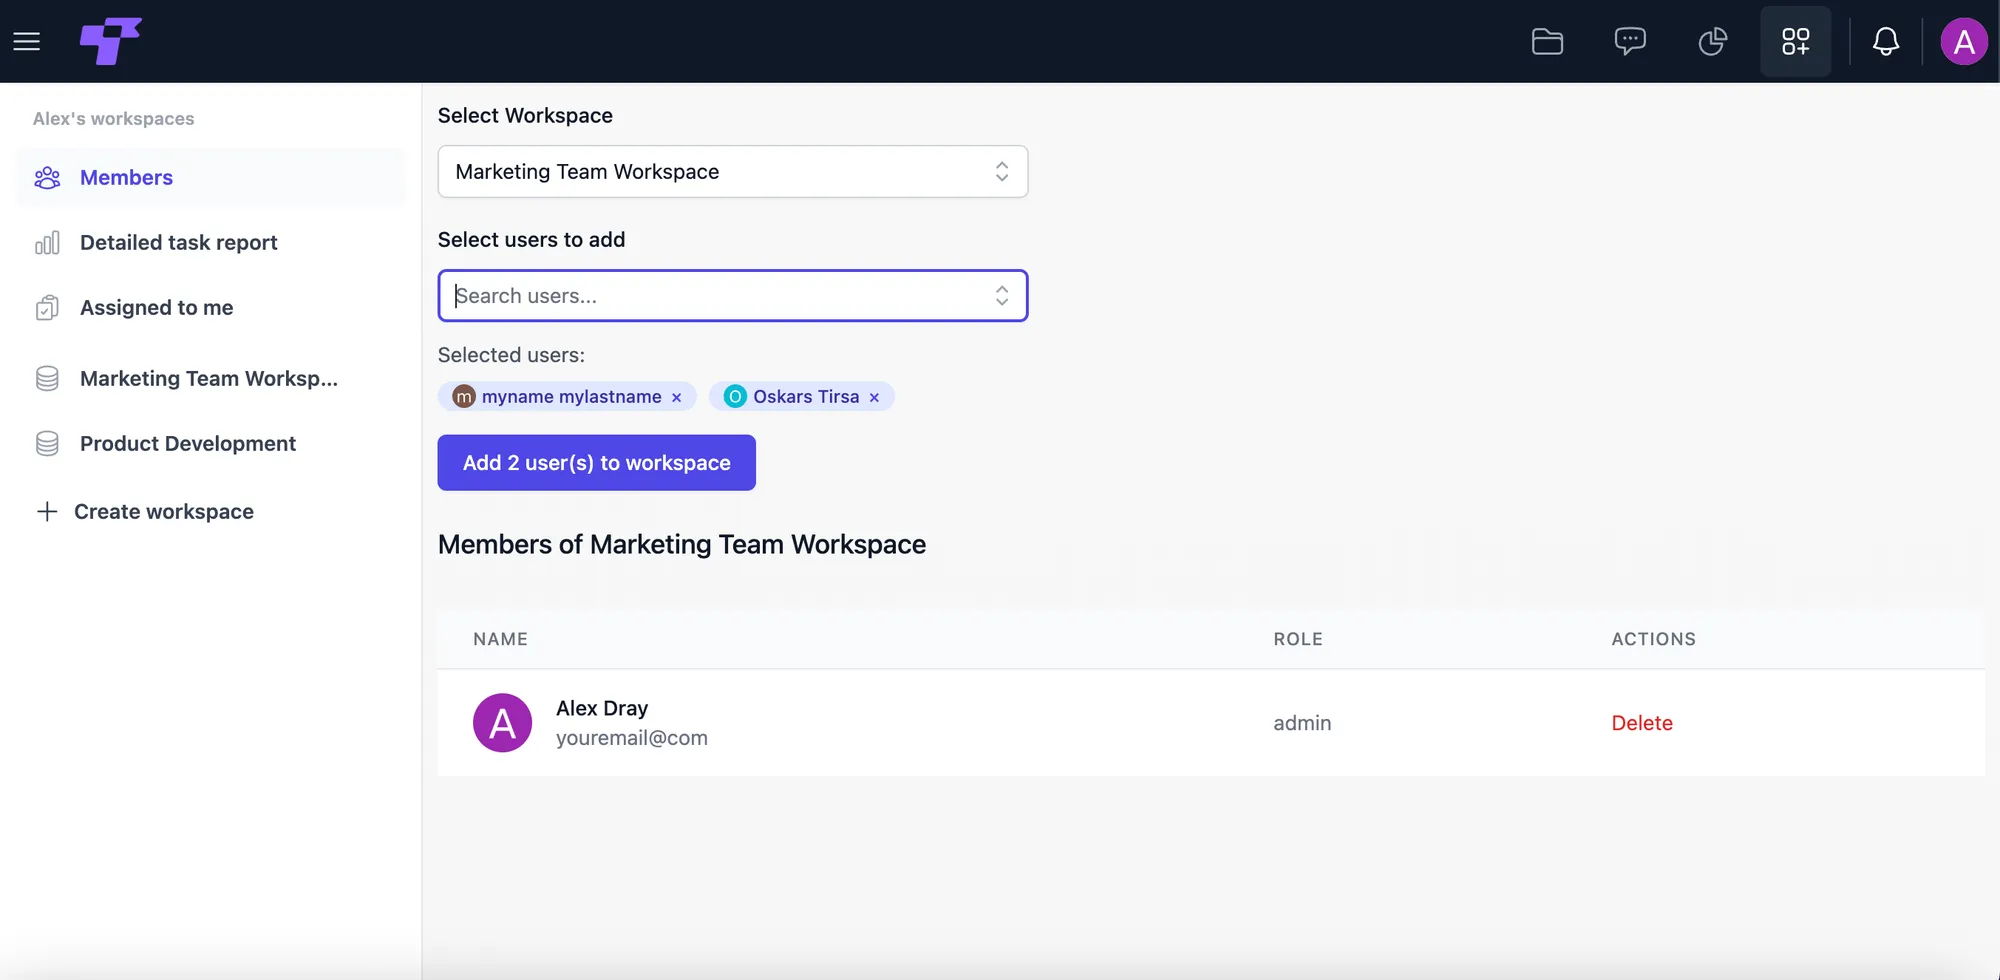
To add users:
- Open the Members section from the left menu.
- At the top, use the Select Workspace dropdown to choose the workspace you want to manage.
- In the Select users to add field, start typing a name or choose from the dropdown list.
- Click Add user(s) to workspace to confirm.
New users are added as regular users. Only workspace admins can manage members and settings.
admin – can add/remove users and manage settings.
user – can view and work on projects, but cannot manage settings.
Removing a user from a workspace does NOT delete their Twigex account - it only removes their access to that specific workspace.
Create a new folder
Folders help you organize the workspace into clear sections. You can create a folder for each client, project, department, or any logical group of work.
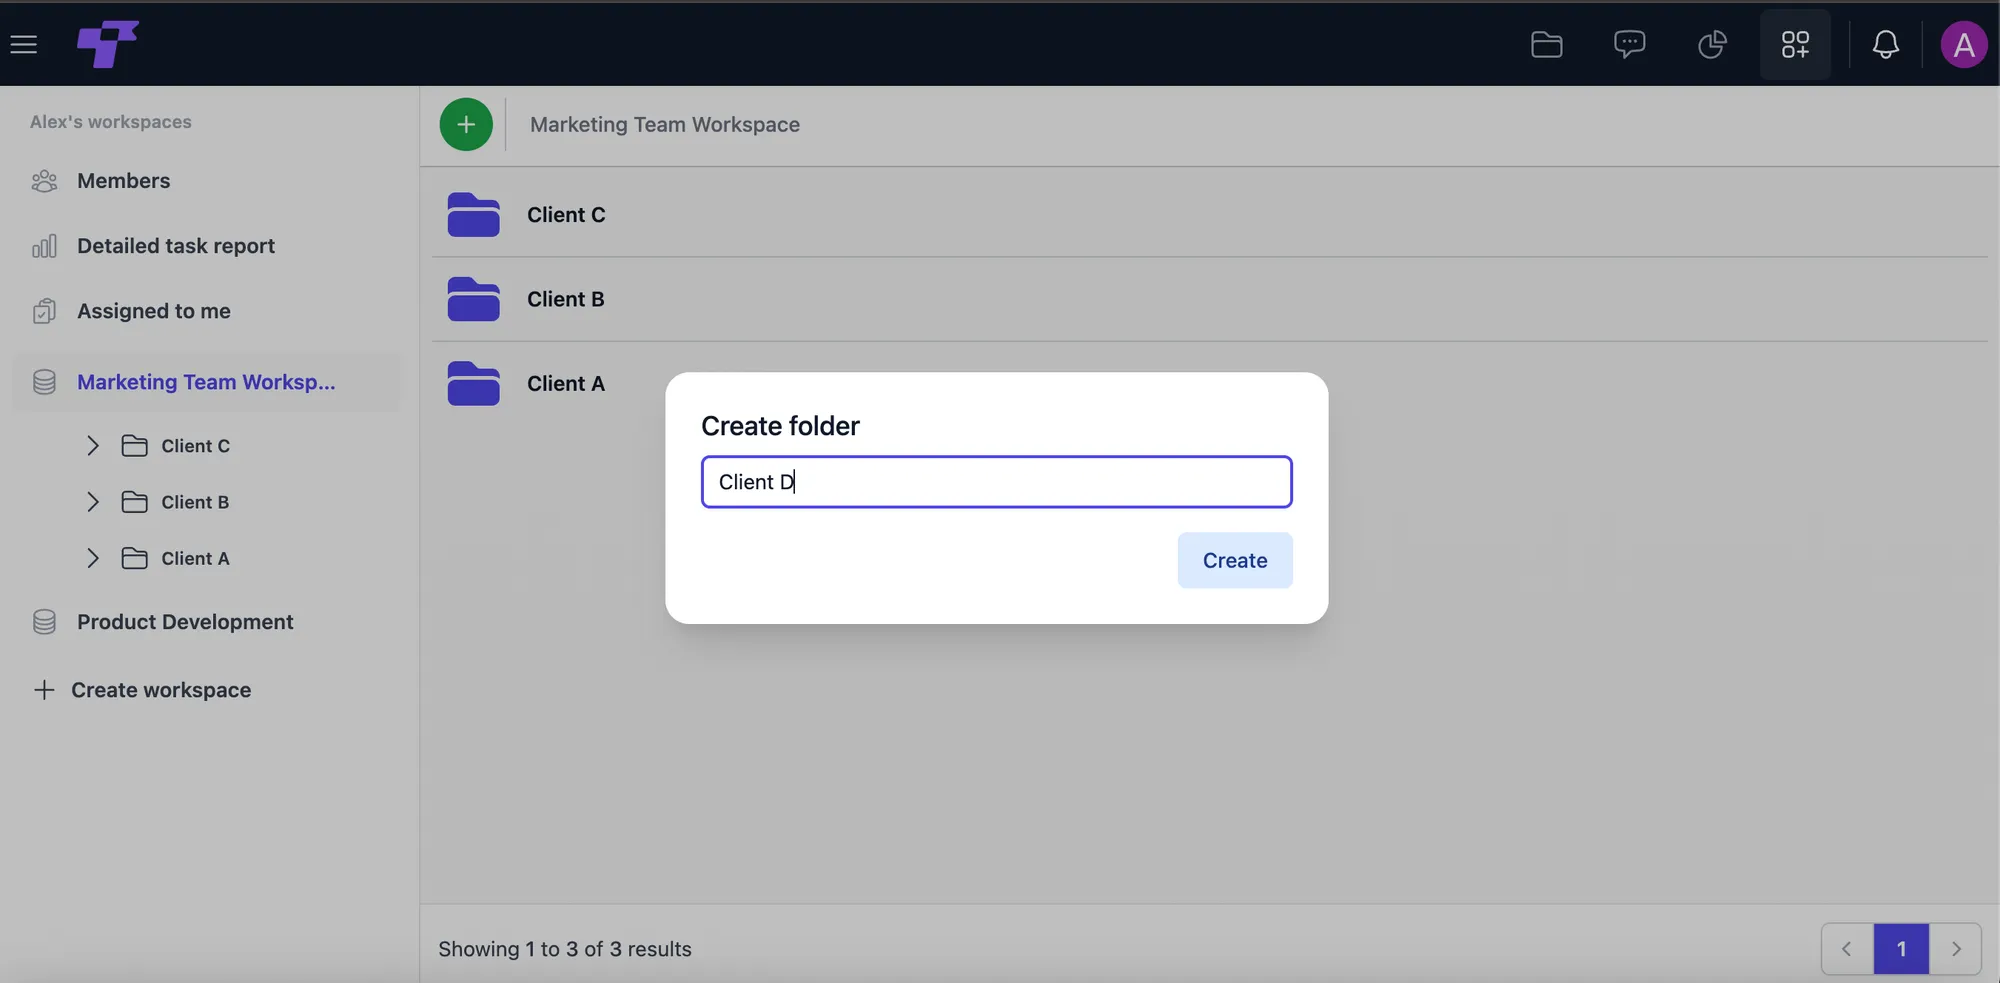
To create a folder:
- Open the workspace where you want the folder (for example, Marketing Team Workspace).
- Click the green + button at the top of the workspace header.
- Select Create folder.
- In the popup window, enter the folder name (for example, Client D).
- Click Create.
Folders can contain many tables, and you can organize and link them however you like. You can expand or collapse them from the left sidebar to keep your workspace organized.
Create a new table (grid) inside a folder
Tables (also called grids) are where you store and manage structured data for each client or project.
Why use separate tables?
- Each client or project may have its own task structure.
- You can keep subtasks in a dedicated table to avoid cluttering the main task view.
Creating a table
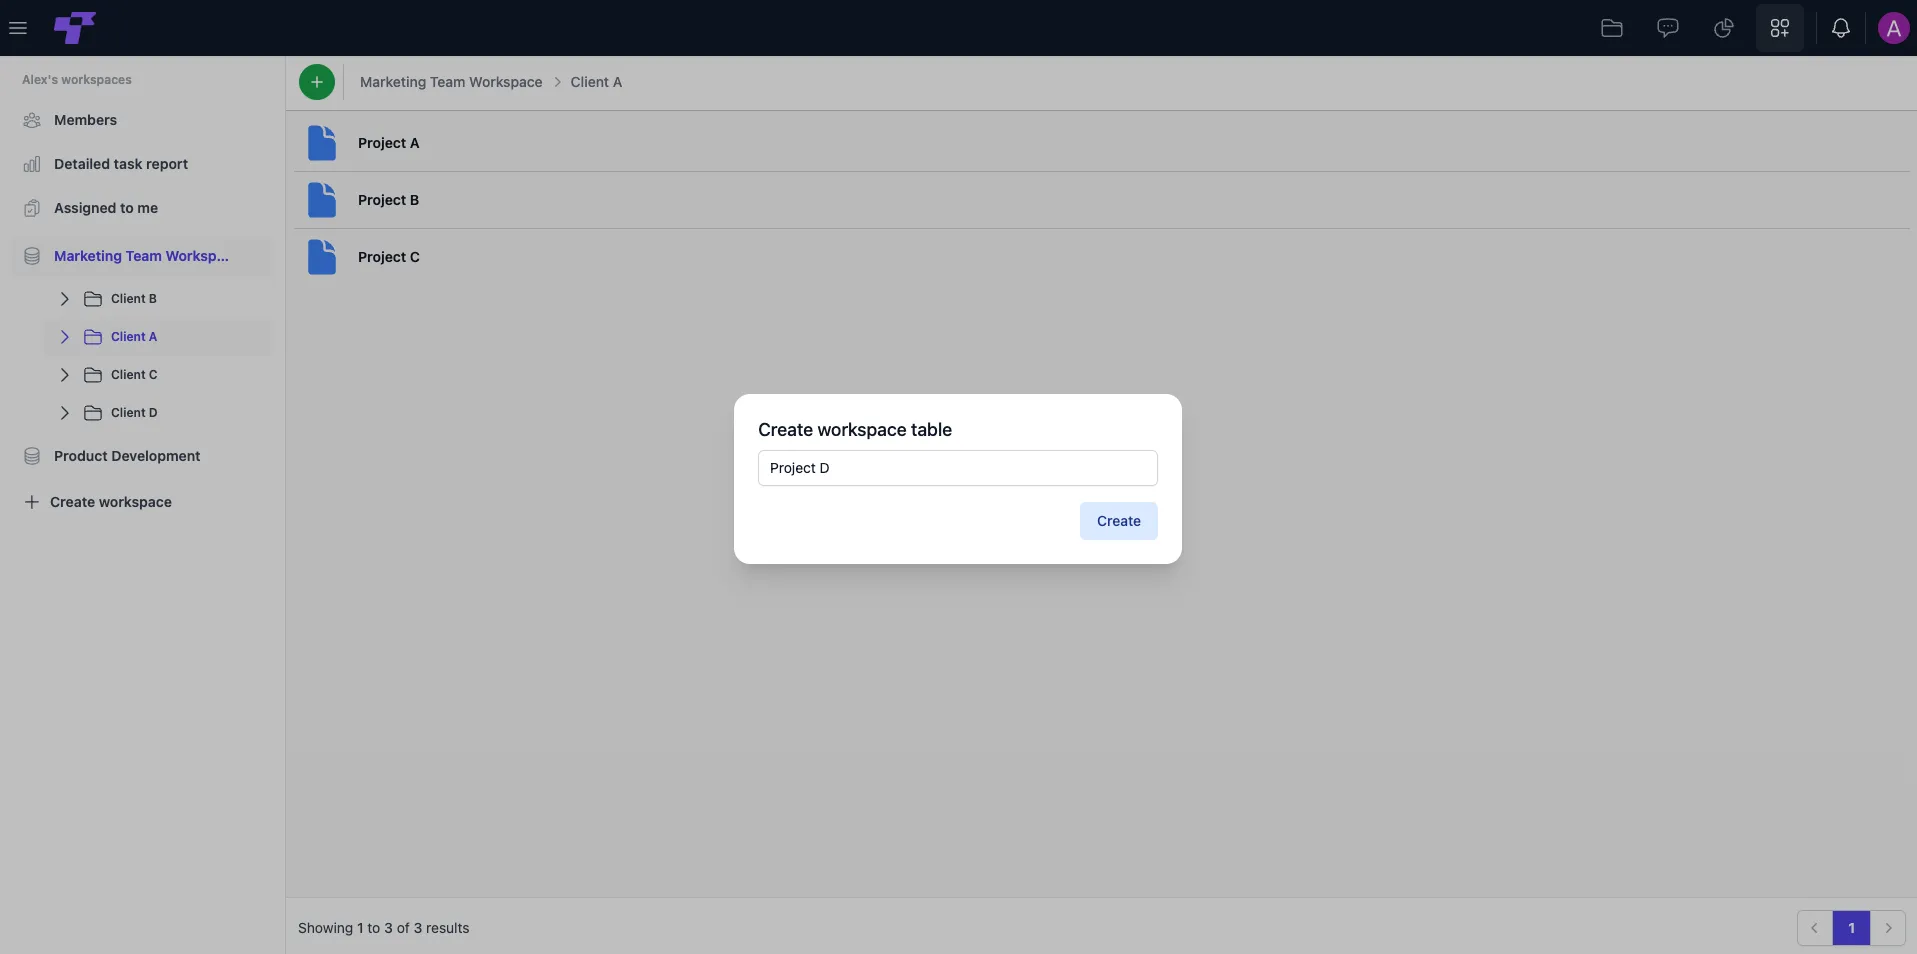
To create a new table:
- Open the folder where the table should be created (for example, Client A).
- Click the green + button in the workspace header.
- Select Create table.
- In the popup, enter the table name (for example, Project D).
- Click Create.
Tables can be customized with your own fields, linked subtasks, filters, and views. You can create as many tables as you need inside each folder.
Editing a Table (Grid)
Tables allow you to manage your project data in a clear, spreadsheet-style layout. Each table contains rows and columns that you can fully customize to match the needs of your project or process.
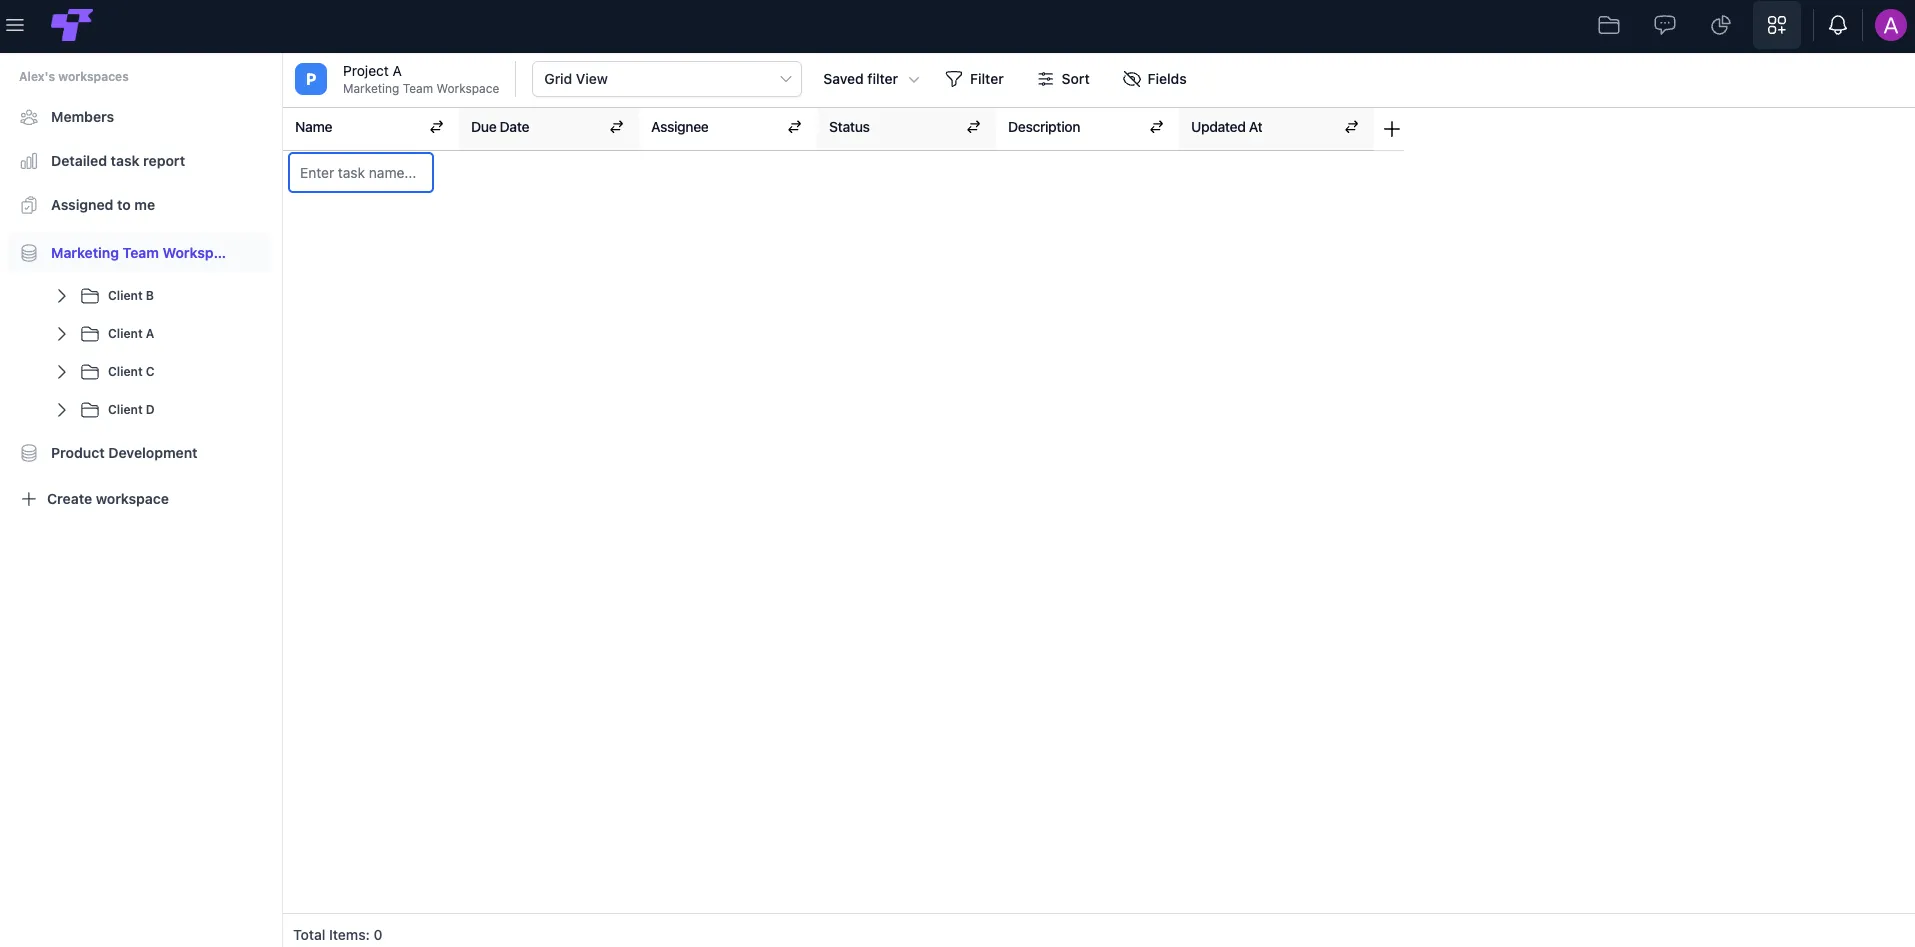
In this example, the table Project A is inside the Client A folder and is currently empty - ready to be filled in.
Default columns
- Start Date – the task’s start date
- Due Date – the deadline
- Assignee – the person responsible
- Status – task progress (e.g., In progress, Done)
- Description – extra notes
- Updated At / Created At – system-generated timestamps
You can rename any column. For example, change Description to Notes, or Name to Task, if it suits your workflow better.
Renaming a column
- Double-click the column name (e.g., "Task Name").
- Enter the new name.
- Click anywhere outside the input, or press Enter, to save.
Editing Table Fields
You can customize any table by adding new fields that match your workflow. Fields help you store the exact type of information you need, such as priority, category, department, or budget.
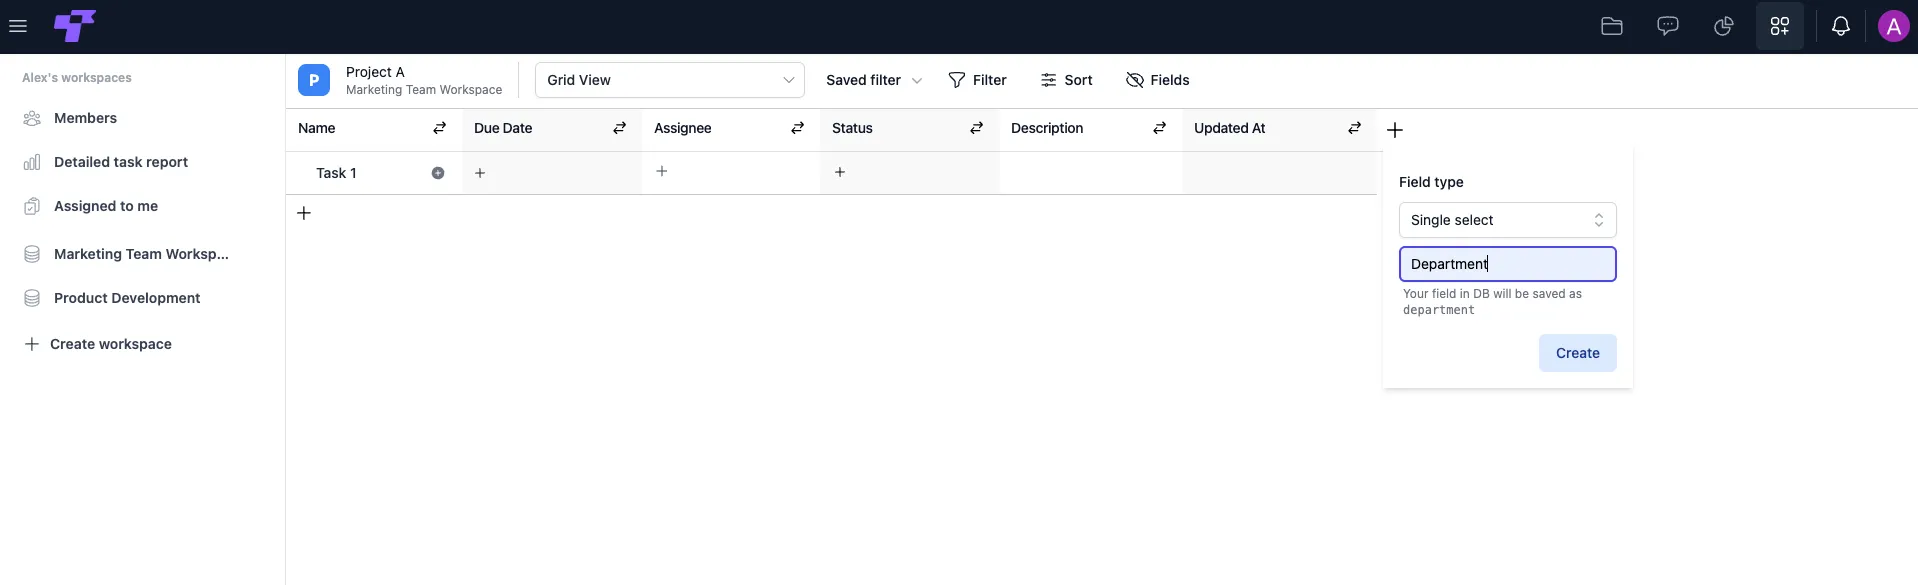
Adding a field
- Click the + button on the far right of the column headers.
- A field type menu will appear. Choose the most suitable type for your data, such as Text, Number, Checkbox, Single Select (e.g., status or priority), Link to Records, Date, Person, Website URL, Calculations, and more.
- Enter the field name, for example
Department, and confirm. You can now add options (like Marketing, Sales, Design) by clicking inside any row under that column.
Field types help define what kind of data will be stored and how it behaves inside your table.
Use Single Select fields for anything where you want a clean list of predefined choices.
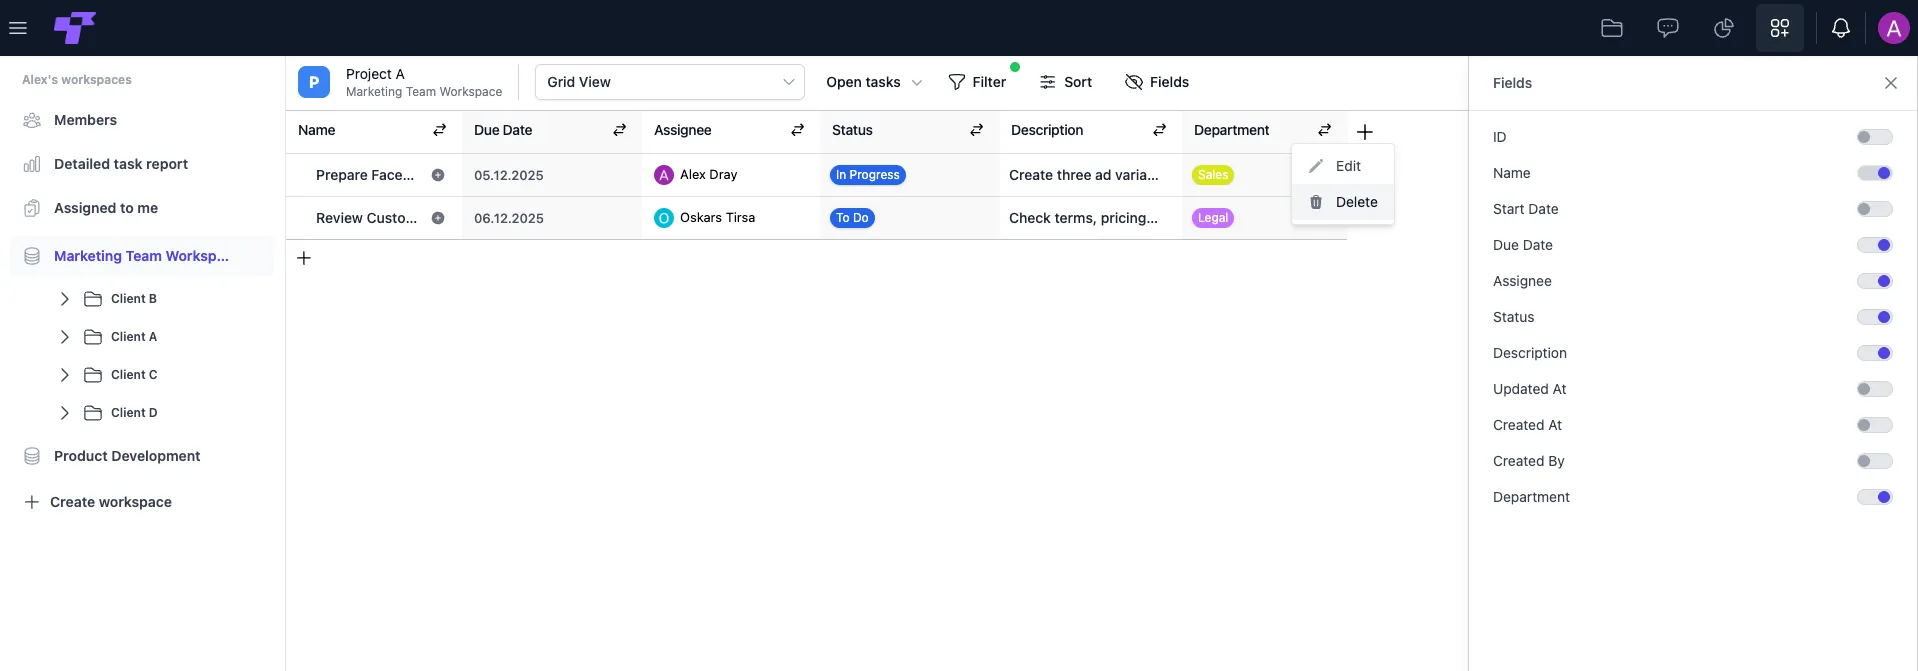
Deleting a field
If you no longer need a field (column), you can remove it from the table.
- Hover over the column header of the field you want to delete.
- Click the three-dot icon (⋯).
- Choose Delete to permanently remove the field from the table.
Showing or hiding fields
The Fields panel lets you control which fields are visible in your table without deleting anything.
- Click the Fields button in the top bar.
- The Fields panel will appear on the right side.
- Use the toggle switches to show or hide any field.
- Blue/Purple – the field is visible in the table.
- Grey – the field is hidden but still exists in the structure.
This is especially useful when your table contains many fields and you want to focus on the most important ones.
Resizing column width
- Hover over the column header.
- Click the resize icon (↔️), then drag left or right to adjust the width of the column.
Reordering columns
You can change the order of your fields at any time by dragging the column headers.
- Hover over the column header you want to move.
- Click and hold the header.
- Drag it left or right to the desired position.
Filling Table Fields
Once you've set up your table columns, you're ready to start adding information to your tasks. Each field type behaves slightly differently, but everything is designed to be quick and intuitive.
Besides editing fields directly in the table, you can also update everything from the task details panel.
Use this panel when you want to enter more detailed information quickly without clicking into each field separately.
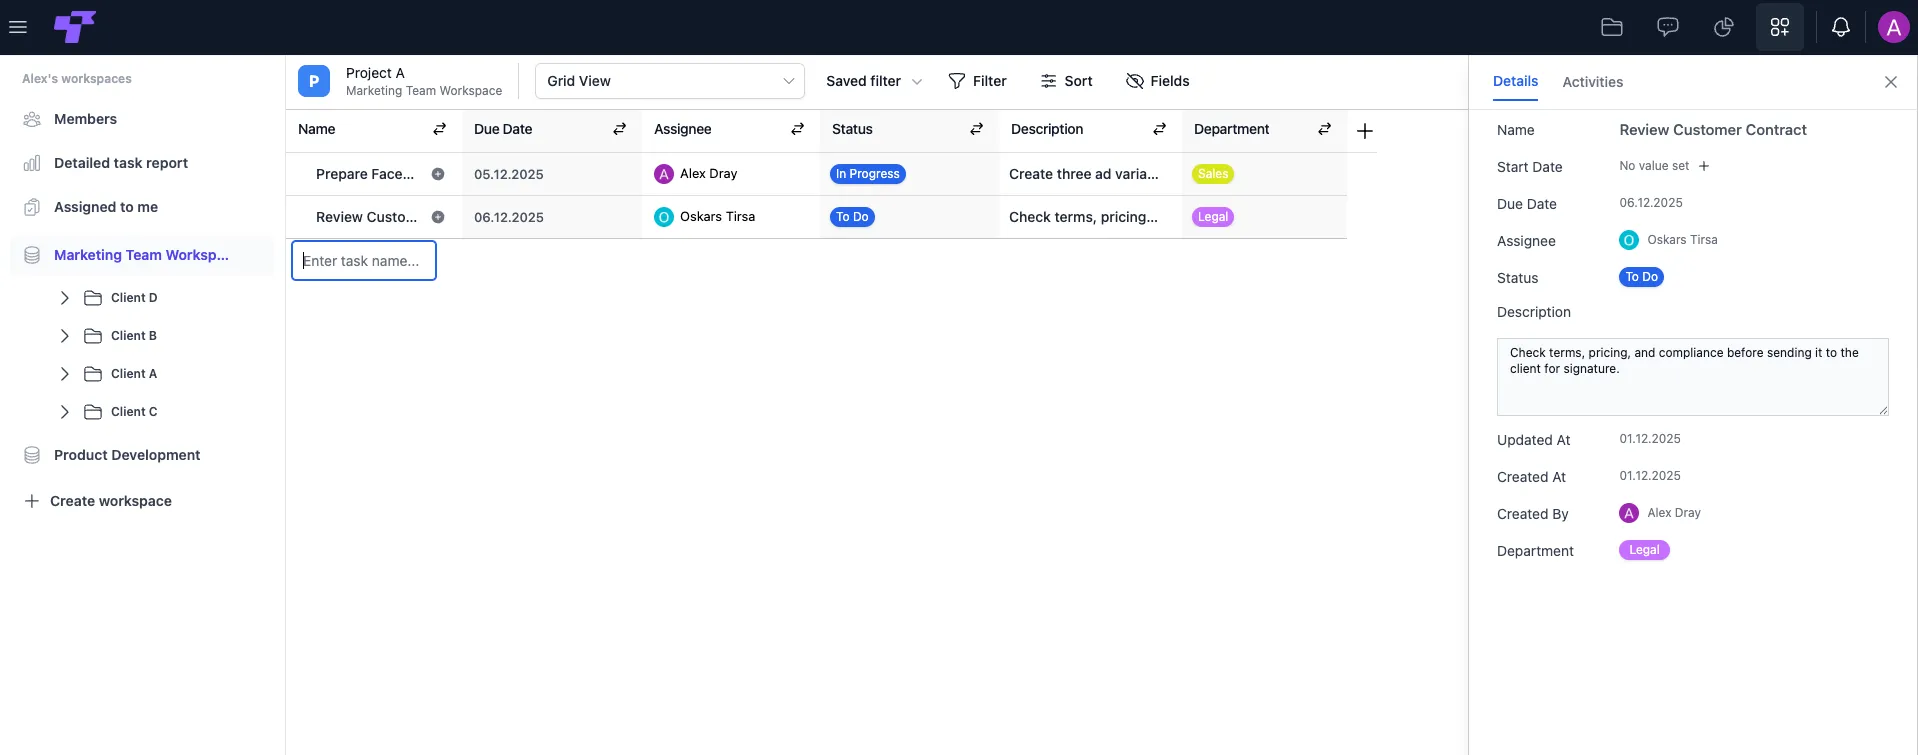
Entering basic text
For simple fields like Task Name or Description, just click into the empty field and start typing.
Selecting a date
For fields like Start Date or Due Date, you can easily choose a date using the built-in calendar picker.
- Click on the date cell to open the calendar.
- Navigate between months or years using the arrows at the top.
- Click a day to select it, then press Save, or click anywhere outside the table.
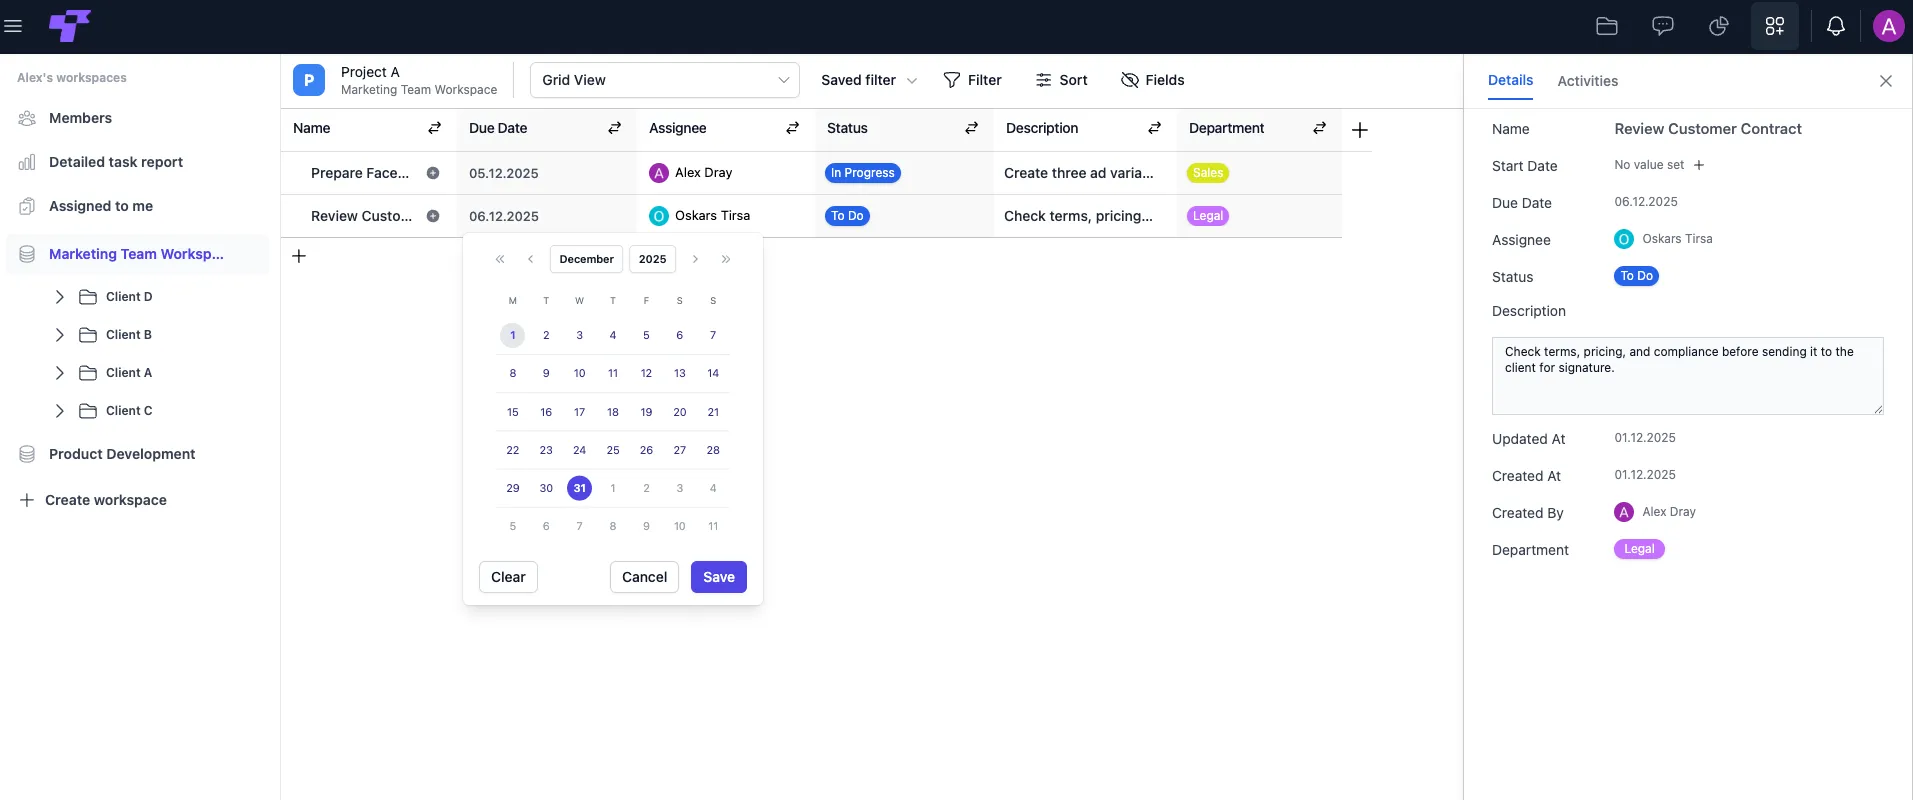
Setting deadlines is especially useful when using filters or sorting tasks by upcoming due dates.
Assigning a task
Assigning tasks helps your team stay organized and ensures everyone knows what they’re responsible for.
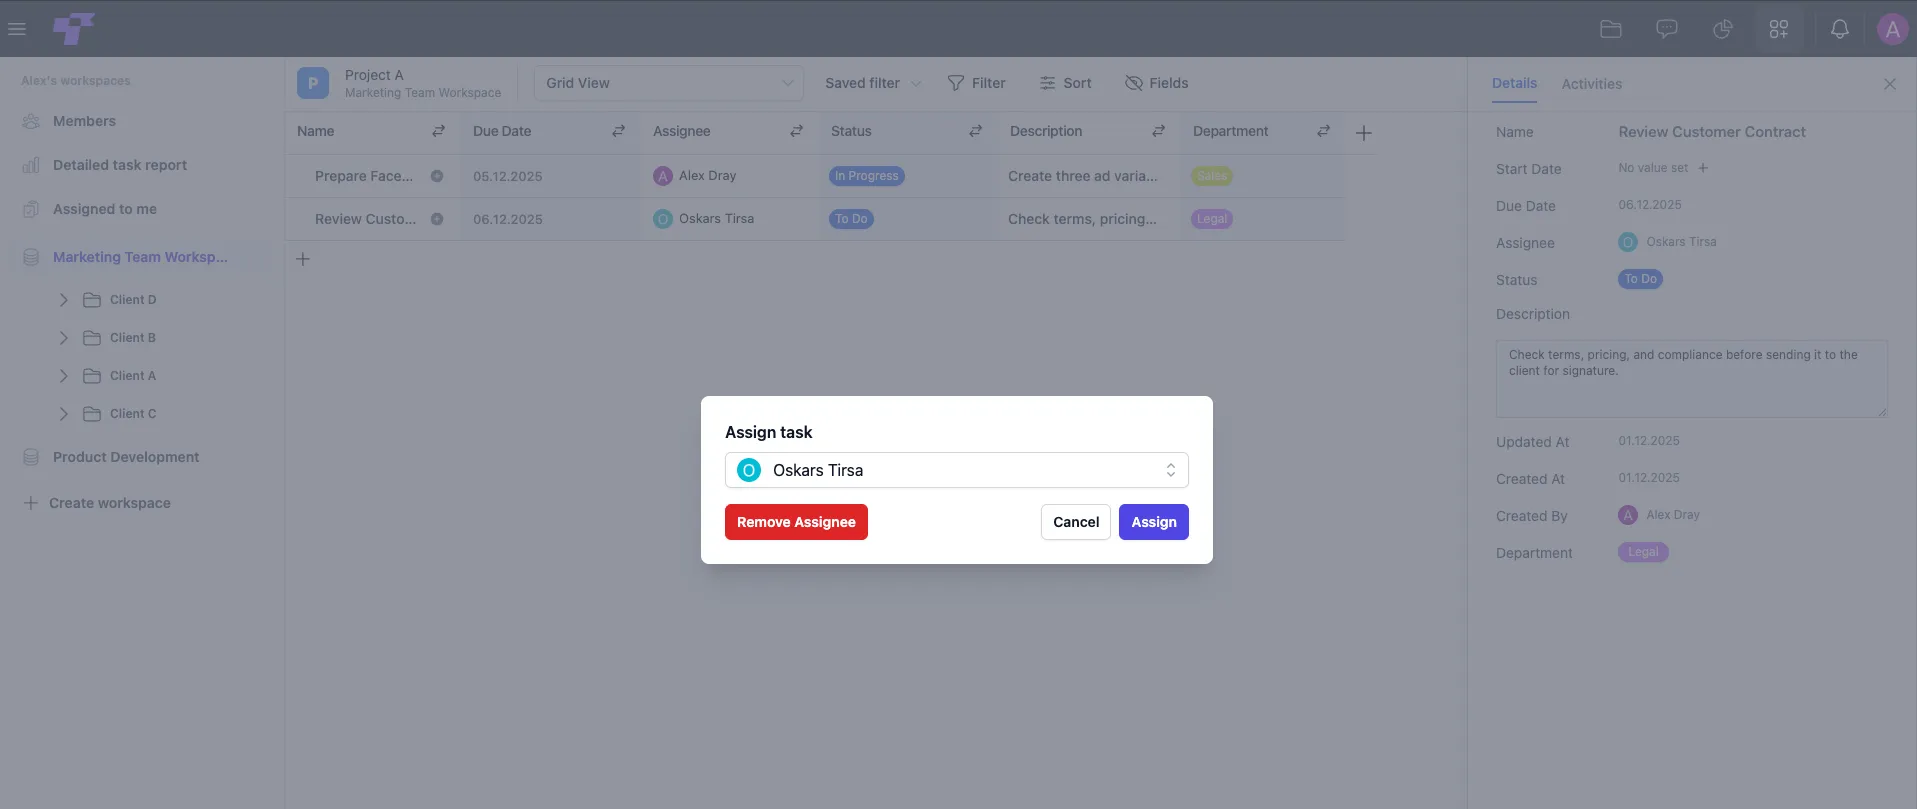
- Click on the empty Assignee field to open the "Assign task" window.
- Type your teammate’s name, or choose one from the dropdown.
- Click Assign to confirm.
- To remove an assignee, click Remove assignee.
The selected person will immediately receive a notification about the task or project they've been assigned.
Task status
The Status field helps you keep track of where each task currently stands.
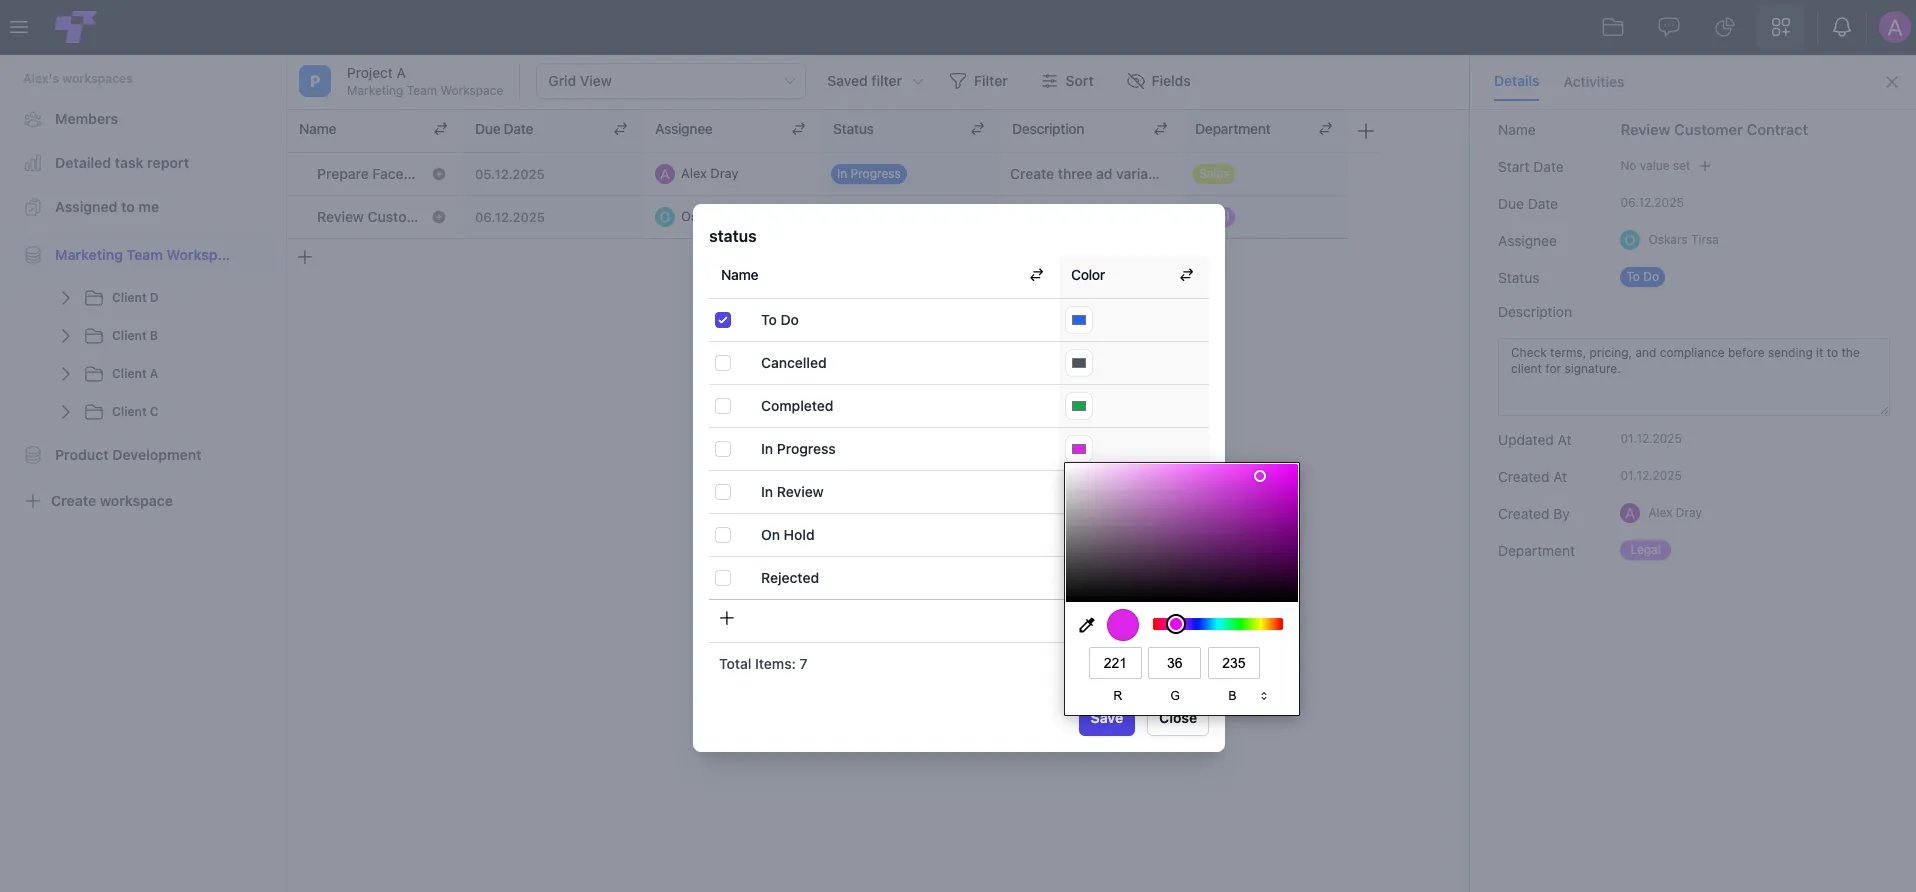
Editing or creating statuses
- Click the Status field on any task.
- In the status list window, you can:
- Add a new status using the + button.
- Rename an existing status.
- Change the color using the built-in color picker.
- Click Save when you're done.
Default statuses include: To Do, In Progress, In Review, Completed, On Hold, Cancelled, Rejected.
You can later filter tasks by their status to focus only on what matters.
Task Details & Activities
Details tab
The Details tab opens automatically whenever you click a task, subtask, or nested subtask in the table. This panel shows everything about the selected task, including nested subtasks.
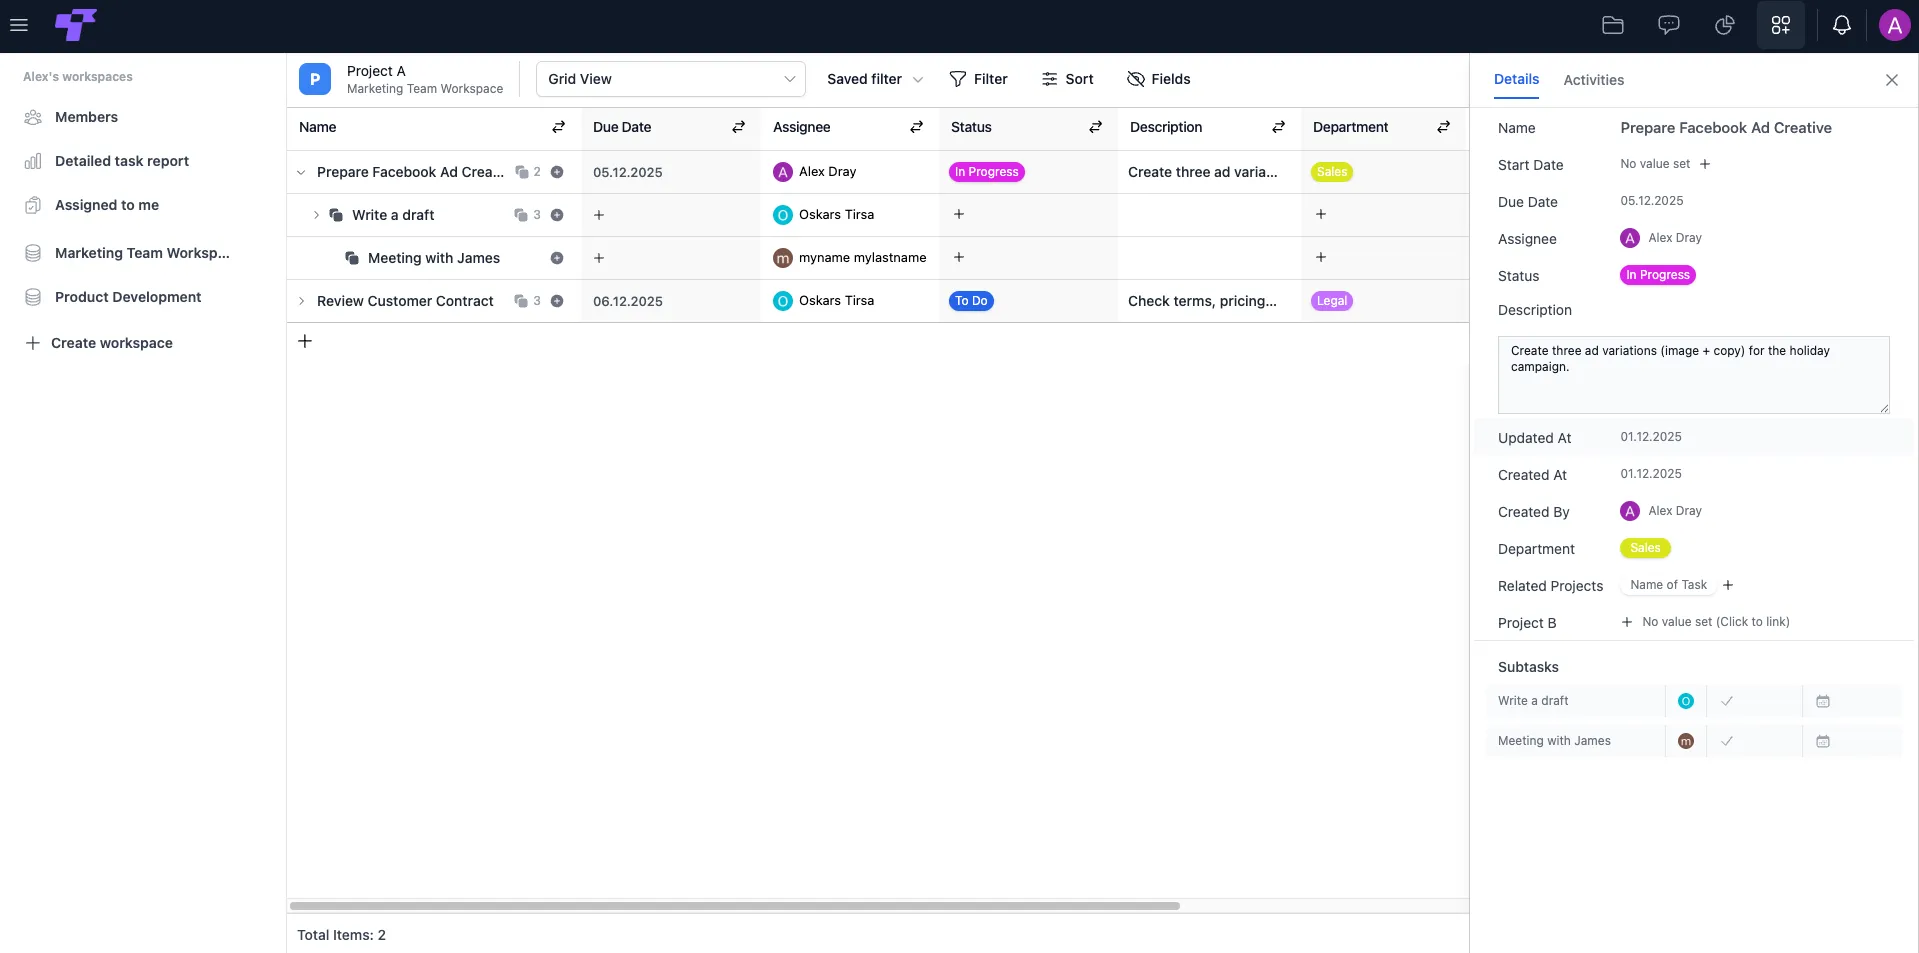
What you can do in the Details panel
- Edit or rewrite the task description.
- Click Assign user to choose who is responsible.
- Click + next to Start/Due Date to select a date.
- Update status (To Do, In Progress, Completed, etc.).
- Add or change Department and Related Projects.
- See all subtasks at the bottom, mark them as done, or open them individually.
Activities tab
Tracks everything that’s happened to the task:
- Task creation.
- Assignment updates.
- Status changes.
- Comments (including @mentions to notify teammates).
This is a useful audit trail for collaboration and accountability.
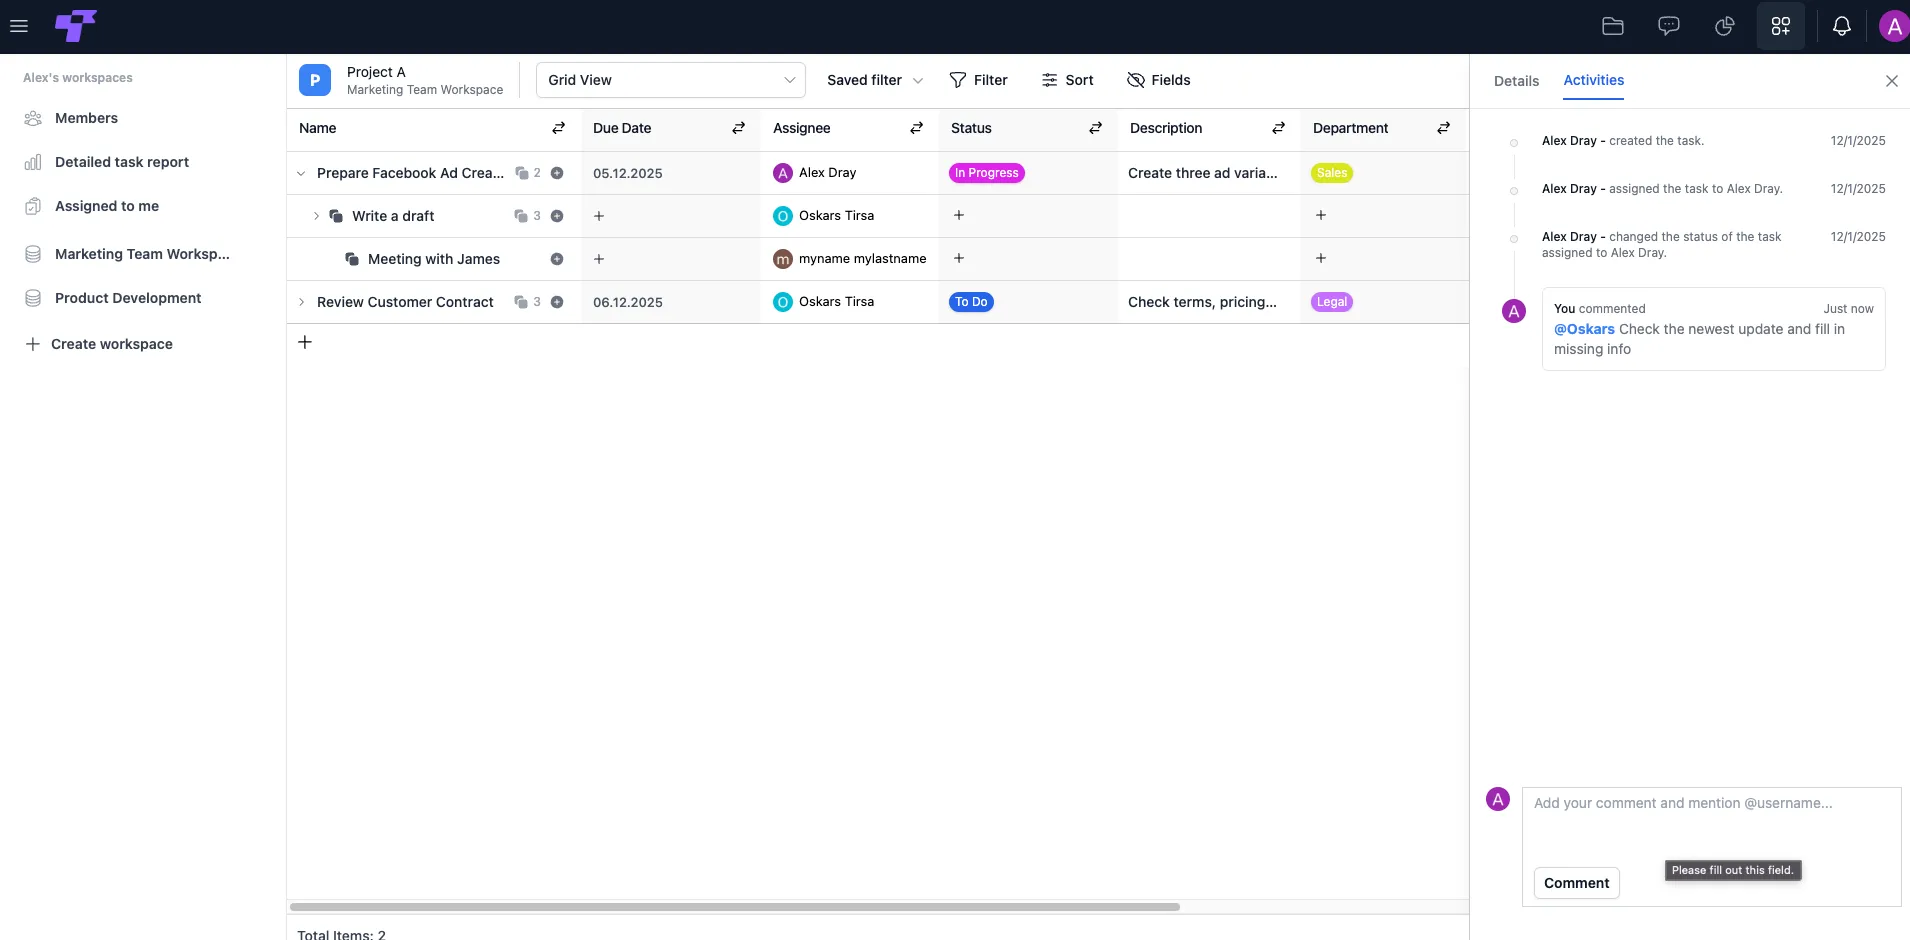
You can reply, mention colleagues (e.g. @Oscar), and stay in sync without leaving the task view.
Create a Subtask
Subtasks allow you to break a task into smaller, actionable steps. They appear nested under the main task and can be managed just like any other task.
When a task has subtasks
You’ll see:
- A number indicator showing how many subtasks it contains.
- A small arrow on the left side of the task name.
Click the arrow to expand the list. Click it again to collapse the view.
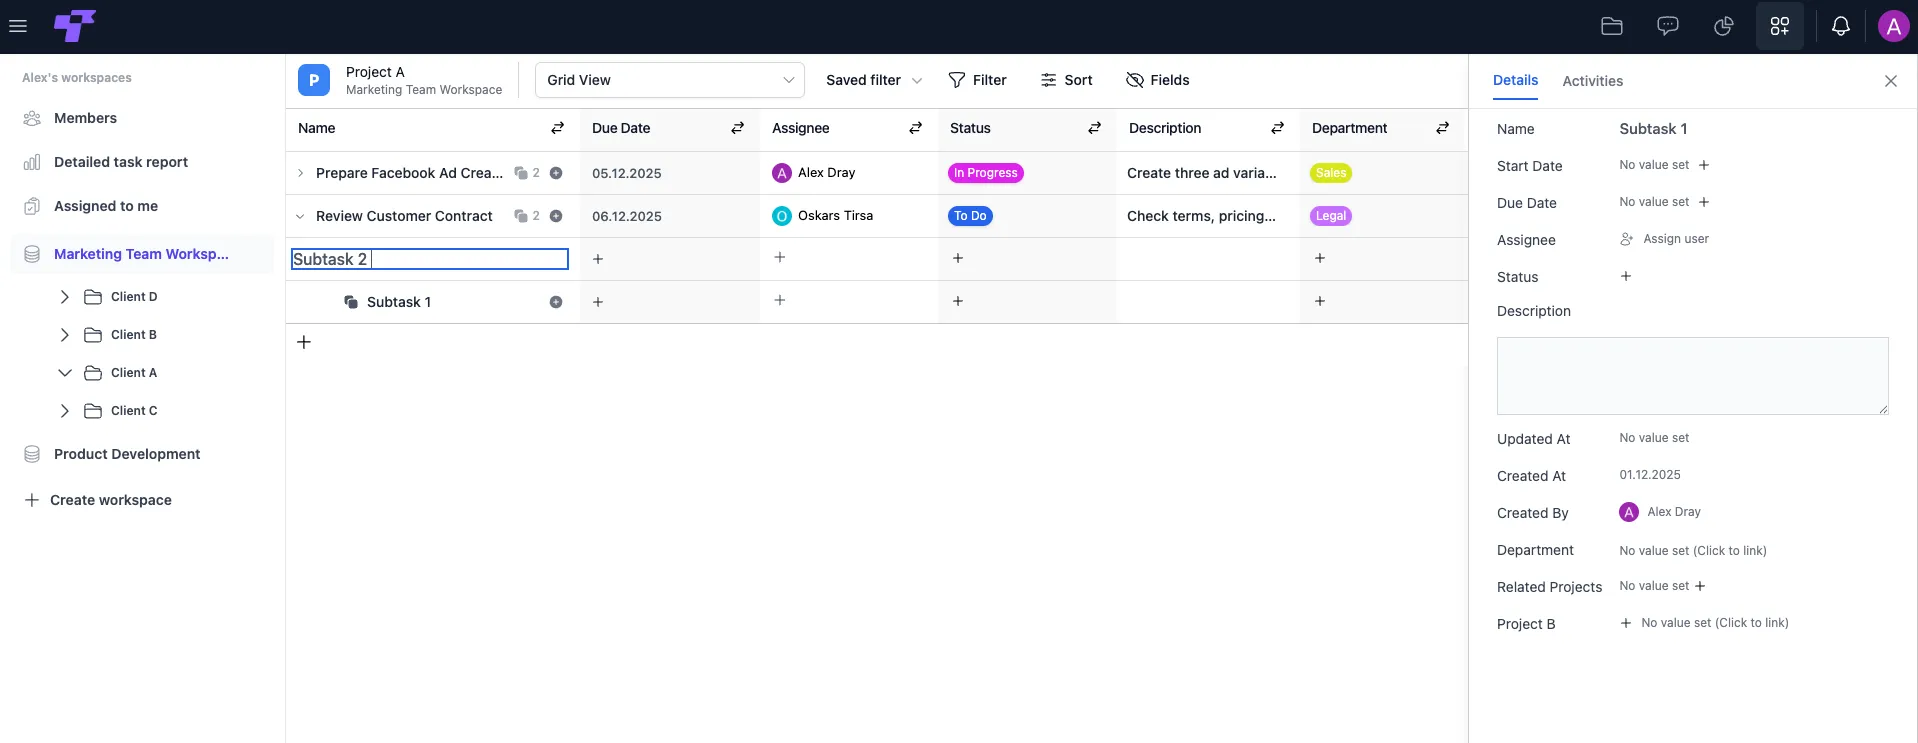
How to create a subtask
- Hover your mouse over the task you want to add subtasks to.
- Click the small + icon that appears directly under the task name.
- A new row will appear - type the subtask name (e.g., Subtask 2).
- Press Enter to save.
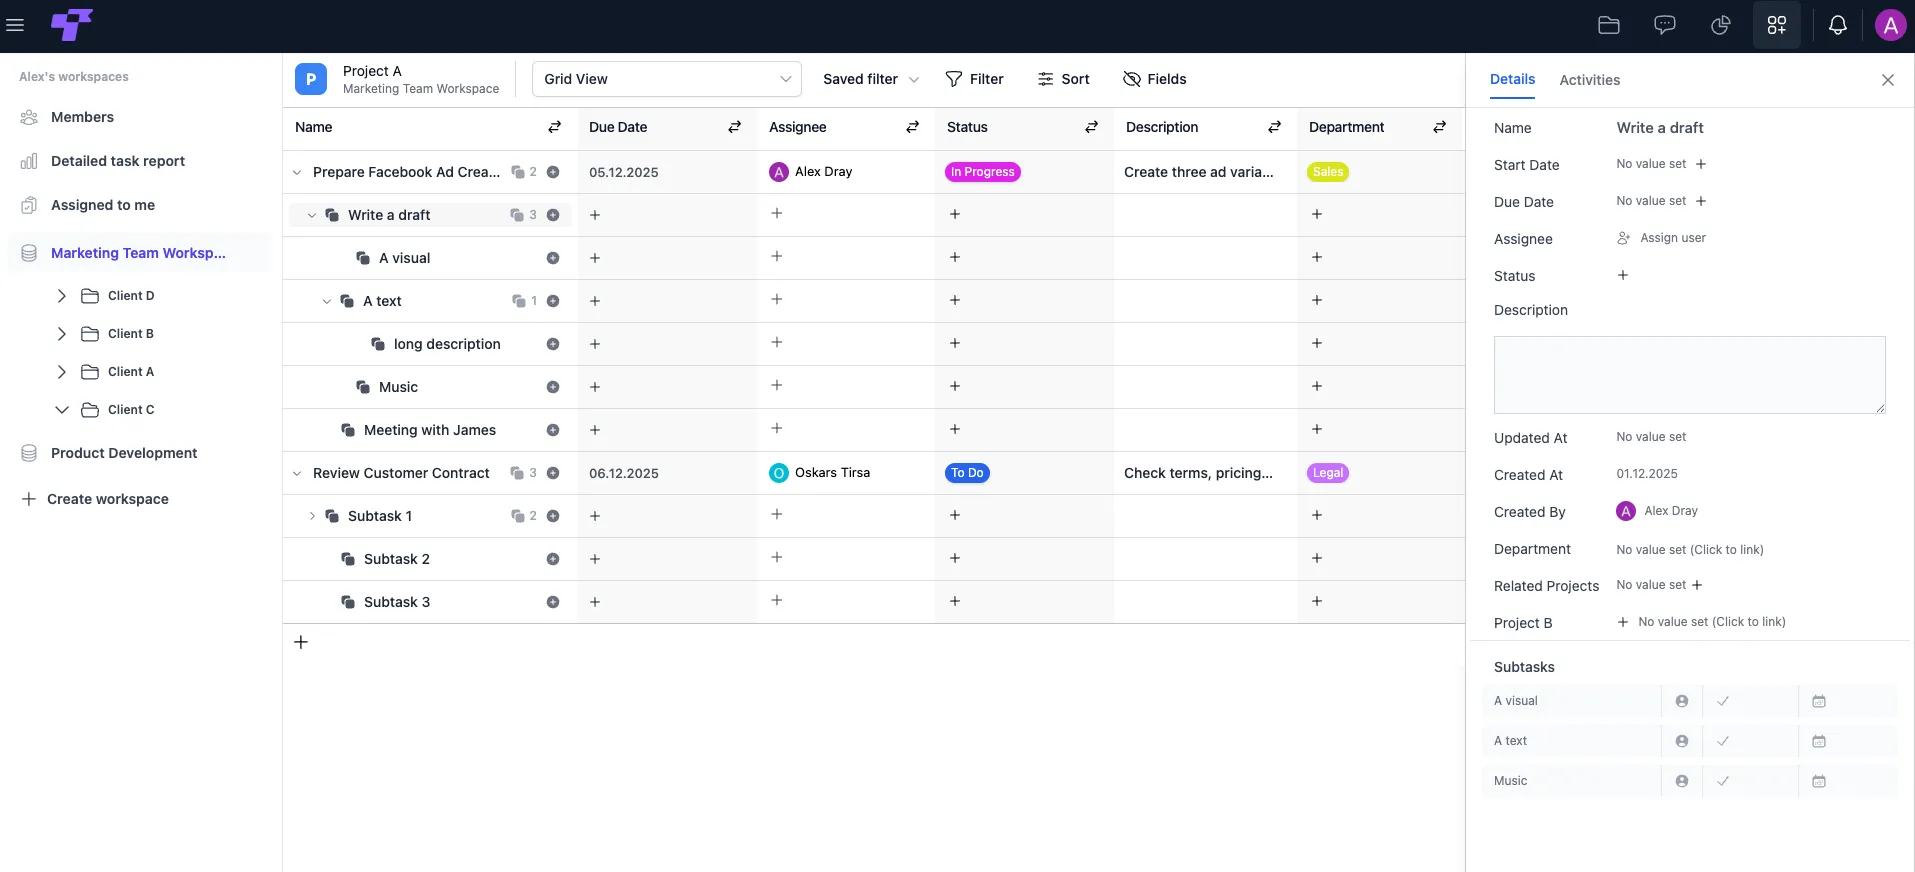
Adding subtasks to a subtask
You can create subtasks on any level.
- Expand the parent task using the arrow.
- Hover over the subtask where you want to add more.
- Click the + icon that appears below it.
- Type the name of the new subtask and press Enter.
There is no limit - you can create as many nested layers as your workflow requires.
Every subtask, regardless of level, can have its own Assignee, Due Date, Status, Description, etc.
When you click a subtask, its Details panel appears on the right, where you can edit all of its information.
Field Types
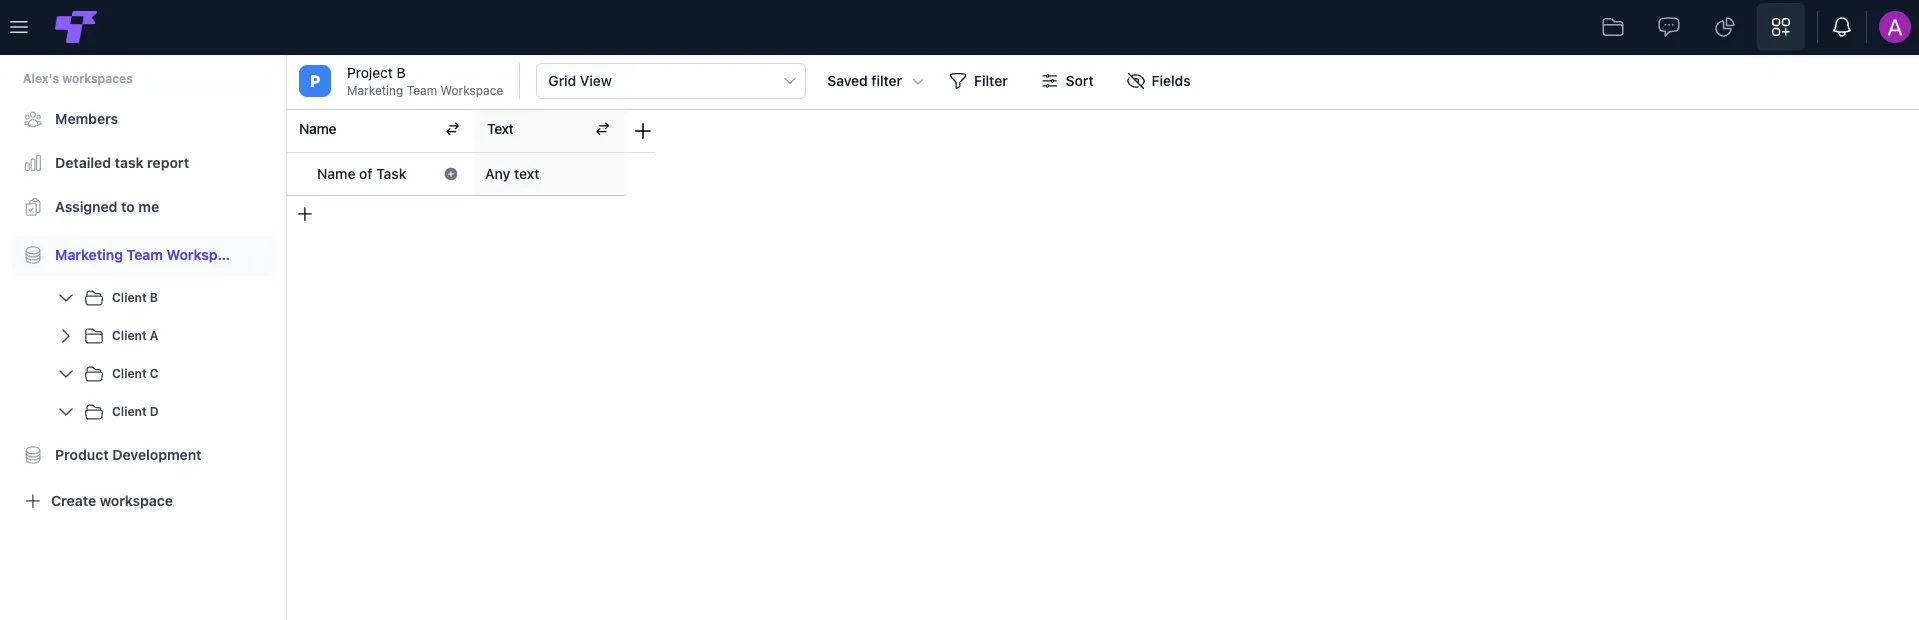
Text
A Text field is the simplest and most flexible type of field. It stores any kind of written information - short or long - without special formatting rules.
Use cases
- Short notes or quick comments.
- Internal labels or codes.
- Client request summaries.
- Simple reminders.
- Any information that doesn’t fit other field types.
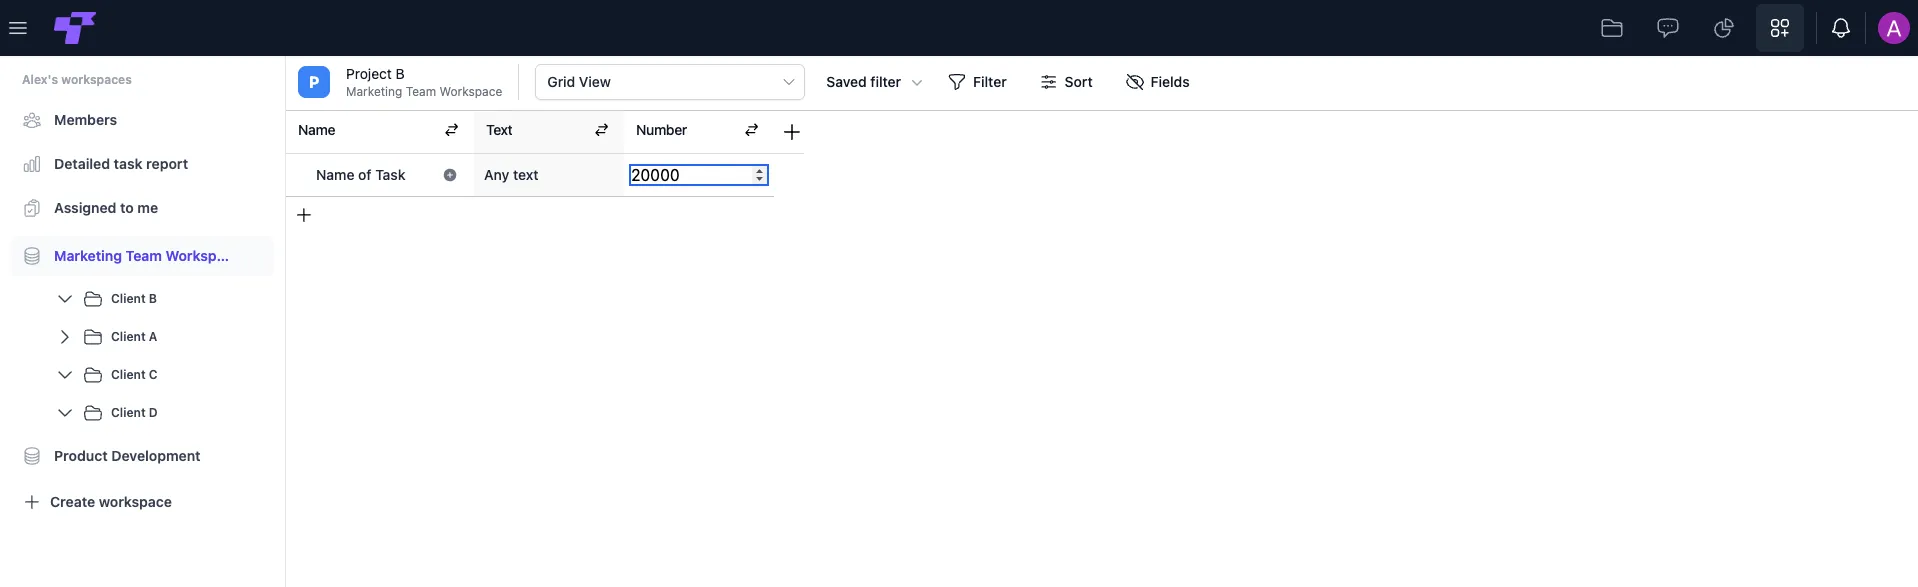
Number
A Number field is used for storing any kind of numeric value. It only accepts numbers, which helps keep data clean and consistent.
Use cases
- Budget amounts.
- Quantities or units.
- Hours spent.
- Pricing.
- Percentages or scores.
- Numerical IDs that must stay numeric.
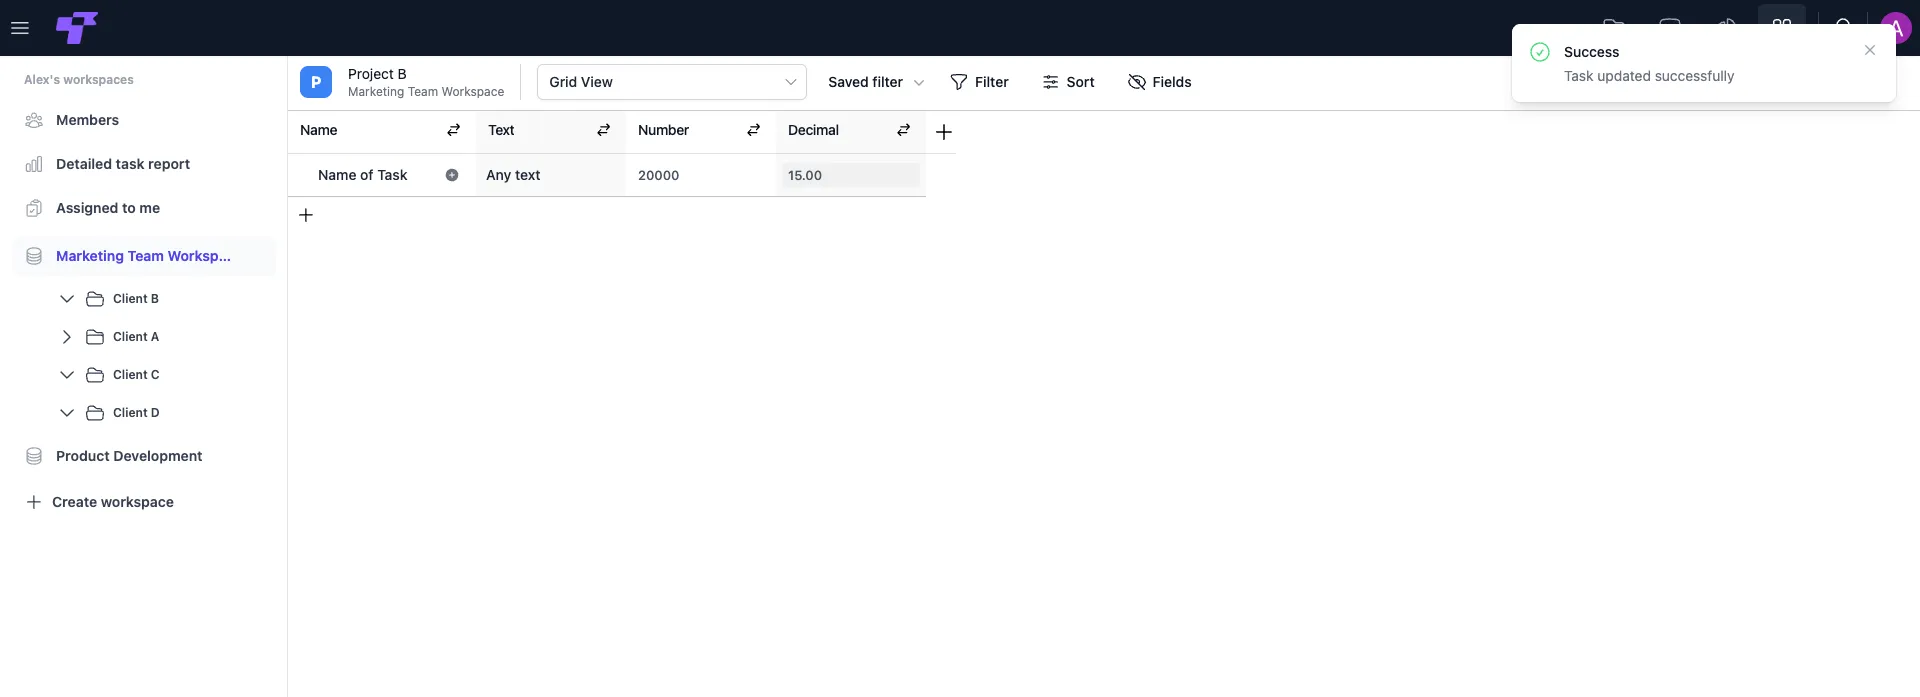
Decimal
A Decimal field is used for numbers that require decimals, such as prices, rates, measurements, or percentages. It keeps the formatting consistent and allows precise values.
Use cases
- Hourly rates.
- Prices with cents.
- Percentages.
- Measurements (e.g., 15.75 cm).
- Ratings or scores that aren’t whole numbers.
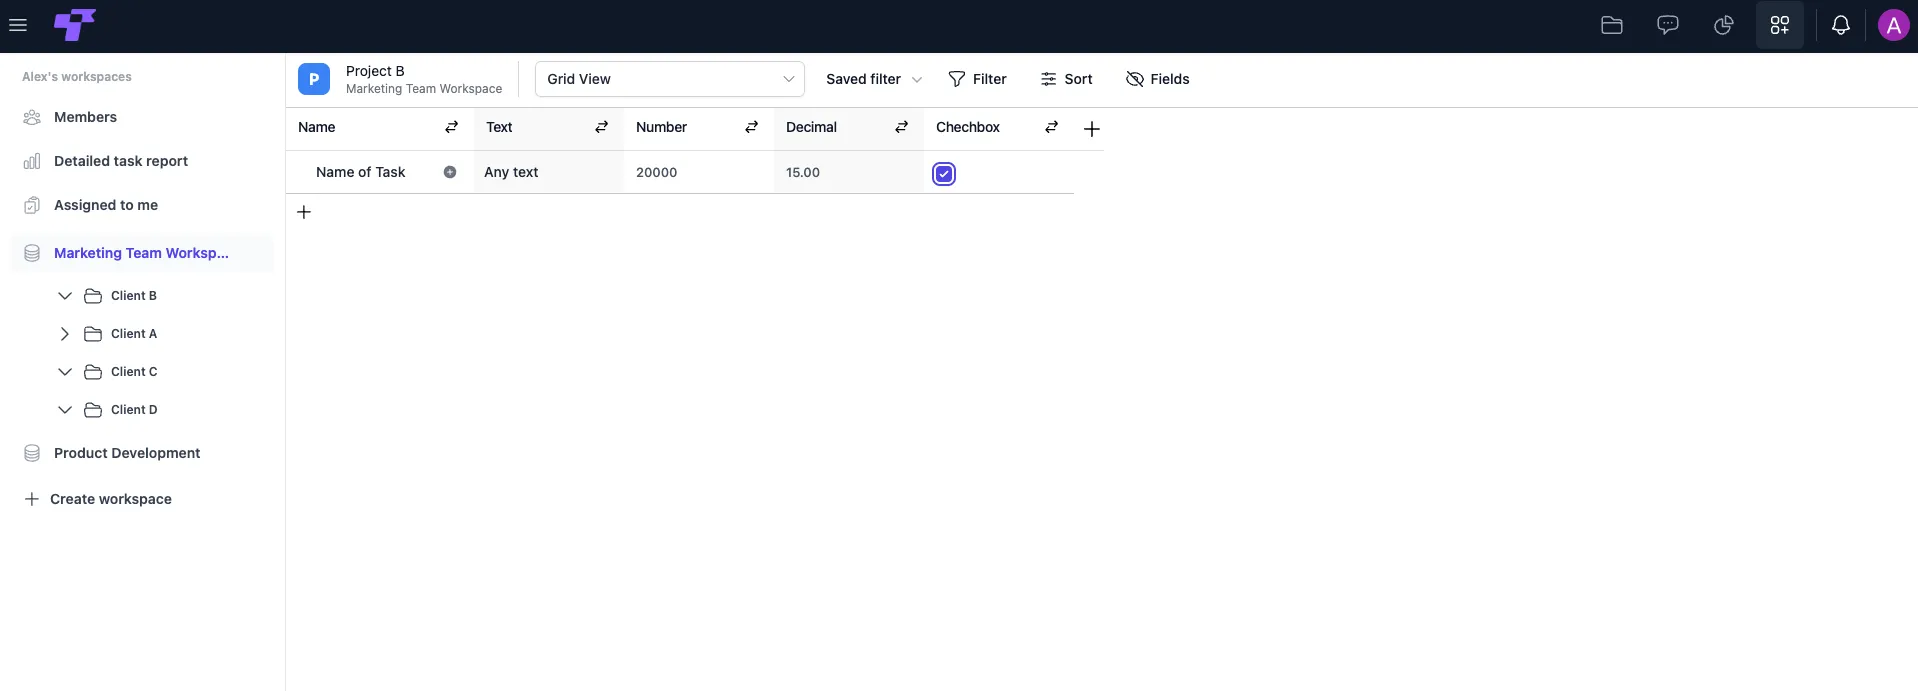
Checkbox
A Checkbox field is a simple true/false option you can toggle on or off. It’s perfect for marking quick statuses or confirming whether something has been done, approved, or reviewed.
Use cases
- Marking tasks as approved.
- Confirming if something is required or not.
- Tracking yes/no steps.
- Marking small internal steps (e.g., "brief received", "invoice sent").
- Simple personal reminders.
Link to Records
A Link to Records field connects rows from one table to rows in another table. It lets you create relationships between tasks, subtasks, clients, assets, or anything else in your workspace.
For a full guide on how to link tables (including two-way linking and viewing linked items), see the How to Link Tables Together section!
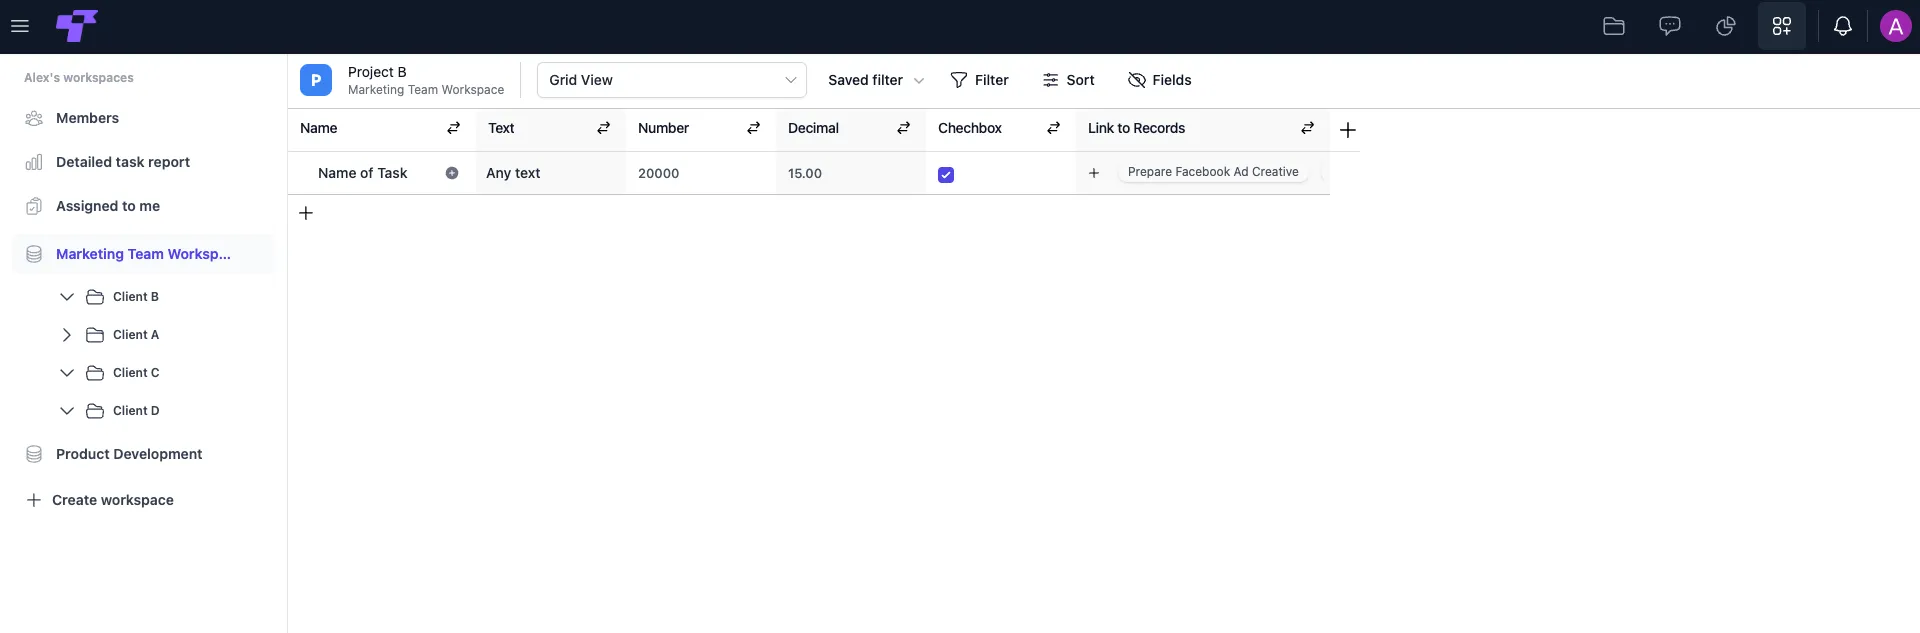
This field is interactive: you can select existing records or create new ones directly from the field.
Use cases
- Attach subtasks to tasks.
- Connect a client to their projects.
- Link a project with related deliverables.
- Reference reusable items like templates, products, employees, or contracts.
Single Select
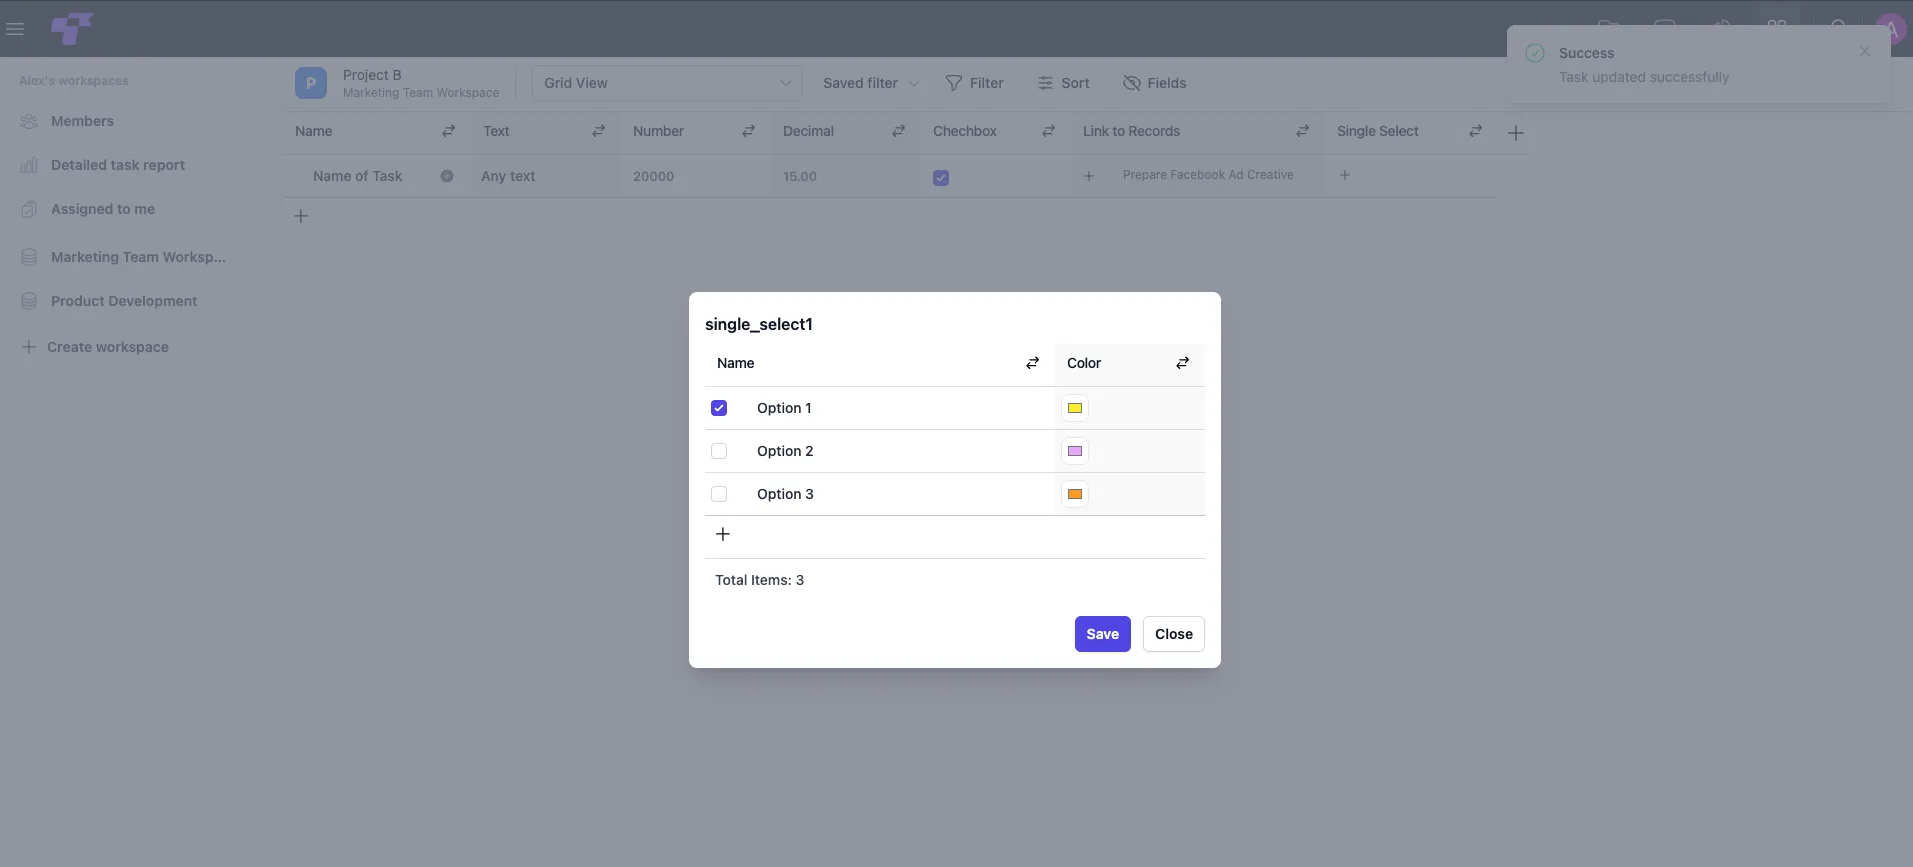
A Single Select field lets you choose one option from a predefined list. Each option can have its own color, making it easier to visually scan your table and understand the context at a glance.
It’s great for fields where only one value should apply at a time.
Use cases
- Task priority (Low, Medium, High).
- Department or team responsible.
- Category of work (Design, Legal, Marketing).
- Phase of a process (Planning, Execution, Review).
- Any situation where only one choice makes sense.
Person
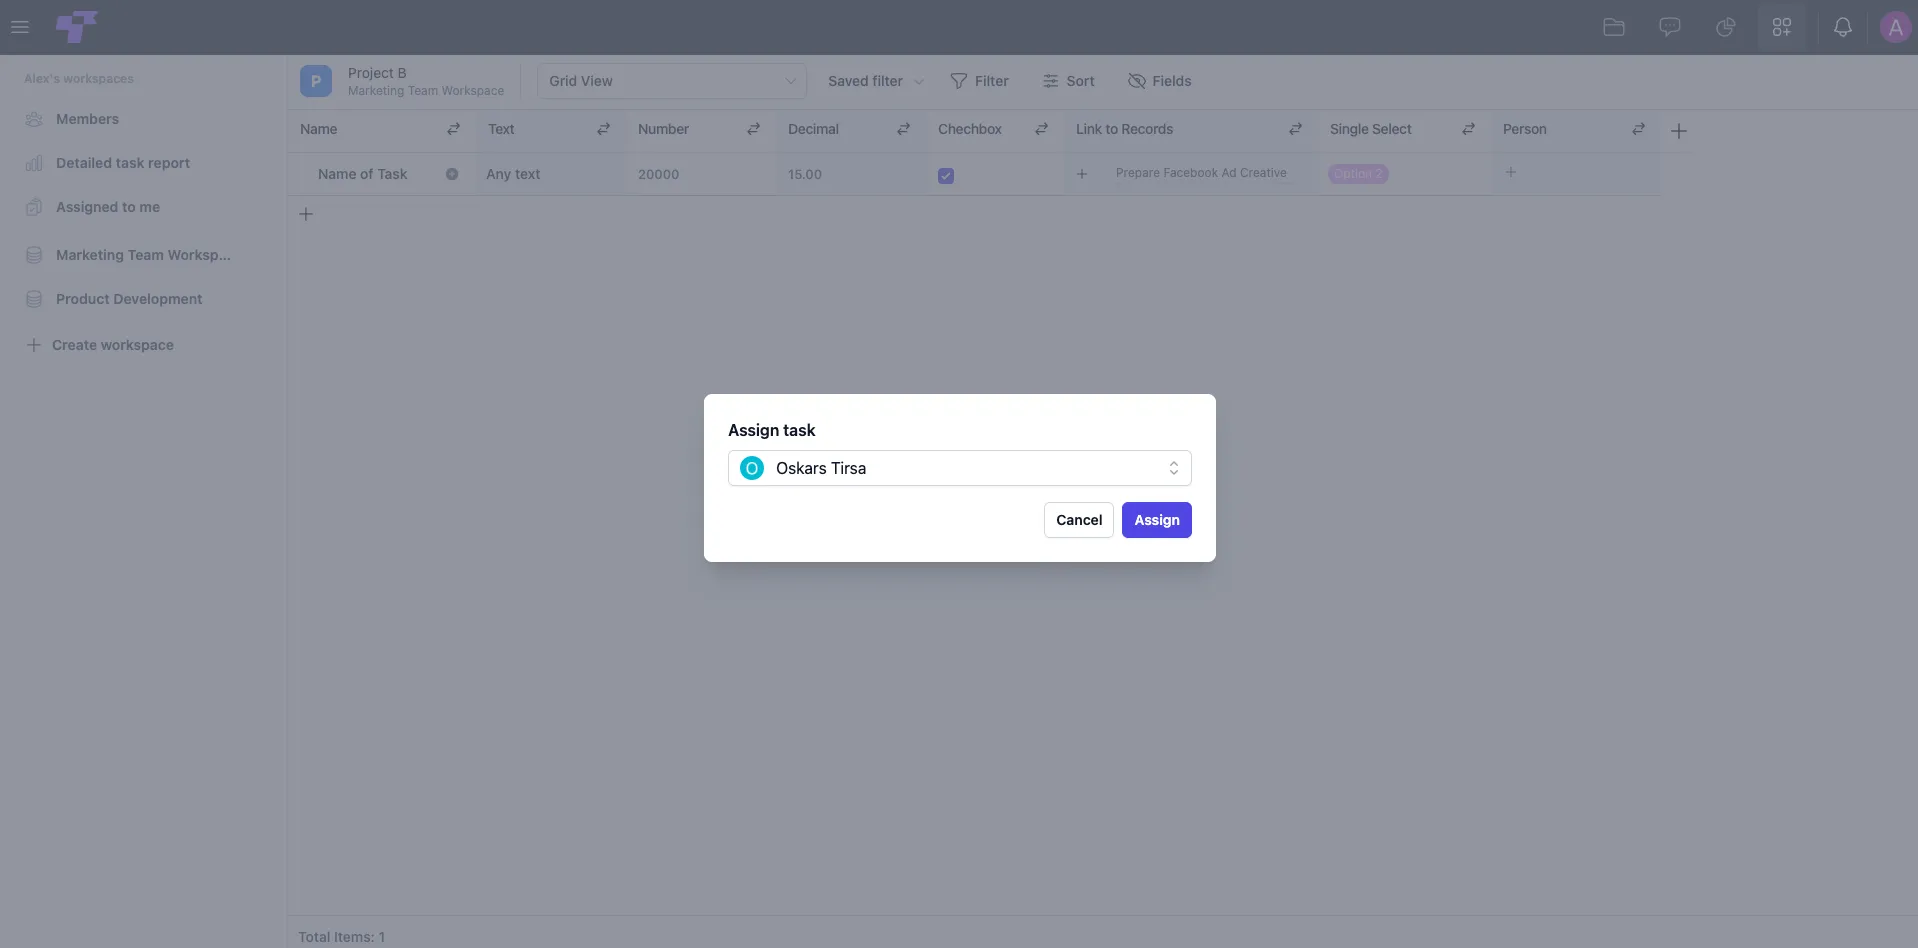
The Person field lets you assign a record (for example, a task) to a specific workspace member. It’s perfect for project management, responsibility tracking, and seeing who is working on what at a glance.
When you click the cell, you’ll see a list of all workspace users and can select one person to assign.
Use cases
- Assigning a task to a team member.
- Marking who created or owns a document.
- Tracking the person responsible for a client, project, or ticket.
- Indicating a reviewer or approver.
Date
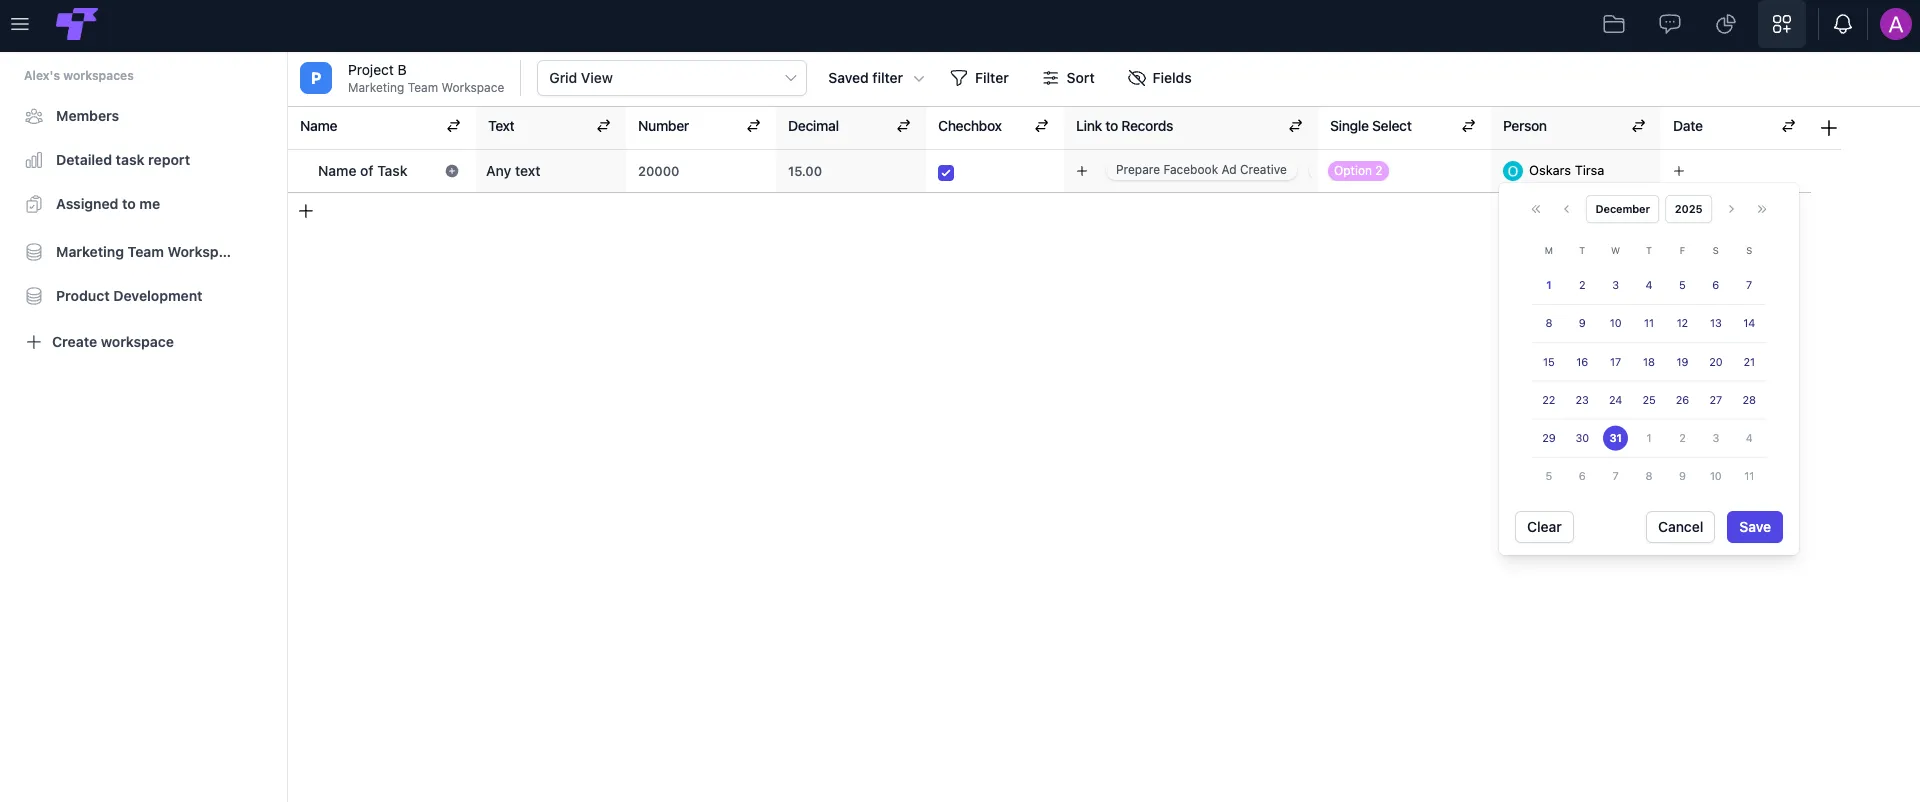
The Date field allows you to select a specific calendar date for any task or record. When you click the cell, a calendar opens where you can pick a day, clear the value, or cancel.
This field is perfect for tracking deadlines, start dates, review dates, events, and anything time-related.
Use cases
- Task deadlines.
- Project start or end dates.
- Meeting dates.
- Content publishing dates.
- Follow-up reminders.
Calculations
A special field type that lets you create formulas based on other fields in the same table. Use it for things like totals, averages, date differences, percentage changes, or automatic values.
To learn how to build formulas, see the Calculations section below.
Calculations
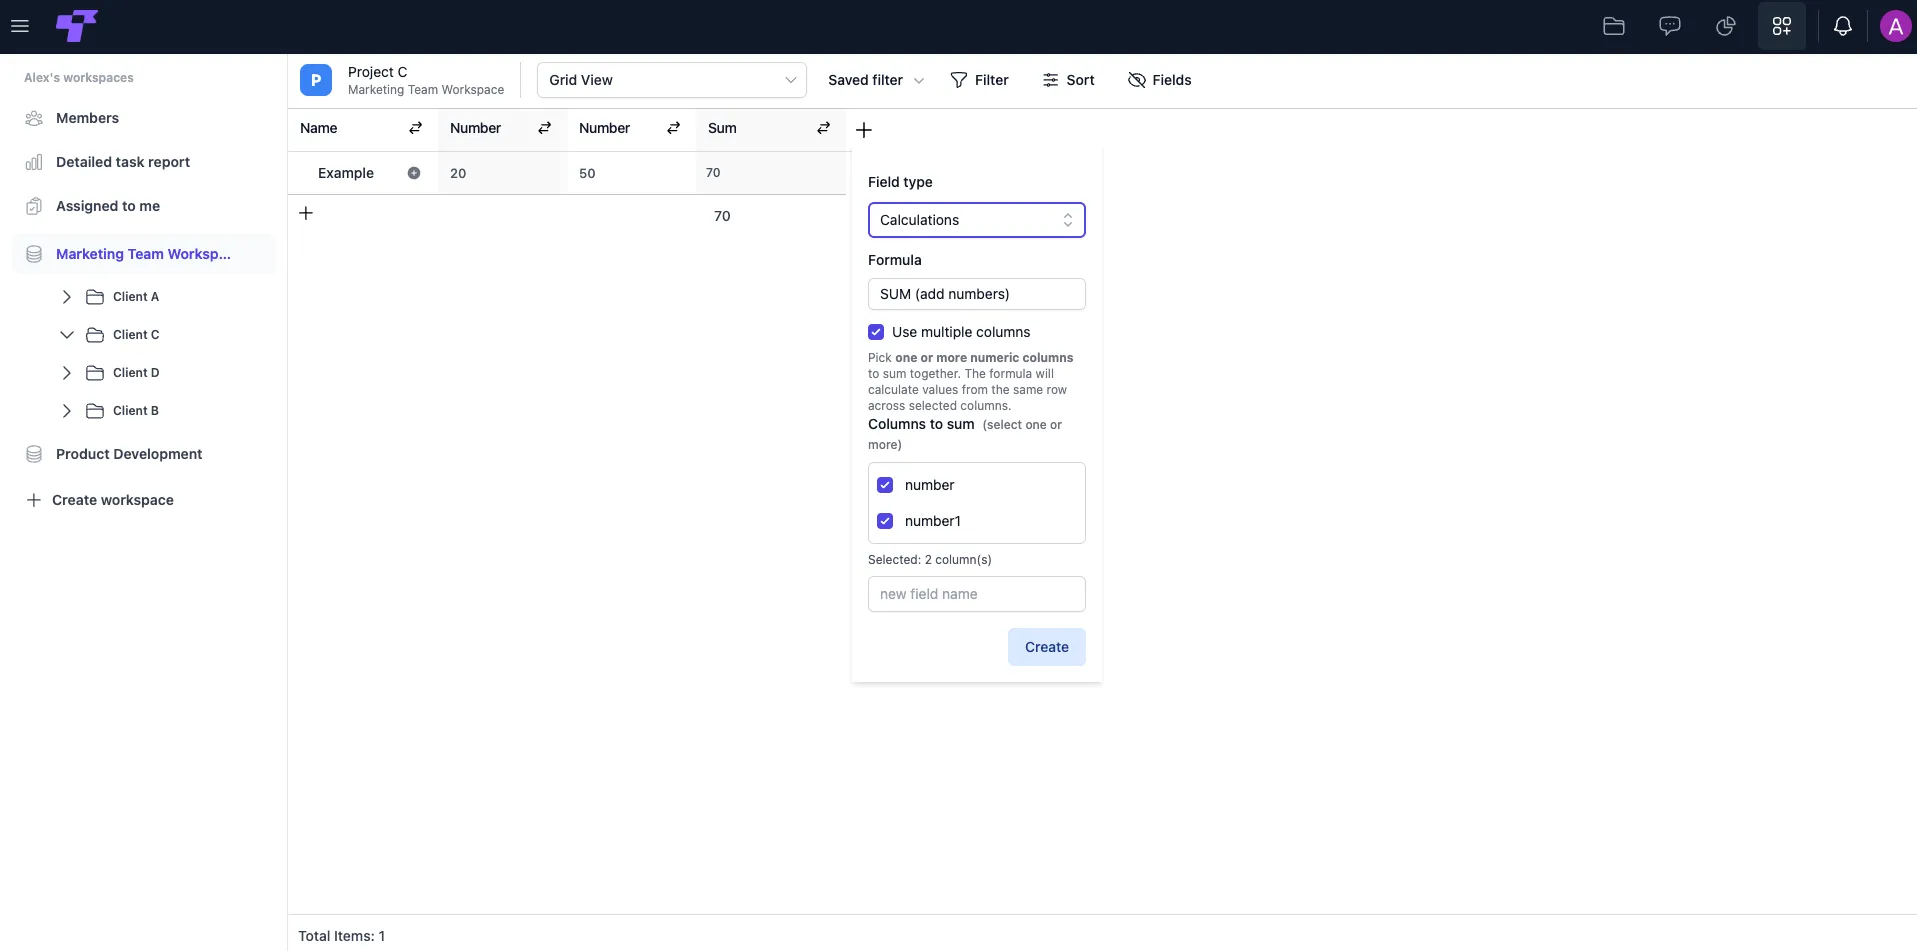
SUM (add numbers)
Adds values from one or more numeric fields in the same row. Great for totals, budgets, hours, or anything you want to combine.
How it works
- Select one or more Number or Decimal fields.
- SUM takes the values from the same row and adds them together. (Empty or invalid values are ignored.)
If you only need to add one field (for example, to make a copy or normalize values), you don’t need multiple columns - just select one.
Use cases
- Calculate total cost (e.g., price + tax + delivery).
- Add up hours from multiple subtasks.
- Combine weights, scores, or quantities.
- Create simple rollups inside a table without linking.
AVERAGE (mean)
Use AVERAGE when you need a single value that represents the midpoint of several numbers. Perfect for scoring, budgeting, tracking estimates, or comparing performance.
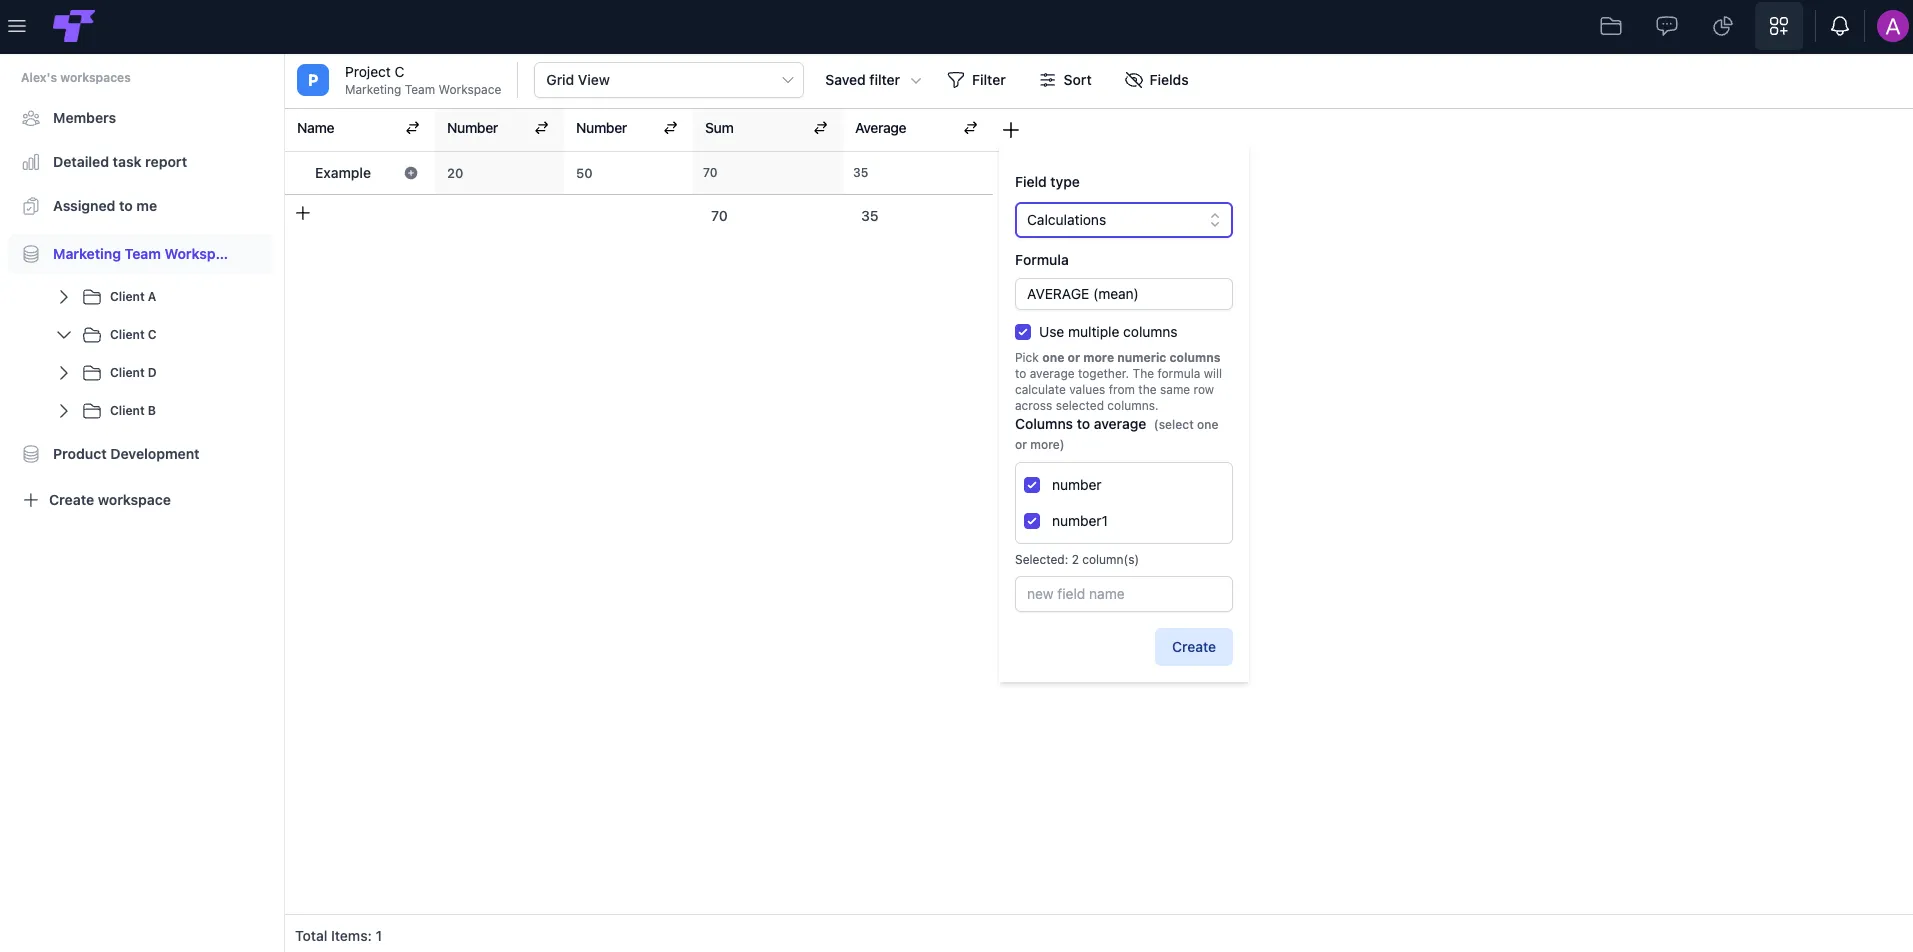
Twigex automatically generates the result and updates it if any of the source fields change.
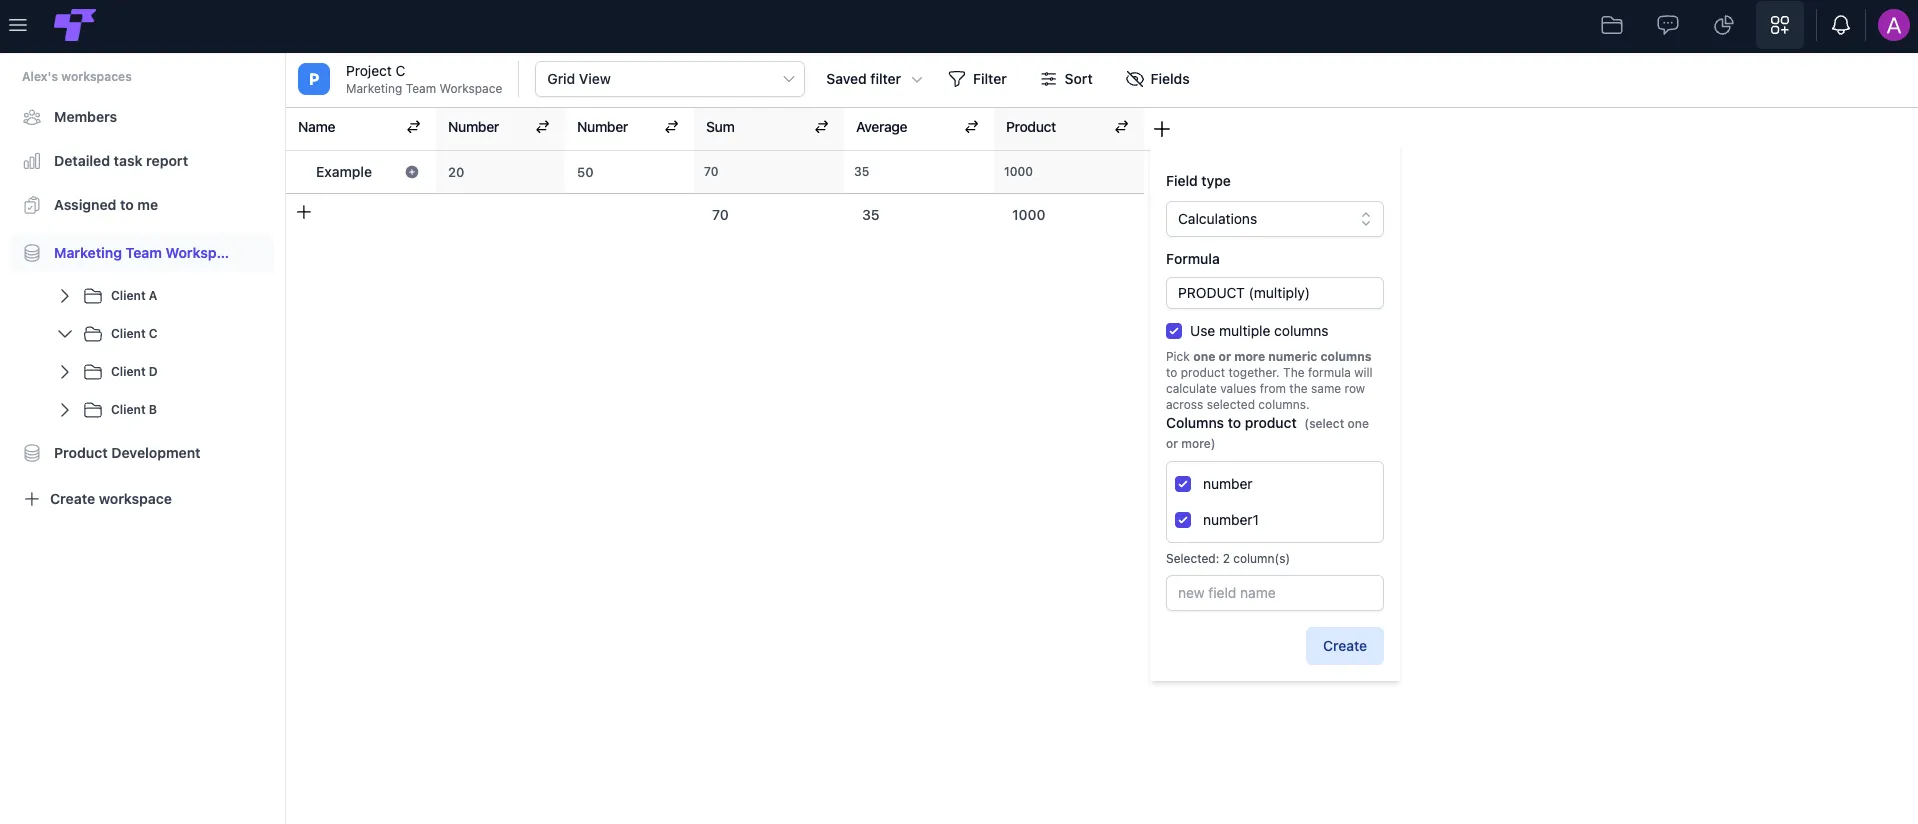
PRODUCT (multiply)
Use PRODUCT when you want to calculate totals that depend on multiplying values. Ideal for pricing, quantity-based calculations, performance scoring, or any situation where numbers need to be combined through multiplication.
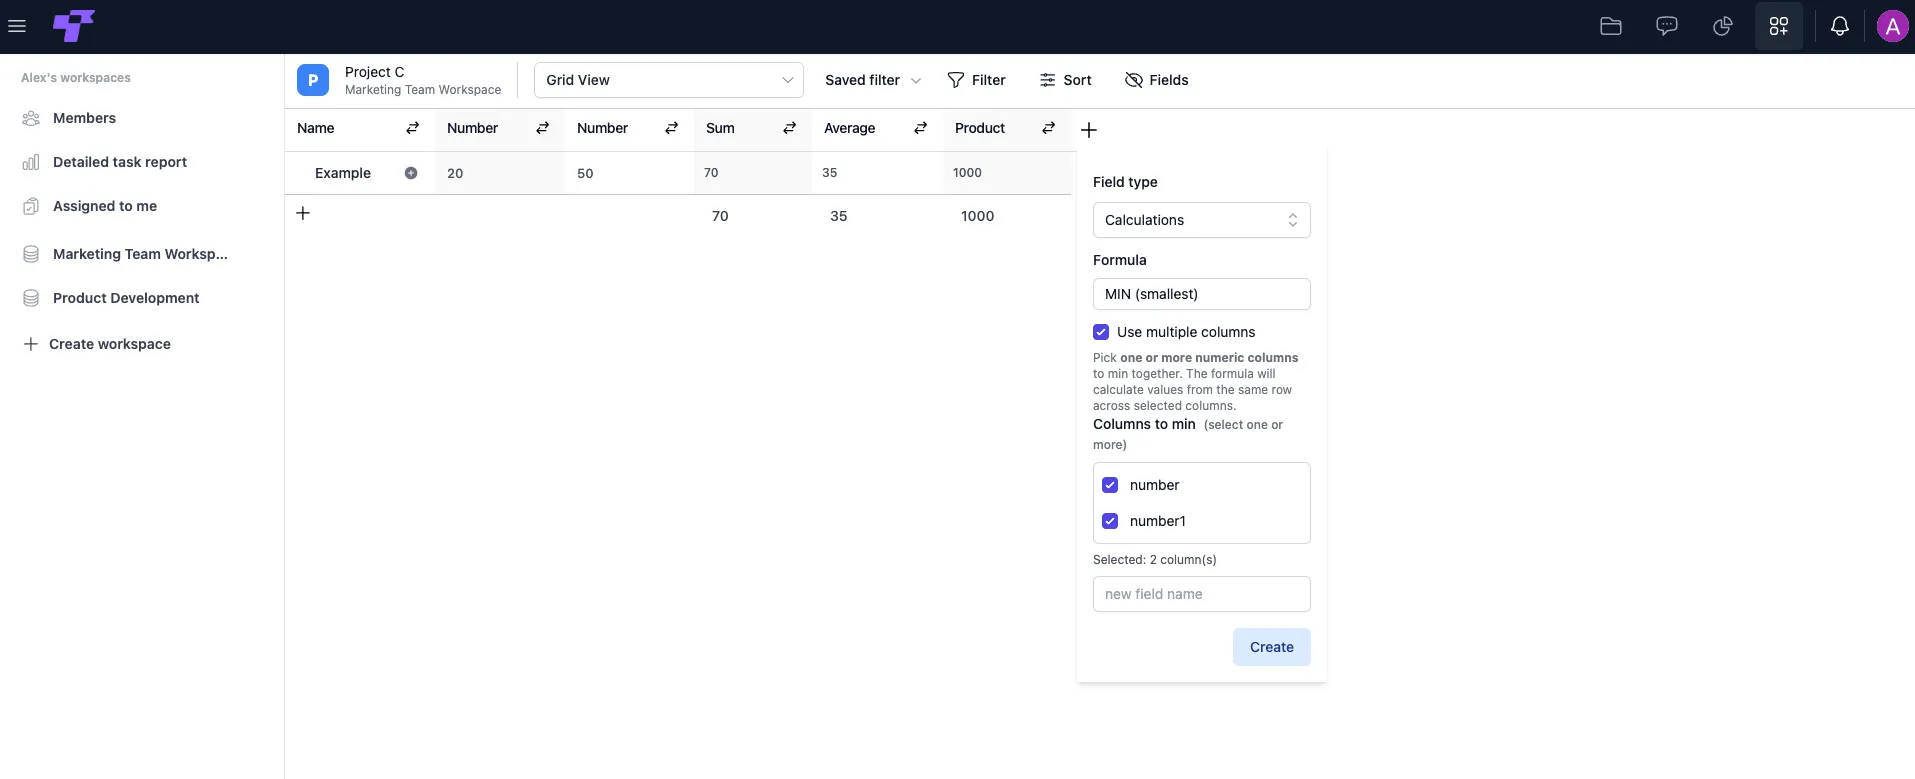
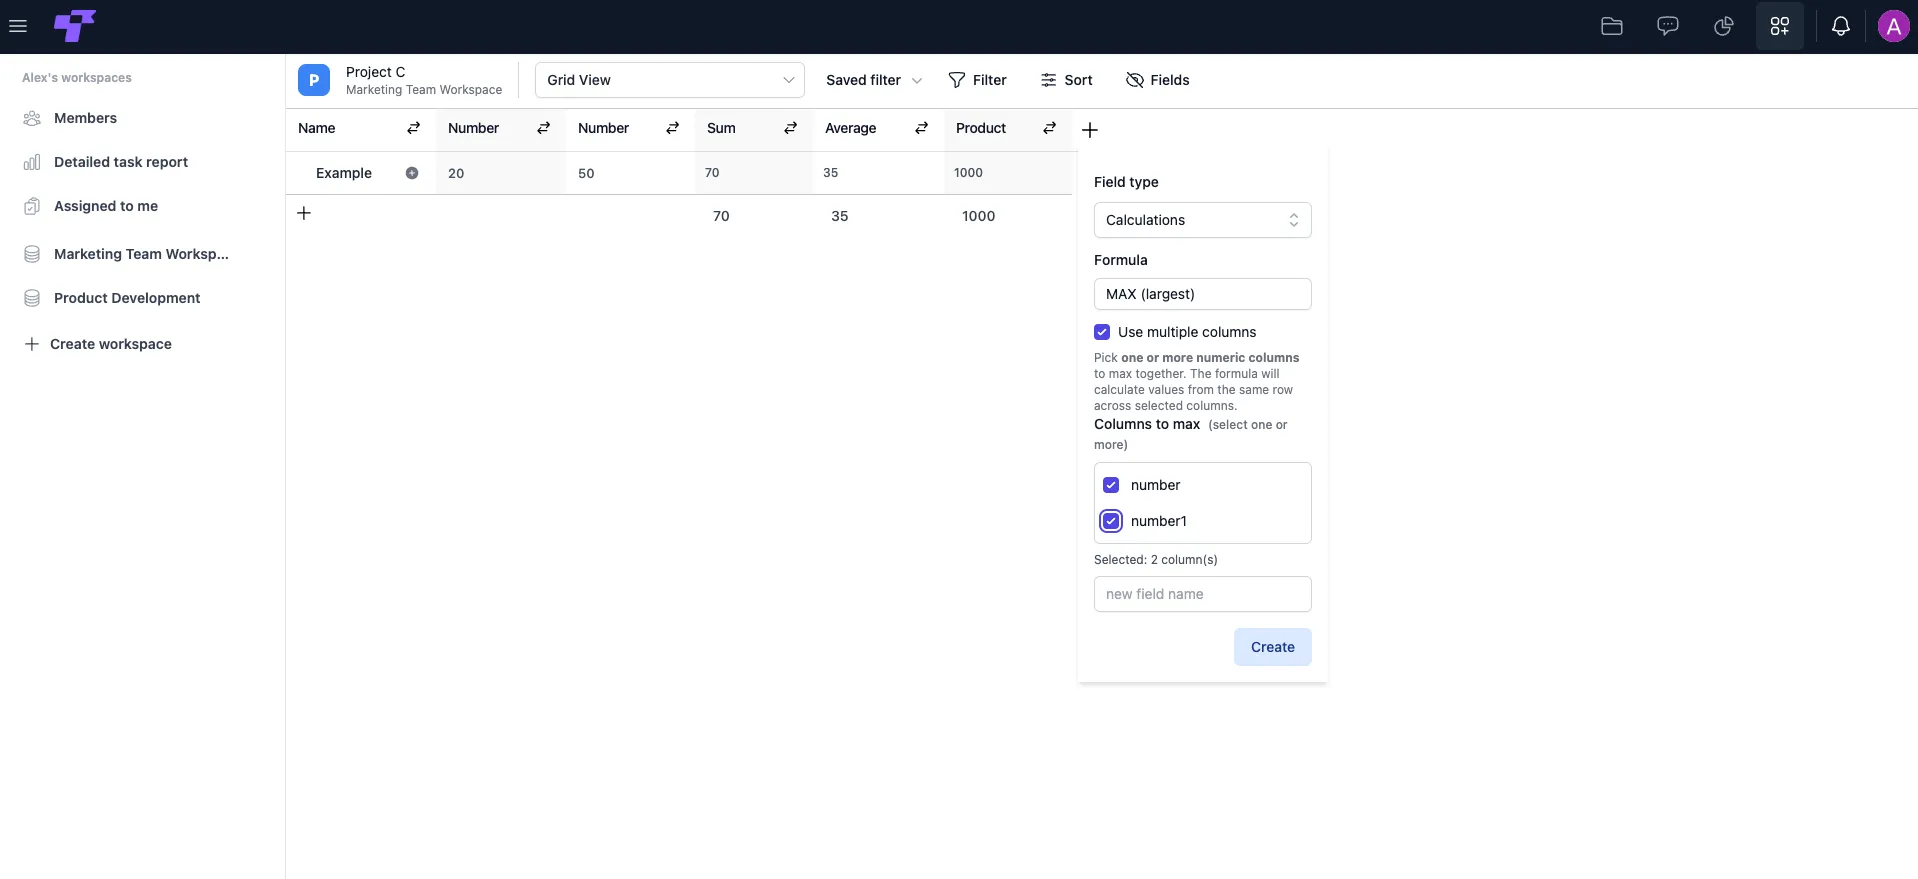
MIN & MAX (smallest / largest)
- MIN finds the smallest value among the selected numeric fields.
- MAX finds the largest value among the selected numeric fields.
These are great for quickly spotting limits, ranges, comparisons, or performance values inside a single row.
Use cases for MIN
- Lowest quoted price from different suppliers.
- Earliest expected delivery or completion time.
- Minimum quantity across warehouses.
- Lowest performance metric of the day.
Use cases for MAX
- Highest cost, revenue, or bid.
- Longest estimated duration.
- Highest stock count.
- Maximum recorded temperature or metric.
Rounding (ROUND, ROUNDUP, ROUNDDOWN)
These formulas help you control how numbers are rounded in your table. Perfect for budgets, prices, time estimates, financial tables, or cleaning up decimal-heavy data.
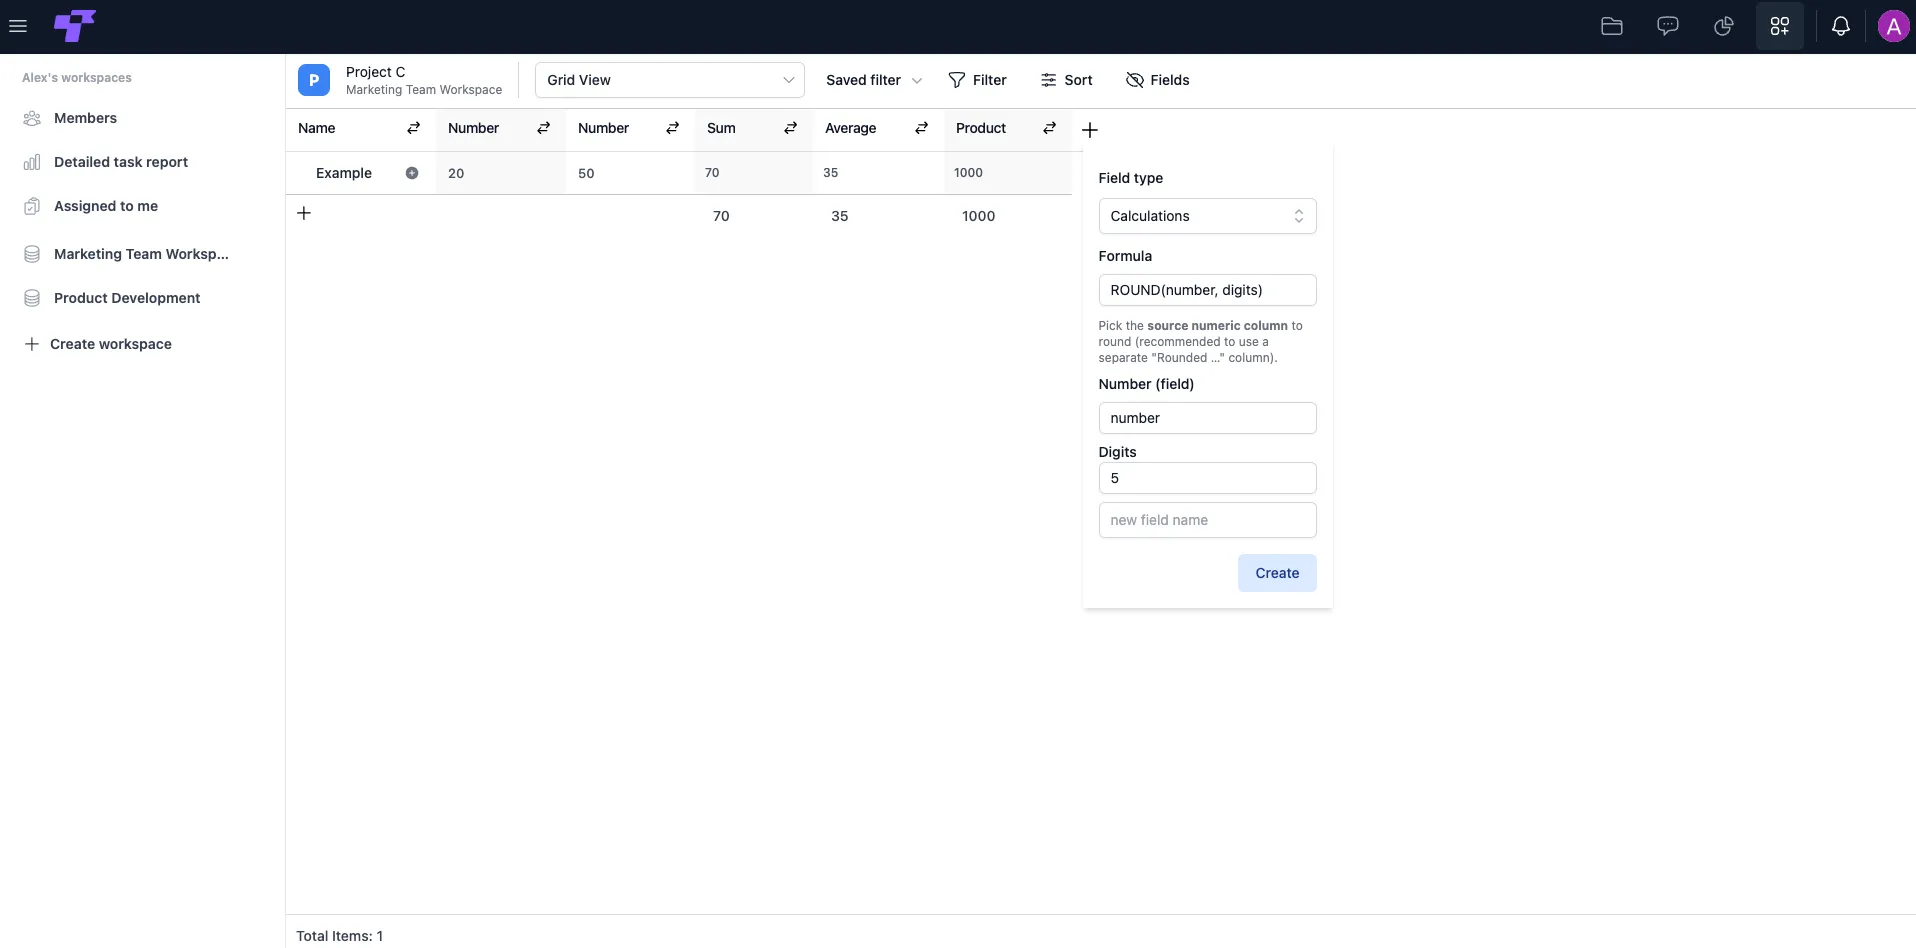
- ROUND(number, digits) - rounds a number to the specified number of decimal places.
- ROUNDUP(number, digits) - always rounds up, away from zero, even if the decimal is very small.
- ROUNDDOWN(number, digits) - always rounds down, toward zero, even if the decimal is large.
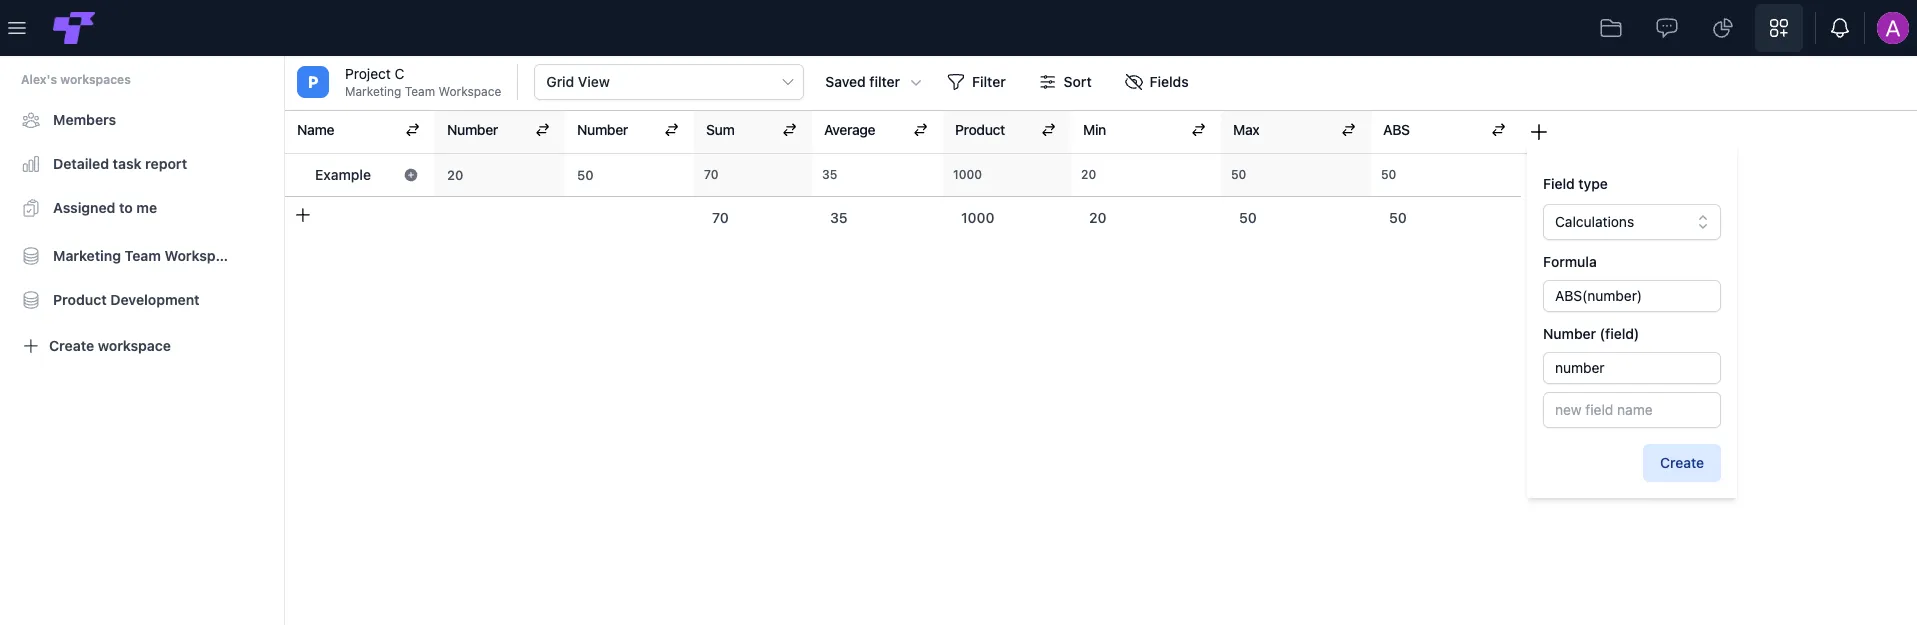
ABS (absolute value)
The ABS function returns the absolute value of a number - meaning it removes any negative sign and returns the positive version.
Use cases
- You want to avoid negative numbers in your results.
- You’re calculating differences and don’t care which value is larger.
- You want cleaner, "positive only" metrics.
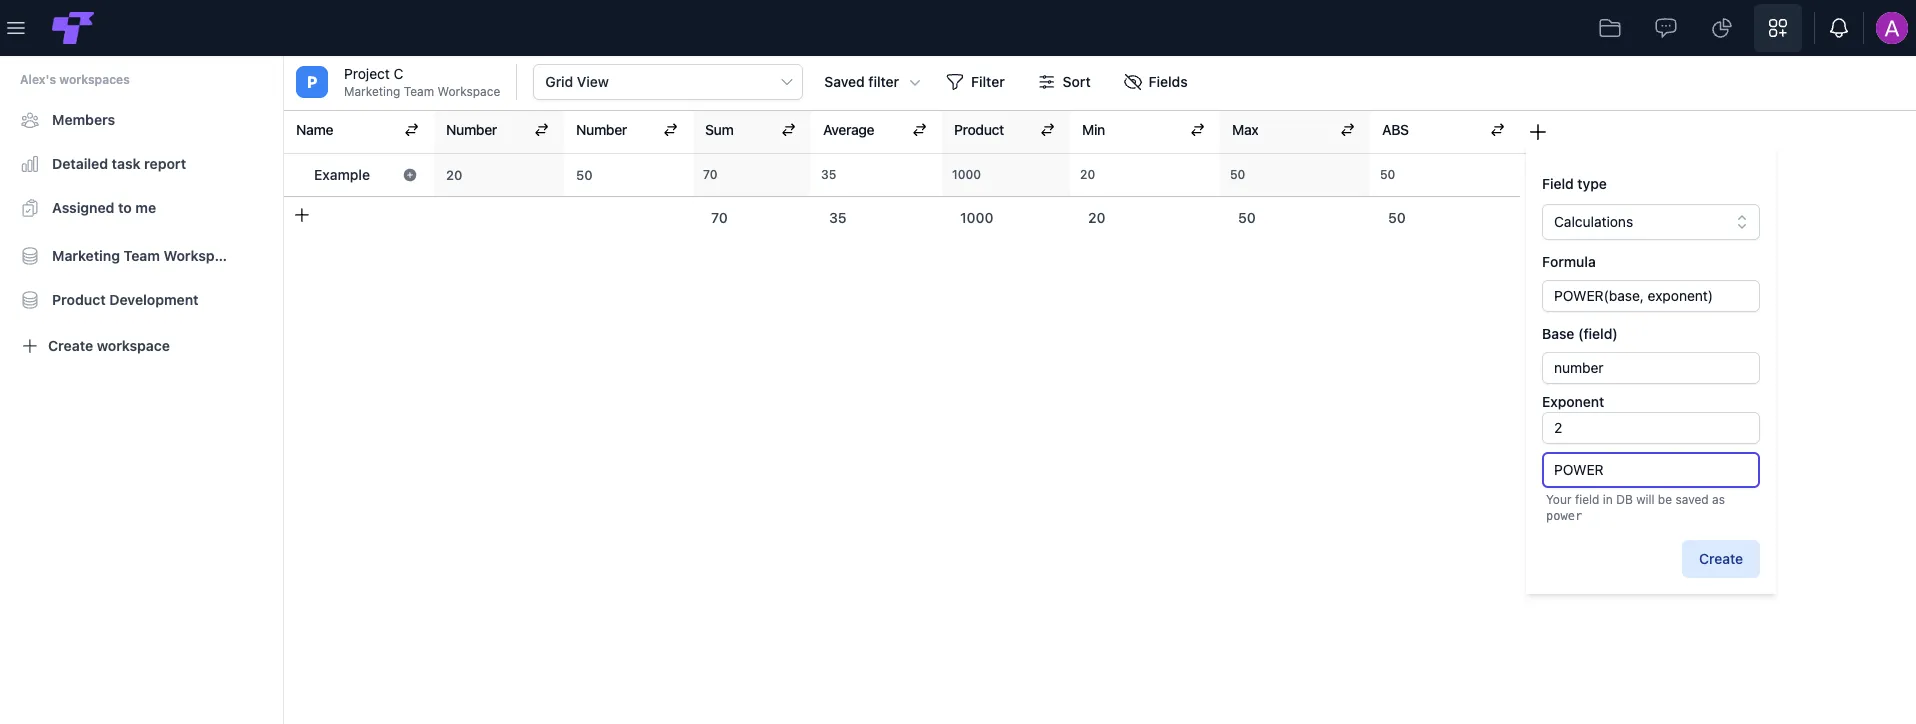
POWER(base, exponent)
Raises a number to a specific power. This is useful for mathematical modeling, scaling, or advanced numeric calculations.
- Base: the numeric field you want to apply the power to.
- Exponent: any number you enter manually (e.g., 2 for square, 3 for cube).
Use cases
- You need squared or cubed values.
- You are calculating growth rates.
- You need exponential scoring formulas.
TODAY & NOW
These two formulas automatically return the current date - with or without the current time - and update every day.
- TODAY() – returns today’s date only.
- NOW() – returns today’s date and the current time (hour and minute).
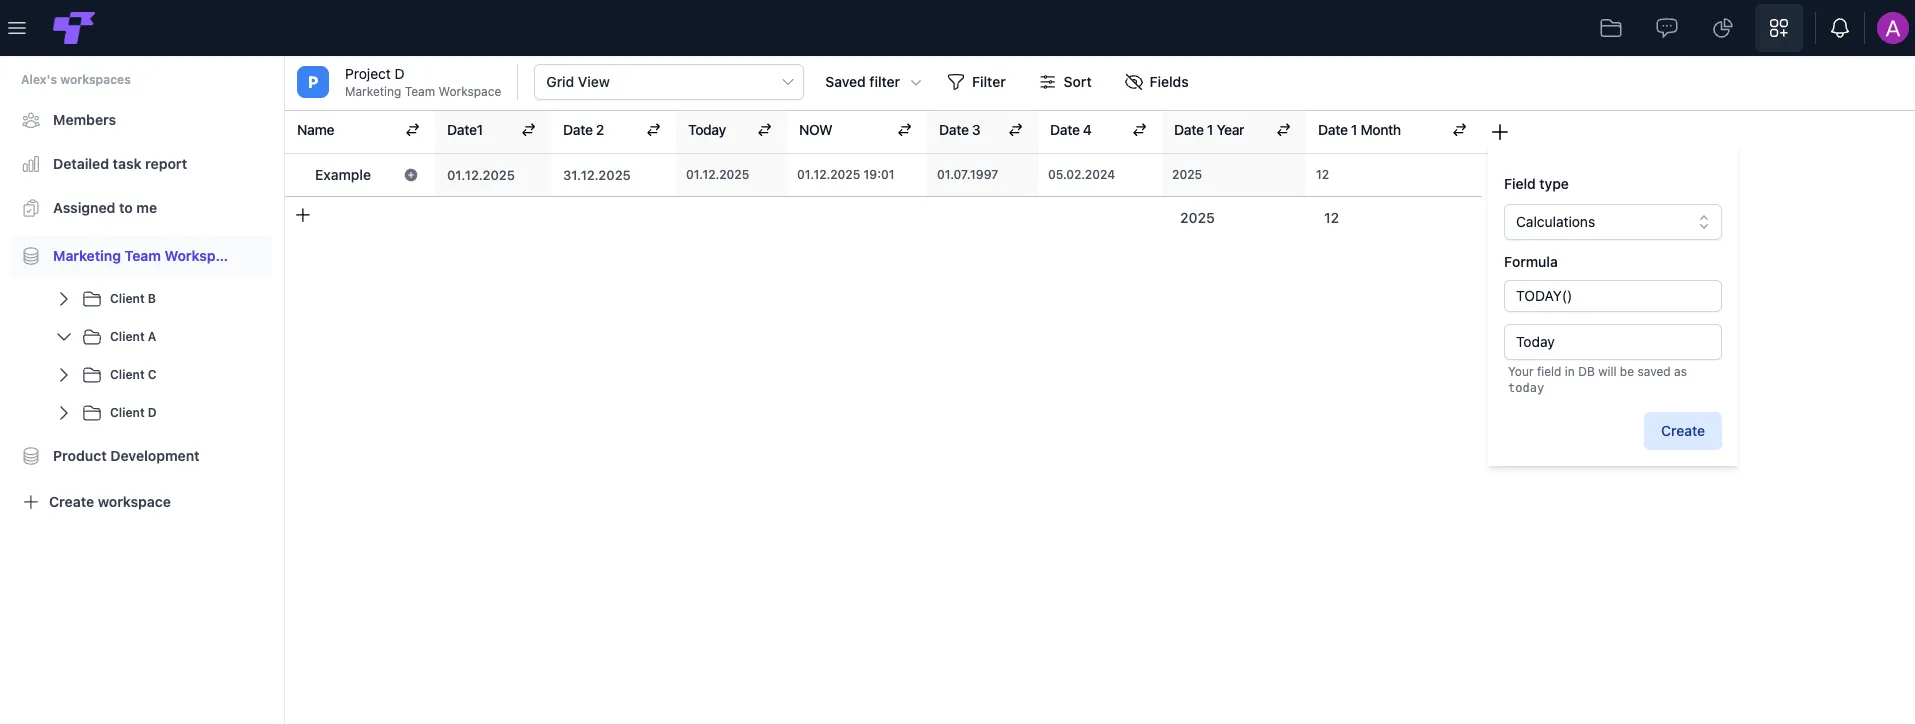
TODAY() is best for deadlines and comparisons, while NOW() is for timestamps and time-based tracking.
DATE(year, month, day)
Use this formula when you need to build a full date from separate values - for example, when the year, month, and day come from different fields or user inputs.
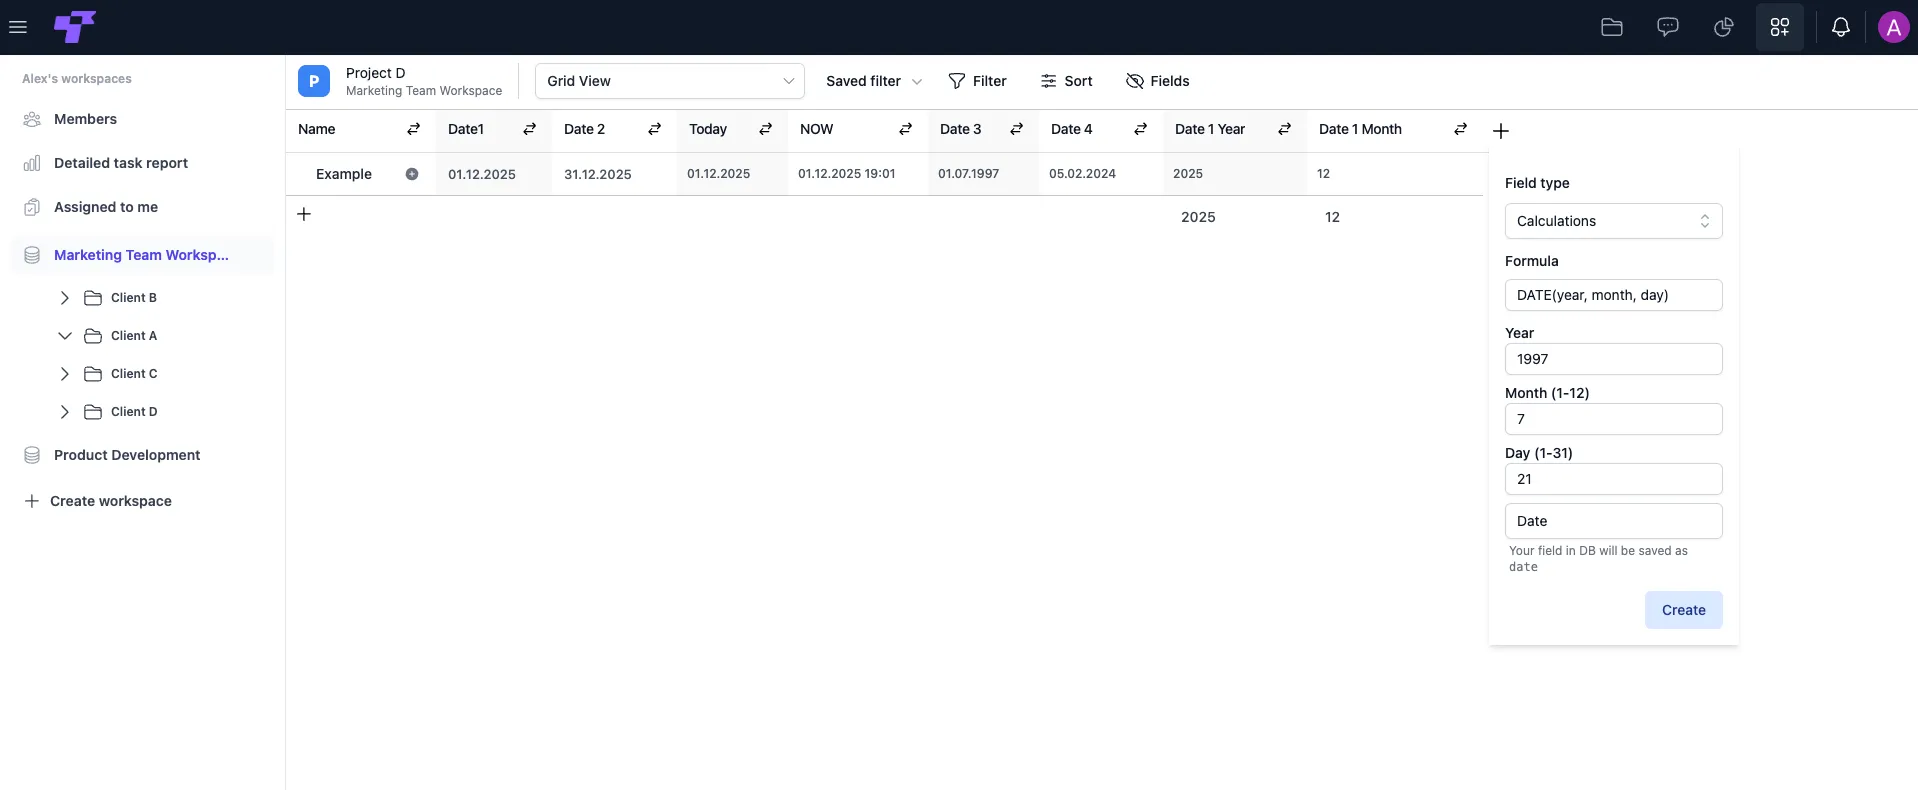
Use cases
- Your data stores the year, month, and day separately.
- You want to generate a normalized date for filtering, sorting, or calculations.
- Rebuilding dates imported from another system.
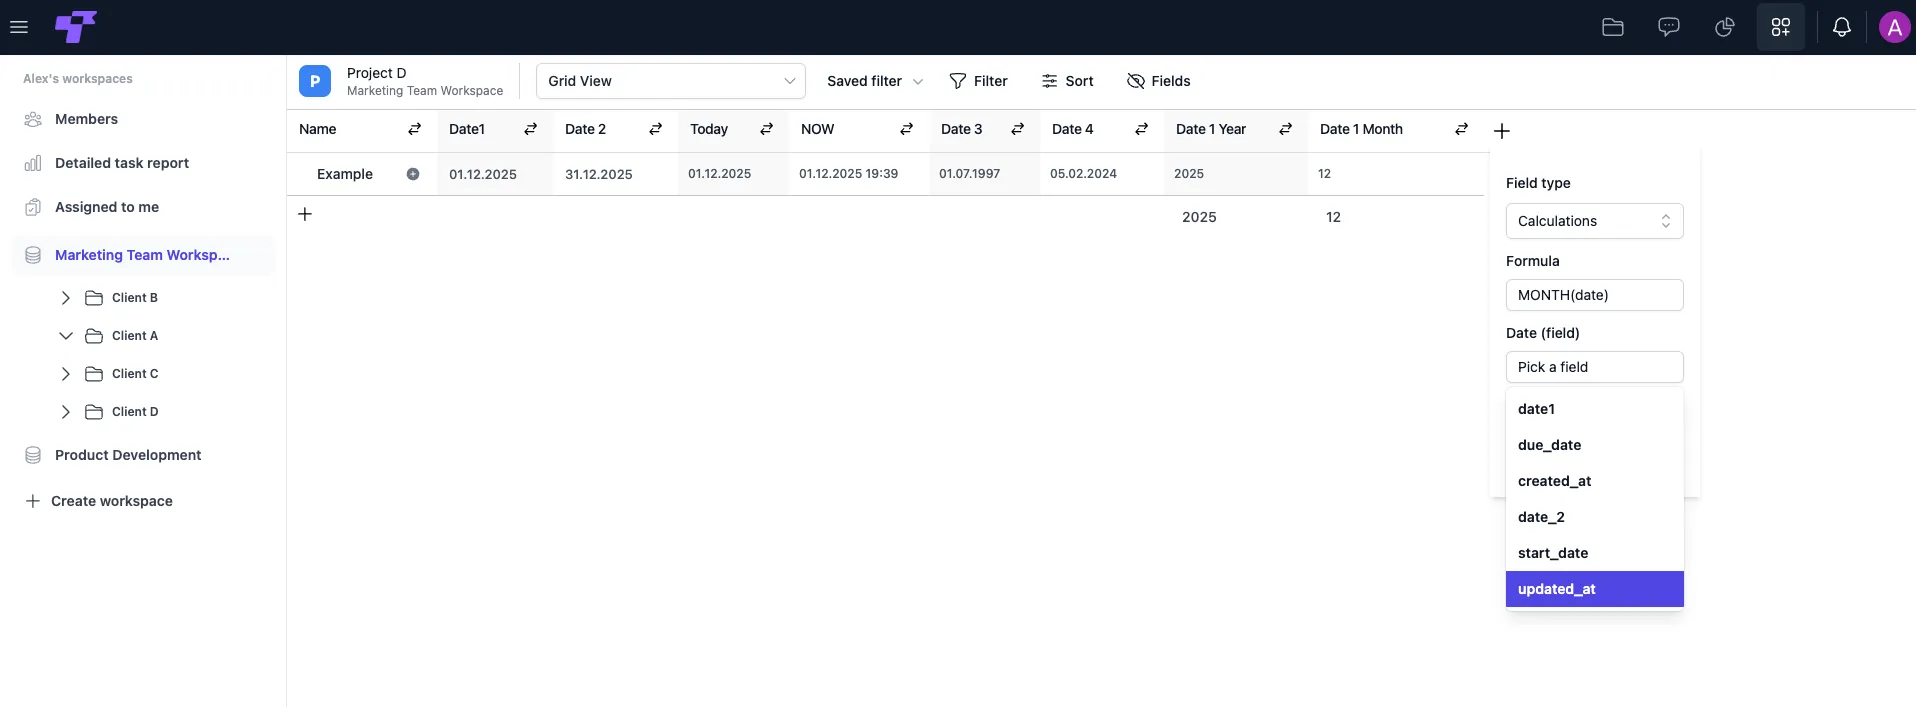
Extracting year, month, and day
These formulas let you pull out specific parts of a date. They are useful for reporting, grouping, filtering, or creating additional calculations based on dates.
- YEAR(date) - extracts the year (e.g., 2025) from a full date.
- MONTH(date) - extracts the month number (1–12) from a date.
- DAY(date) - extracts the day of the month (1–31).
DATEDIF(start, end, "D/M/Y")
Use DATEDIF whenever you need to measure a time span, such as task duration, days until a deadline, months between project phases, or age calculations.
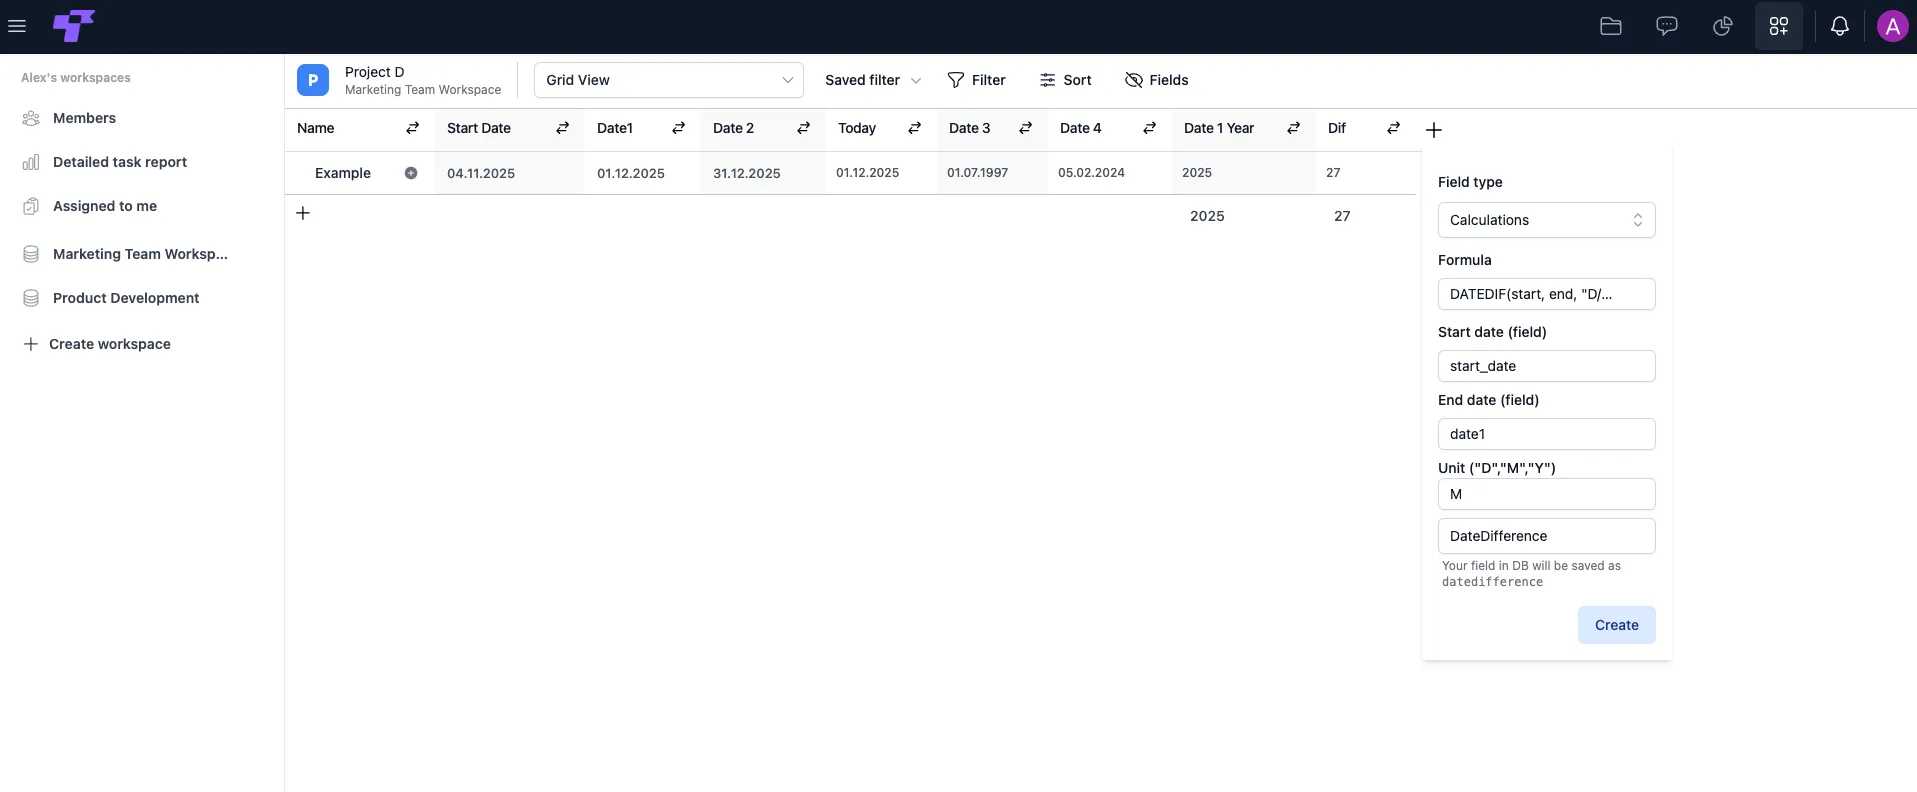
Calculates the difference between two dates in days (D), months (M), or years (Y), depending on the unit you choose. Just write the letter in the Unit field.
Available units:
- "D" – total days
- "M" – total completed months
- "Y" – total completed years
Use cases
- You want to calculate days left until a deadline (e.g., TODAY() → due date).
- You need to find how many months passed between two project dates.
- You want to calculate someone’s age from their birthdate.
- You want to measure how long a task took (start date → end date).
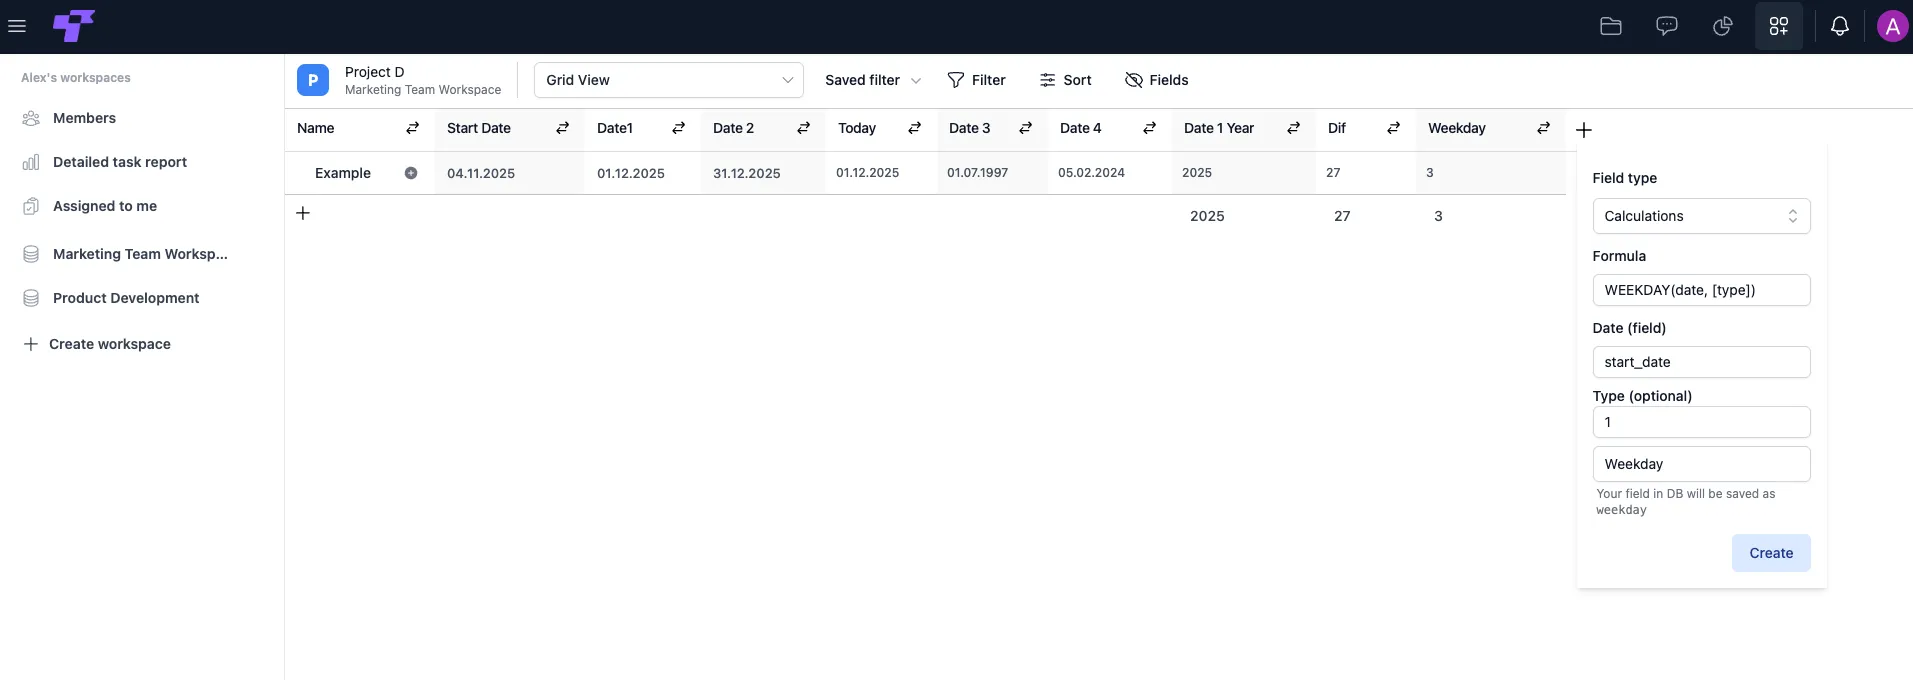
WEEKDAY(date, type)
This formula returns the day of the week as a number, based on the date you choose.
If type = 1 (default): Monday = 1, Tuesday = 2 … Sunday = 7
Use cases
- You want to know which weekday a task starts or ends on.
- You’re planning schedules and need to avoid weekends.
- You’re analyzing patterns, like which days have the most deadlines.
How to Link Tables Together
In Twigex, there are two ways to connect tables:
- Link to Table – for quick navigation
- Link to Records – to create relationships between individual items
Link to Table
The Link to Table field connects entire tables, not individual rows. Use it when one table should act as a master source for another - for example, linking a project to its department list, or linking a task table to a central configuration or template table.
This field is for navigation only: you can’t edit or add entries through it.
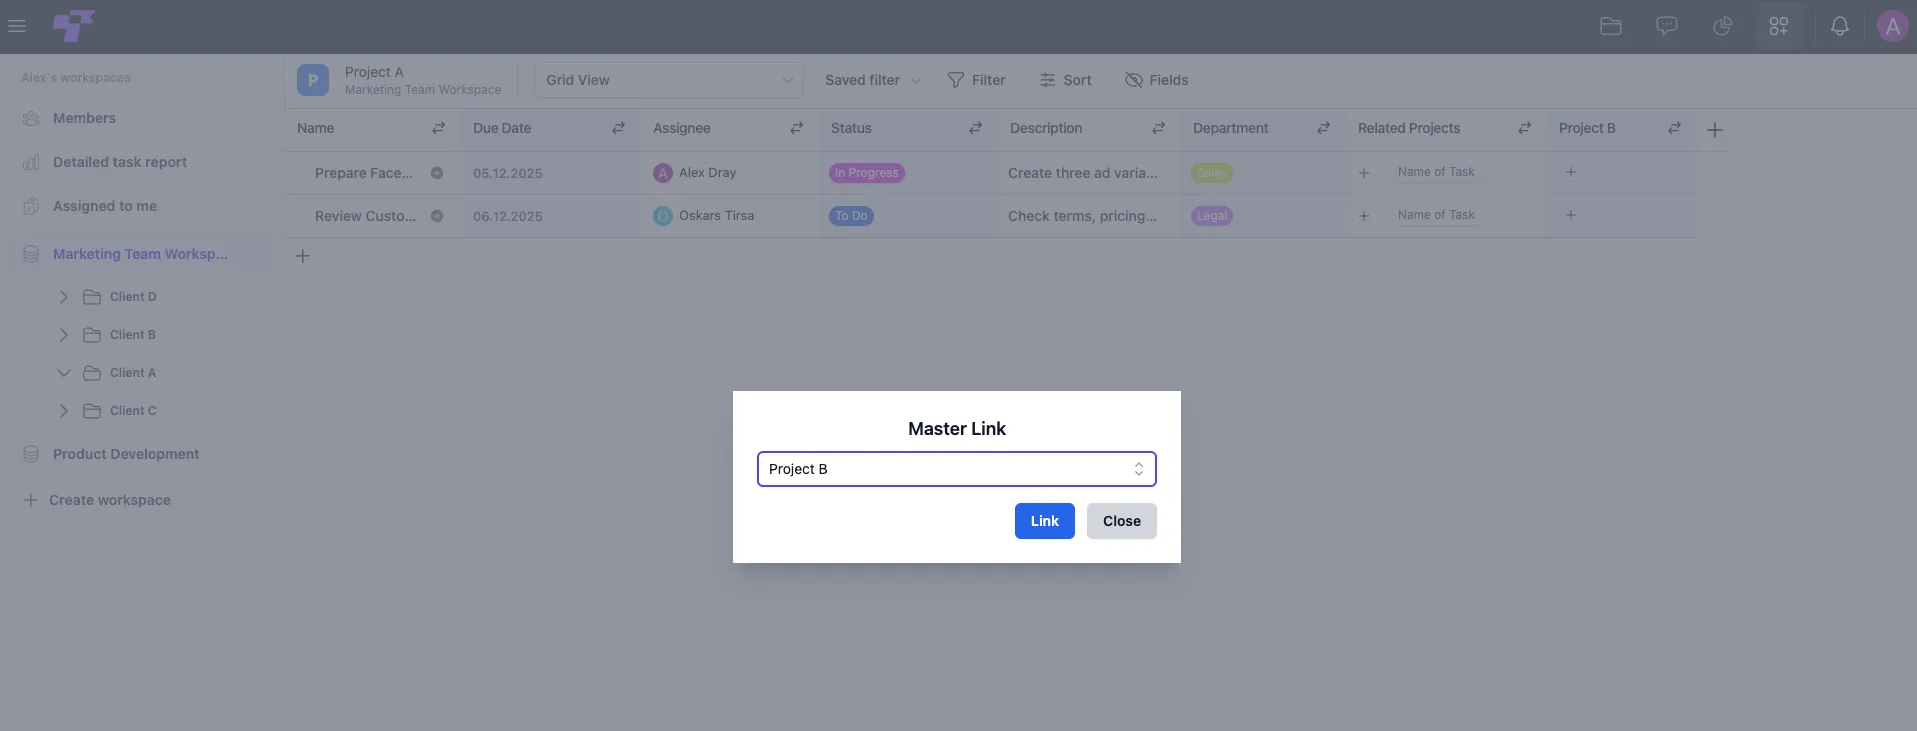
Creating a Link to Table field
- Click the + button to add a new column.
- Choose Link to Table as the field type.
- Select the table you want to connect to.
- Name the field - for example, Department.
- Click Link to finish.
Use cases
- Project templates: link your project to a master template table.
- Shared configuration data: statuses, departments, pricing lists.
- Workspace-wide reference tables: tags, labels, teams.
- Organizational linking: link many sub-tables to one master project index.
If your goal is to link specific records (not entire tables), use Link to Records instead.
Link to Records
Linking records allows you to connect information across different tables. This is useful when you want one row to reference related data from another table - for example, linking tasks to projects, subtasks to parent tasks, or clients to contracts.
Use cases
- Linking tasks to projects.
- Connecting subtasks to parent tasks.
- Linking clients to contracts.
- Connecting time entries to tasks.
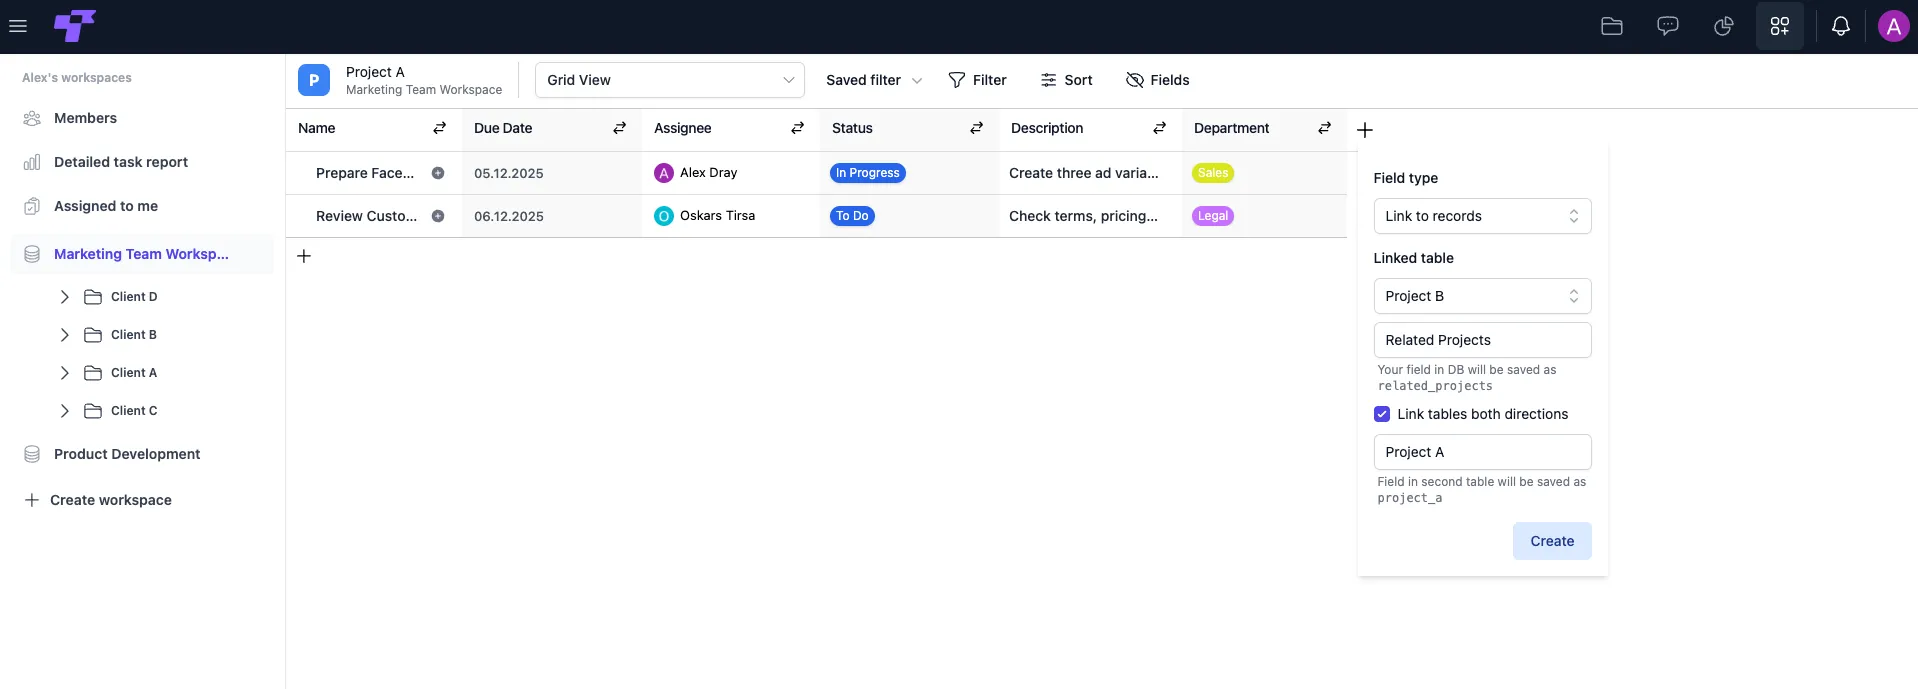
Creating a Link to Records field
- Click + to add a new field.
- Choose Link to Records from the field type list.
- Select the table you want to link to, for example Project B.
(Optional) Enable Link tables both directions if you want the other table to automatically create a reverse link back.
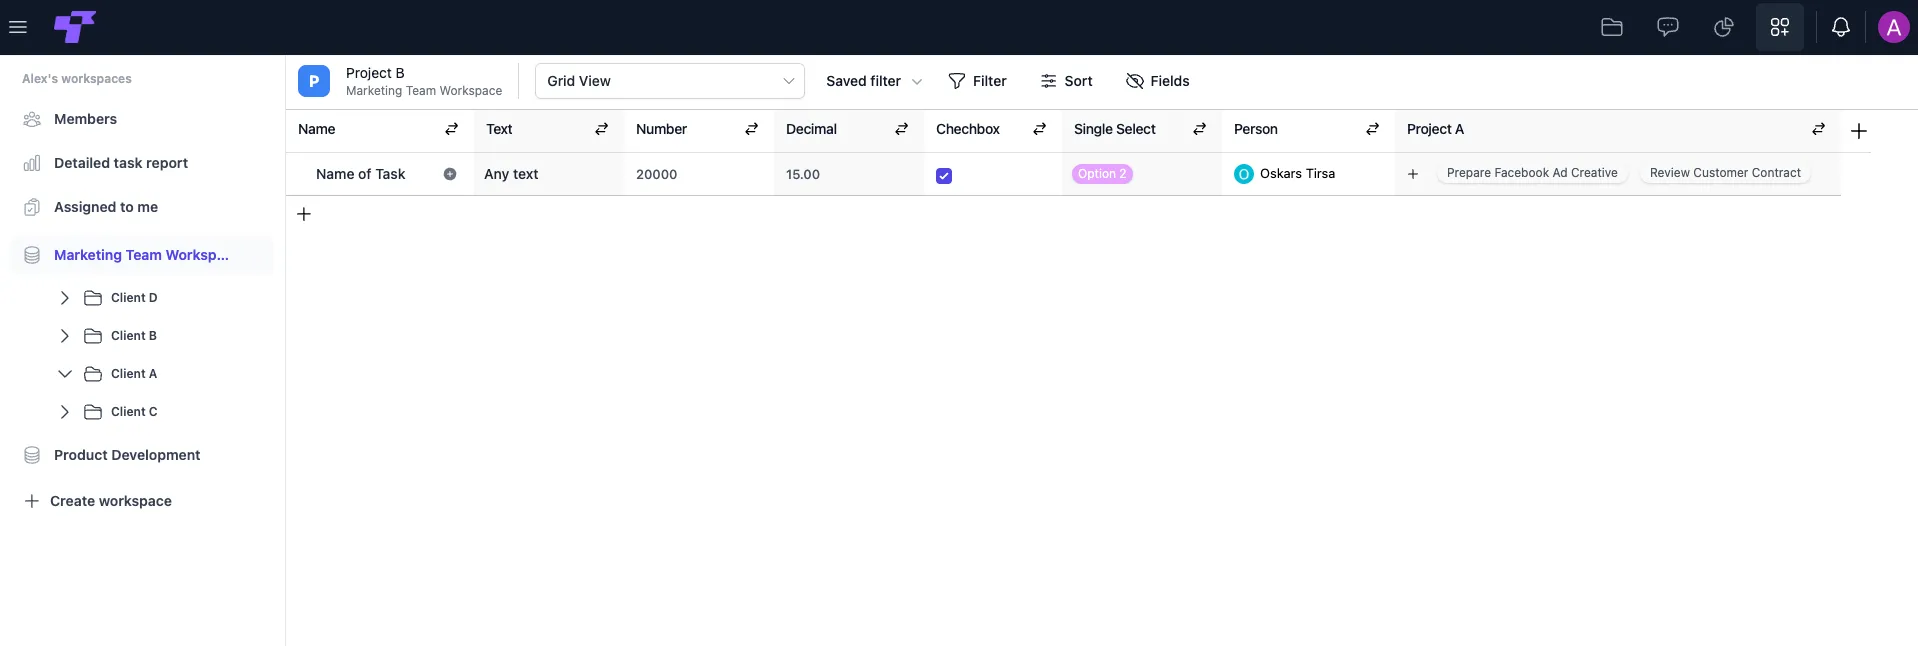
When two-way linking is enabled, the connected data also appears in the other table.
For example, when linking tasks from Project A to Project B, you will see the corresponding tasks listed inside Project B under the linked field:
Adding linked records inside a row
Once the field is created, you will see a + button inside that cell.
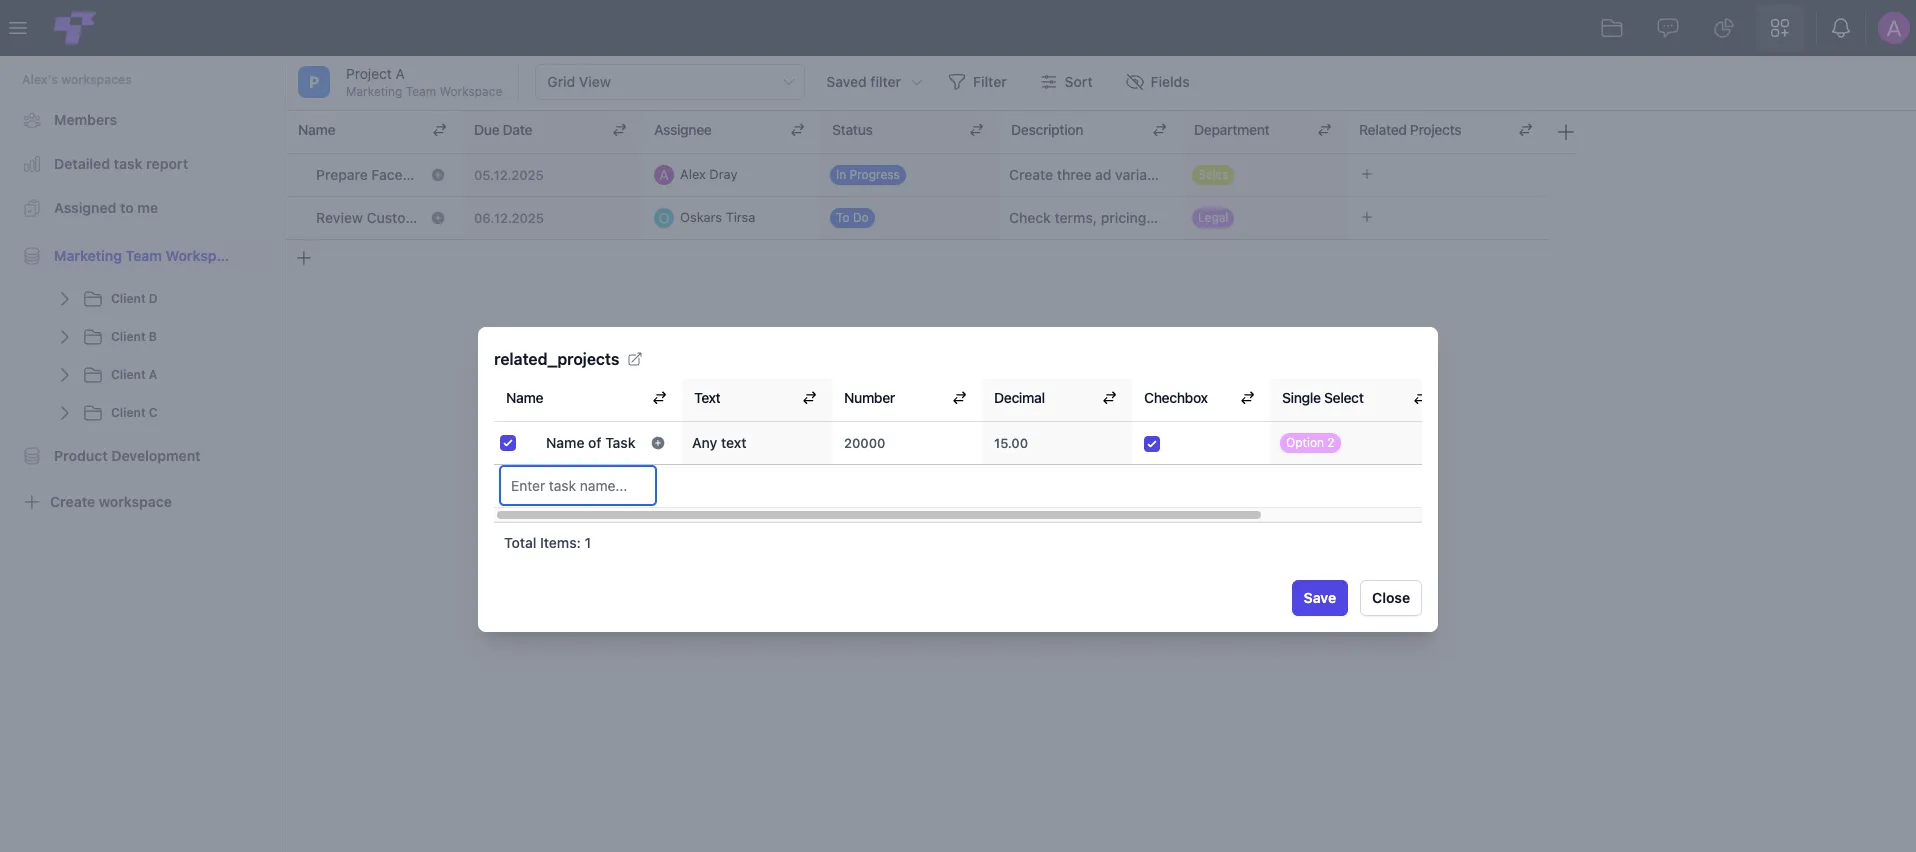
Clicking the + opens a small table where you can:
- Add new linked items.
- Edit existing linked records.
- Fill out additional fields (text, numbers, checkboxes, selects, etc.).
This mini-table works just like any other table: you can type directly, toggle checkboxes, or choose values.
Table Connection Examples
Twigex allows flexible structuring of your projects depending on complexity and team needs. Below are three typical ways to organize your project tables:
Unified table structure
Best for: simple processes with identical structure across all projects.
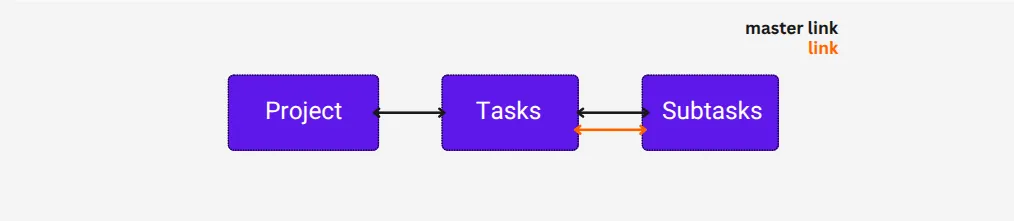
All projects share the same Projects, Tasks, and Subtasks tables. This setup works well when the structure and workflow don’t vary much between projects.
Split structure
Best for: projects with the same structure at the project level, but unique task/subtask requirements.
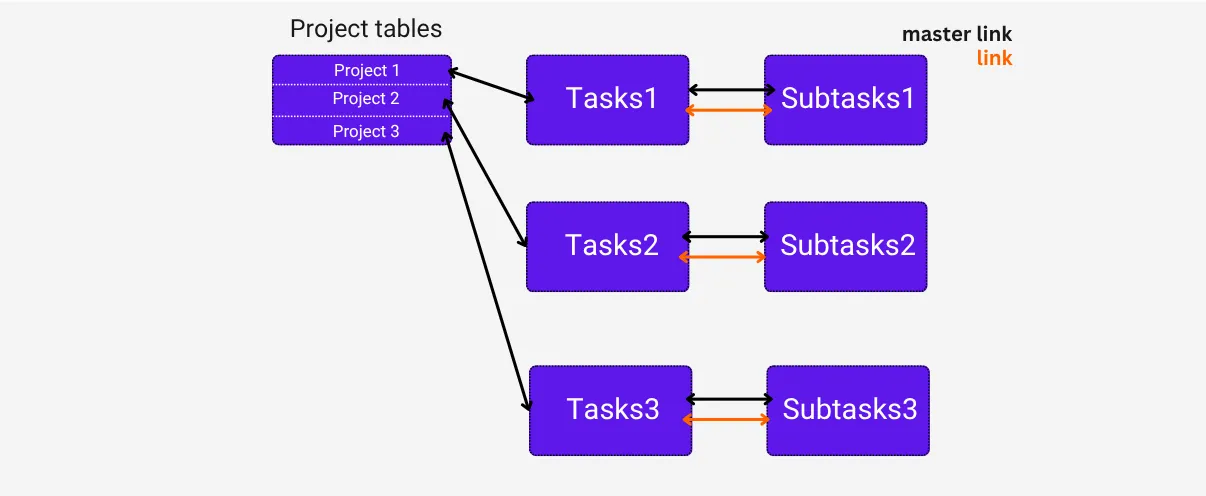
Each project in the shared Projects table links to its own Task and Subtask tables. This allows customizing task structures per project while maintaining a central list of projects.
Separate table groups per project
Best for: large, isolated projects with unique and complex structures.
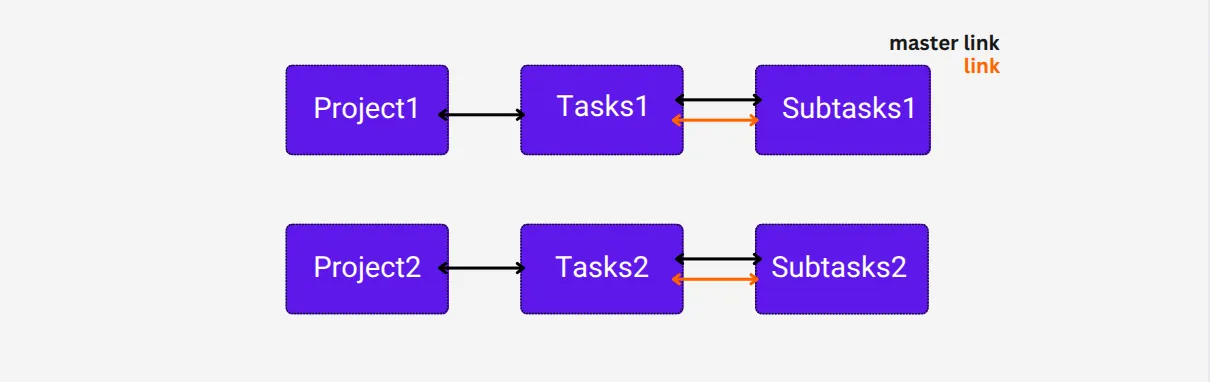
Each project has its own set of Projects, Tasks, and Subtasks tables. This structure offers complete flexibility but can grow complex for many small projects.
Filtering and Sorting
Twigex gives you quick, ready-made views that allow you to instantly filter or sort your tasks without creating manual filters. These views sit at the top of your workspace for fast switching between different task states.
Task view
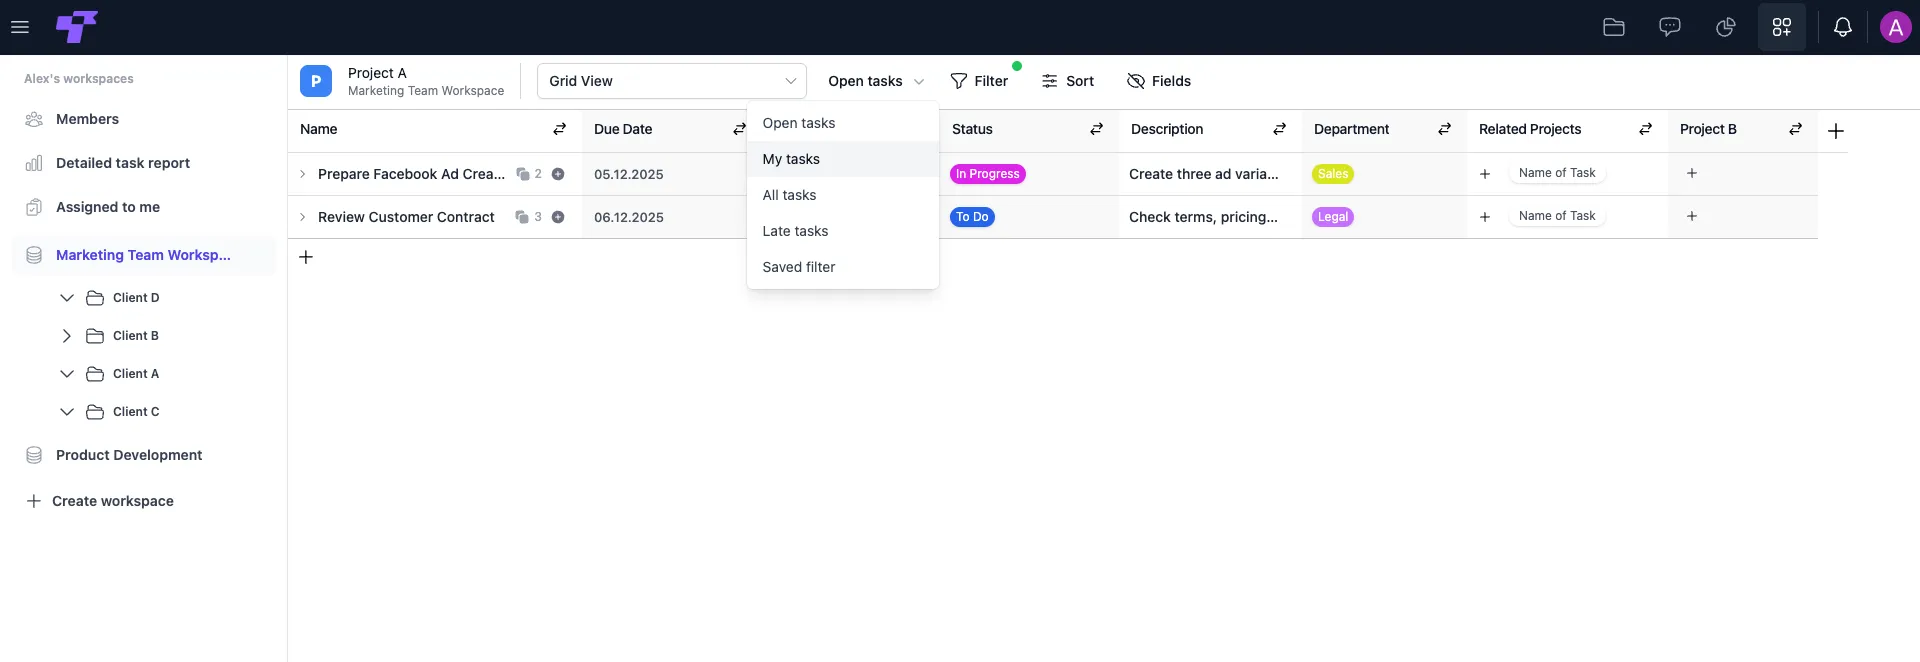
At the top of the task table, use the View dropdown to switch between:
- Open tasks – see all currently active tasks.
- My tasks – view only tasks assigned to you.
- All tasks – full overview of every task in the project.
- Late tasks – quickly spot tasks that have missed their deadlines.
- Saved filter – displays filters that you have created and saved on your own, allowing you to come back to your preferred setup at any time.
Filtering tasks
Filtering helps you quickly hide anything that’s not relevant and show only the tasks you need, based on status, due date, department, assignee, project links, and more.
Filters only affect this view: they do NOT change anything in other projects or tables.
Click the Filter icon to apply conditions that refine your view.
Creating a simple filter
- Click + Add Filter.
- Choose a field (e.g., Status, Due Date, Department, Assignee).
- Select the operator (is, is not, contains, is empty, etc.).
- Select or type a value.
- Click Apply to filter the tasks.
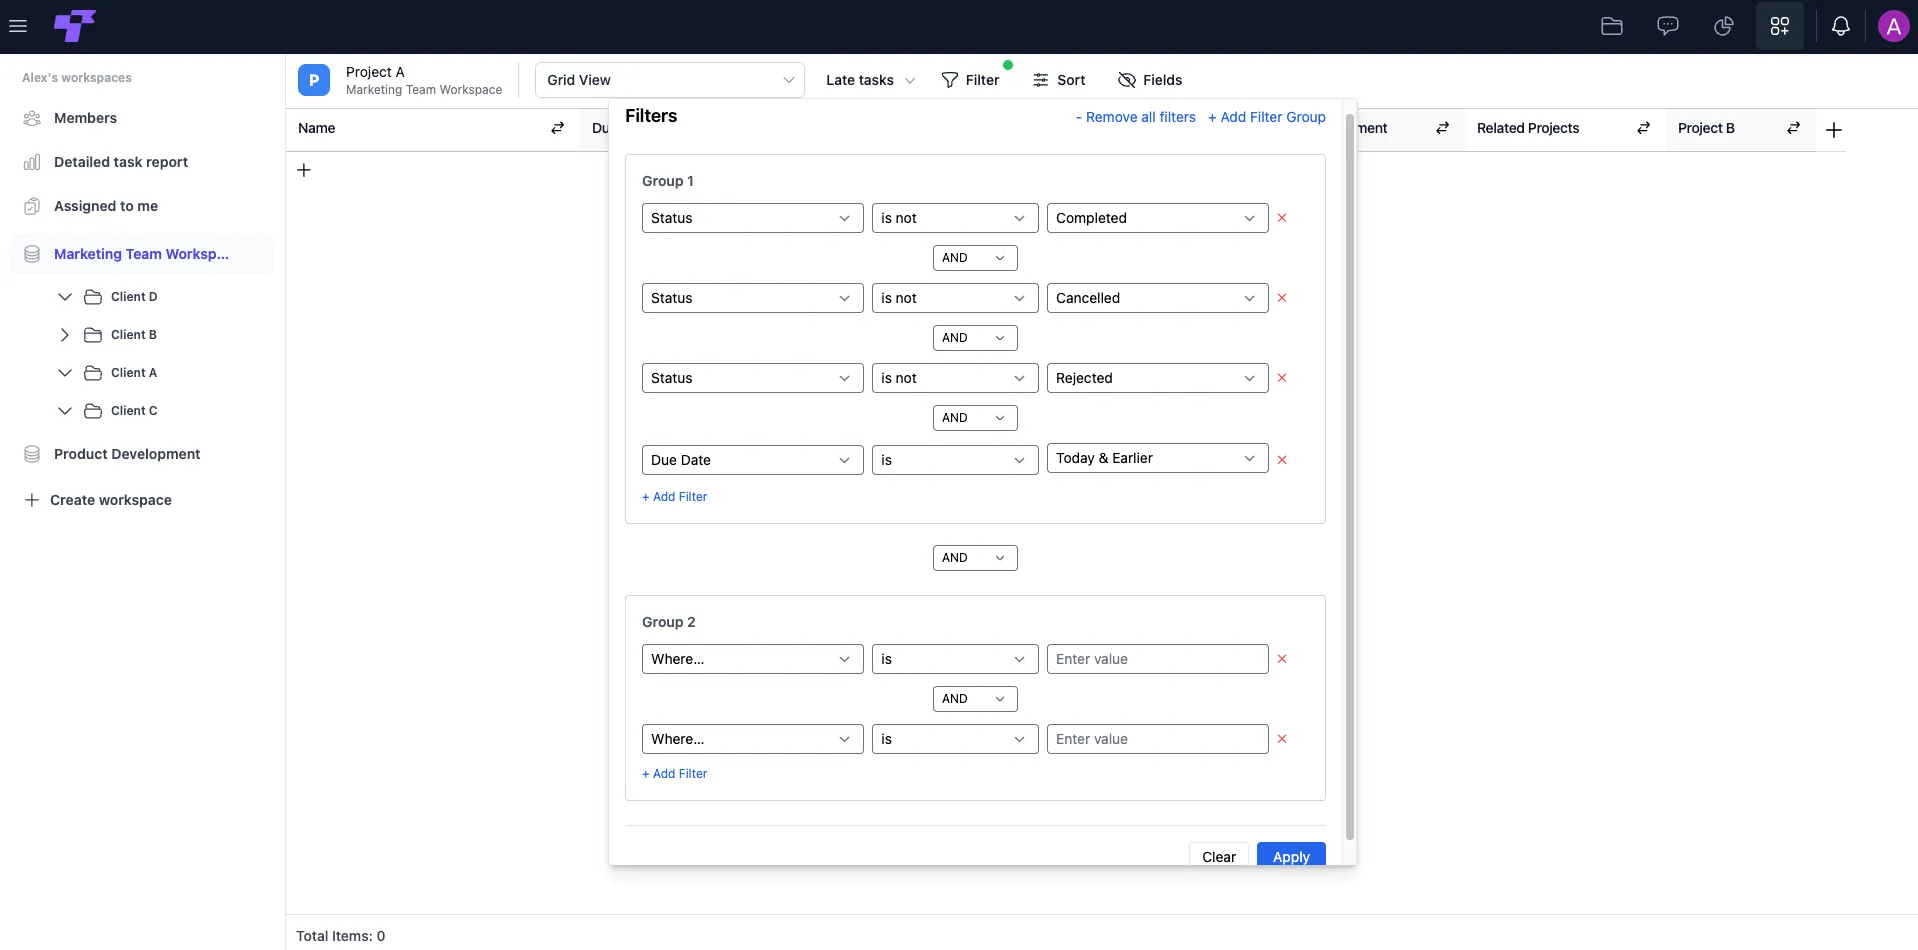
You can control how filters interact: AND requires all conditions to be true; OR allows any condition to be true.
Filter Groups let you build more advanced logic. Each group works like a block of conditions connected with AND or OR.
- Add multiple groups (e.g., Group 1 + Group 2).
- Combine groups with AND / OR.
- Build very precise selections.
Cleaning up filters
- Click ✕ to remove a specific filter.
- Click Remove all filters to reset everything.
- Click Clear at the bottom.
Sorting tasks
Click the Sort icon to organize tasks by multiple fields.
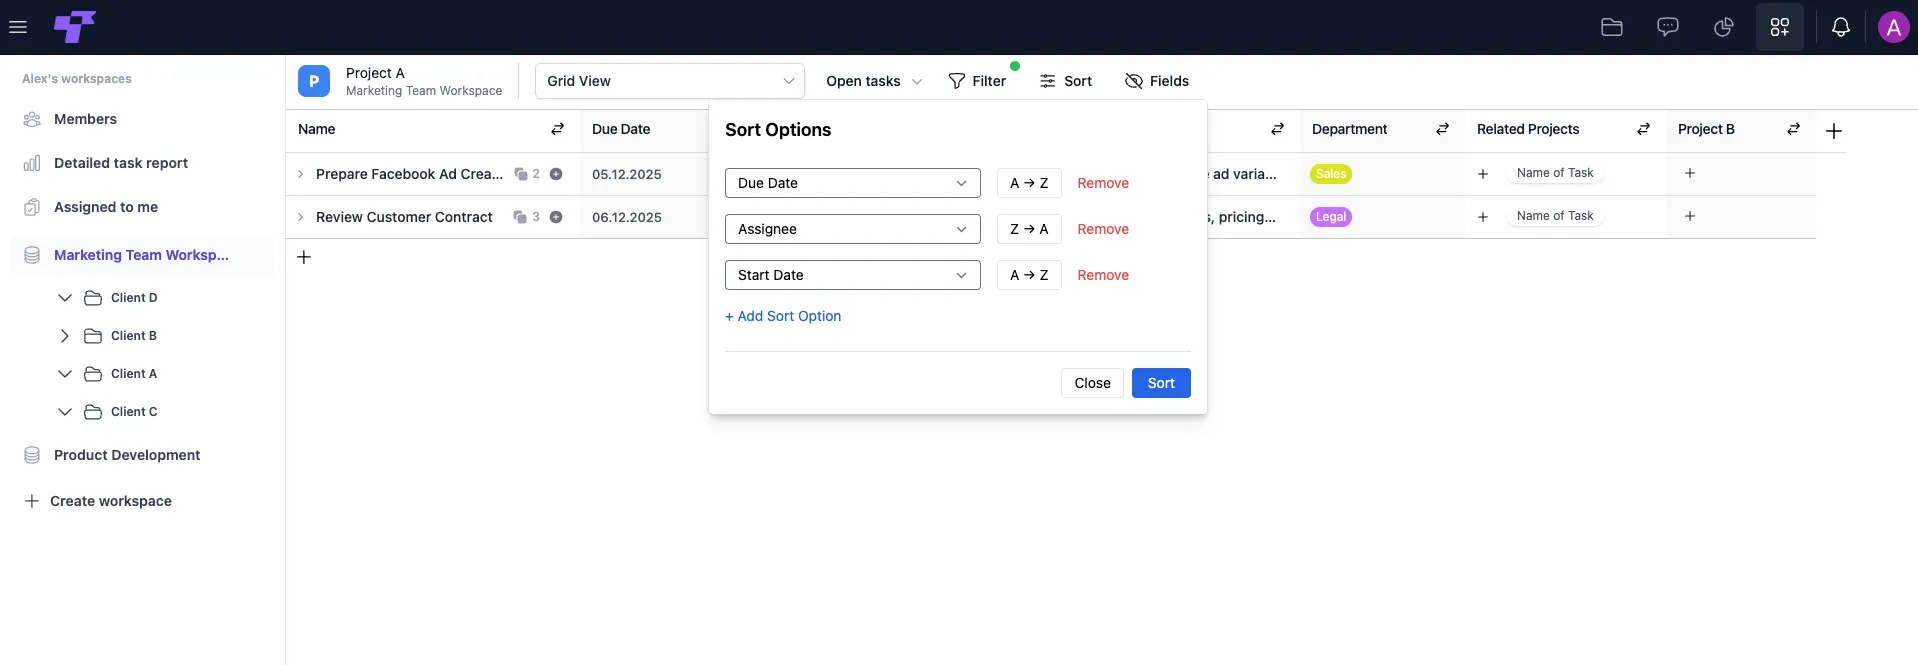
Use the A → Z or Z → A toggles to switch between ascending and descending order. You can add multiple sort conditions for more control.
Click Sort to apply the configuration.
Assigned to me
The Assigned to me section shows all tasks assigned specifically to you, collected across different tables and projects. This acts as your personal task dashboard, helping you stay focused on what’s currently your responsibility.
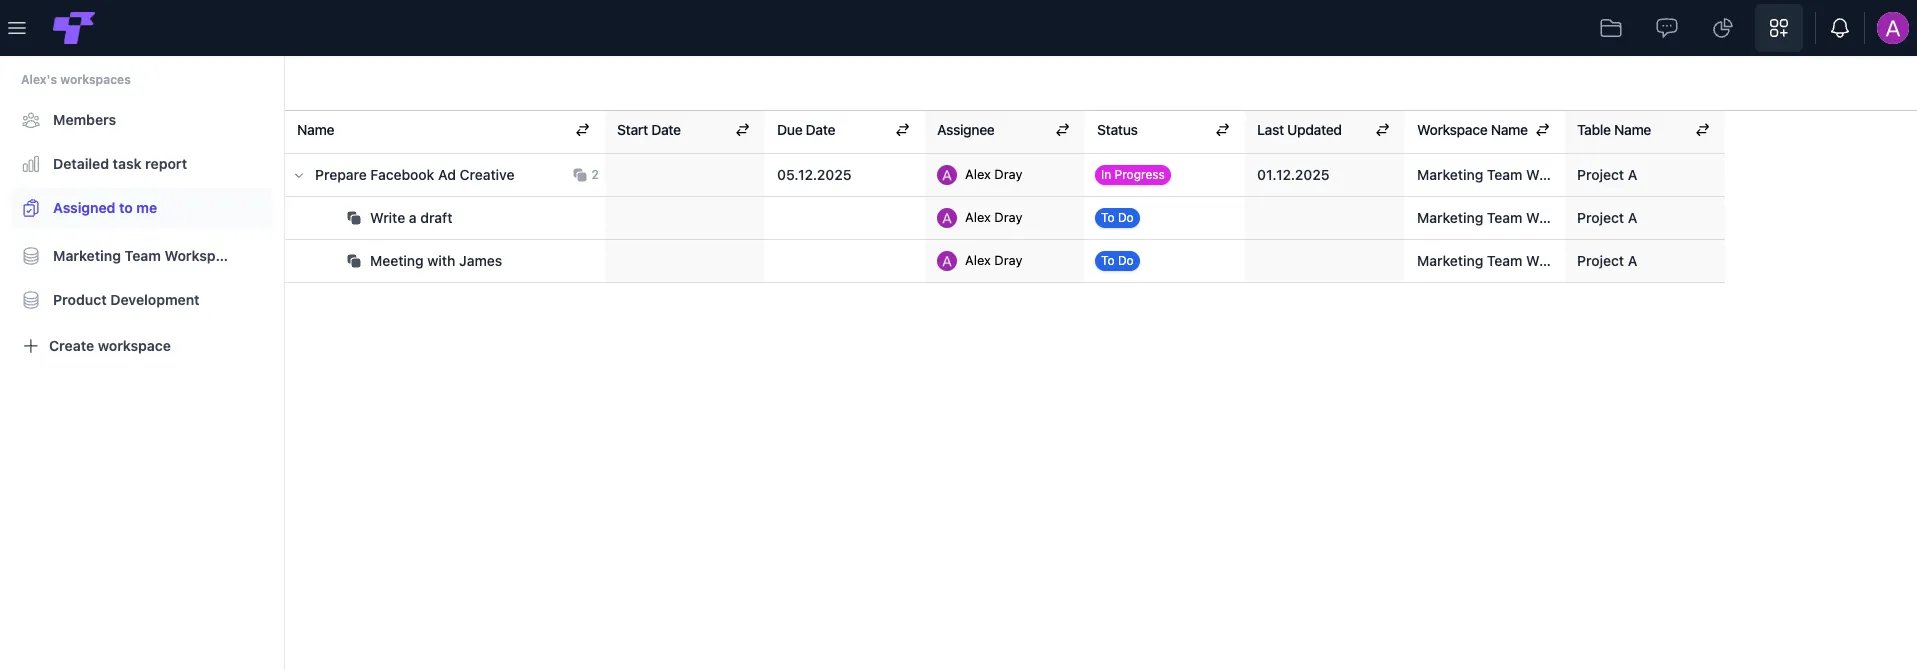
What you can do here
- Track only your work – no distractions from team-wide overviews.
- See deadlines and statuses at a glance, helping you prioritize efficiently.
- Click "Link to table" to jump into the original table or project the task belongs to. (This opens the full context for edits, comments, or navigation.)
Ideal for daily check-ins, status reviews, and personal workload planning.
Kanban View
Kanban View lets you visualize your tasks as cards grouped into columns, typically by status. It’s perfect for tracking progress, managing workflows, or simply getting a quick overview of what's in motion.
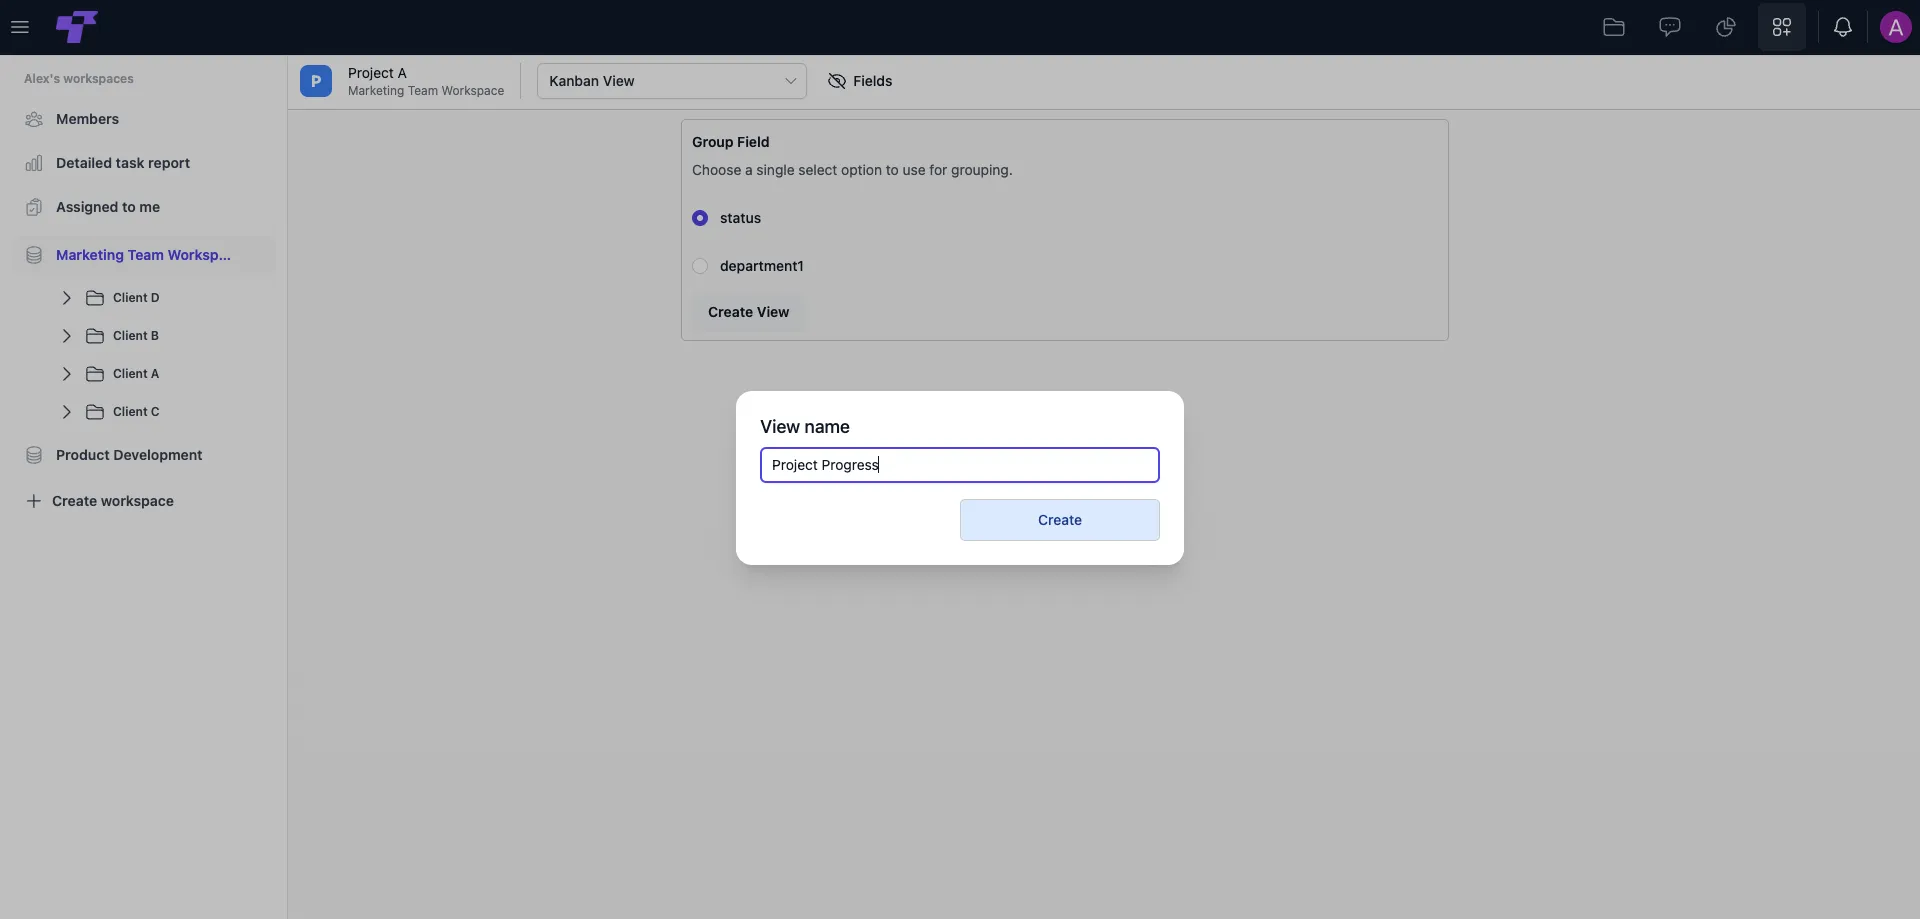
Creating a Kanban view
- Click the dropdown where it says Grid View and select Kanban View.
- When prompted to select a Group Field, choose Status.
- Write a view name and click Create View to generate the board.
Editing the view
Once you've created your Kanban View, you'll see your tasks organized into columns by status – like "To Do", "In Progress", "Completed", etc.
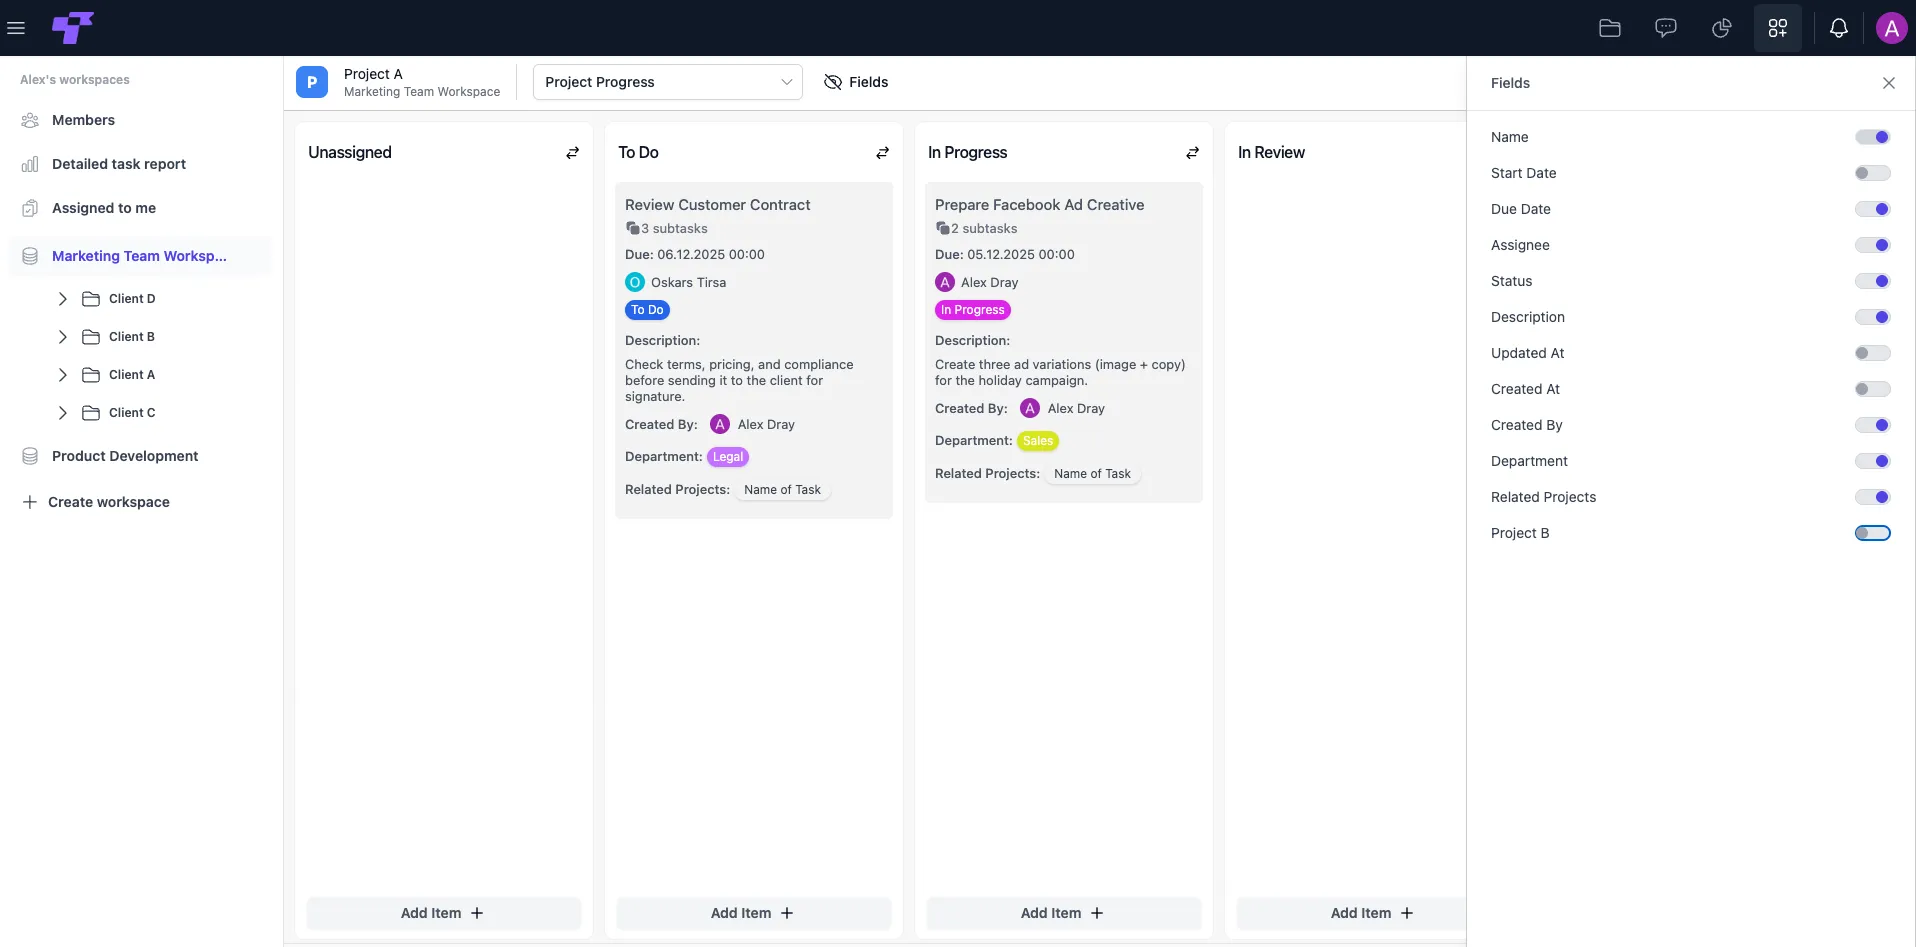
How it works
- Add Section – use the button in the upper right to create new status columns (e.g., "Waiting for Feedback").
- Add Item – add new tasks directly into any column using the Add Item button at the bottom.
- Drag & Drop – simply move tasks between columns to change their status automatically.
- Edit or Delete Sections – click the three-dot icon on a column title to edit or remove that status.
Kanban is perfect for progress tracking and team updates in a clear visual way.