

Admin settings
On this page
Administrators manage the whole Twigex installation under Admin settings. To open them, click your picture or initial at the top right, then Settings. The admin settings are listed on the left below your own settings (see Settings).
Who sees which page depends on their role. The Administrator role sees all of them.
Some features need a Self-hosted license or Enterprise; they're marked with a note.
Setting up a new installation? Follow Set up Twigex first: it walks through the settings you need on day one.
Most pages have a Save button at the bottom right. Changes take effect only after you click it.
People and access
Who can use Twigex, what they can do, and how they sign in.
Users
Users lists everyone with an account, with their storage space, status and role. Type in Search users… to find someone.
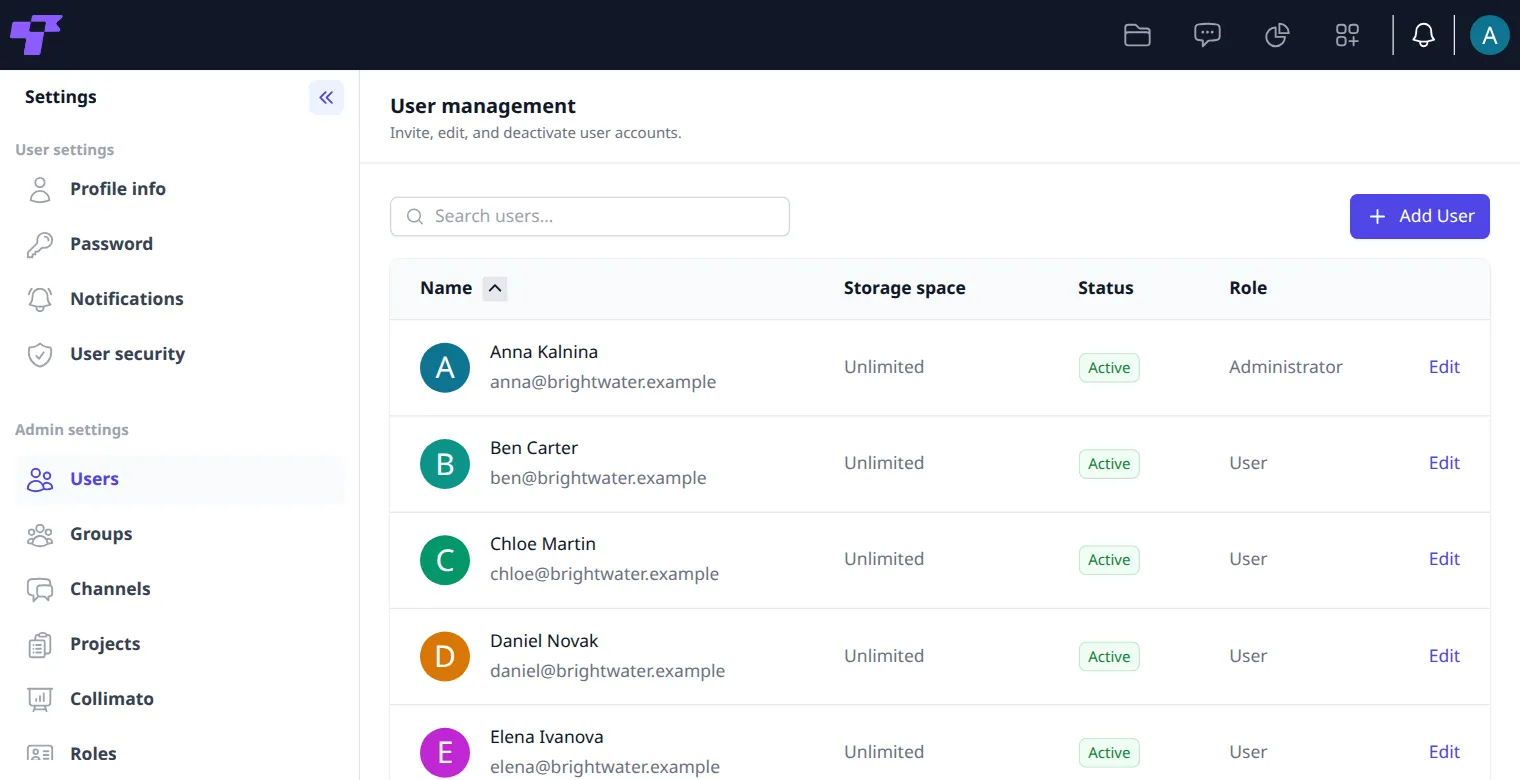
Create a user
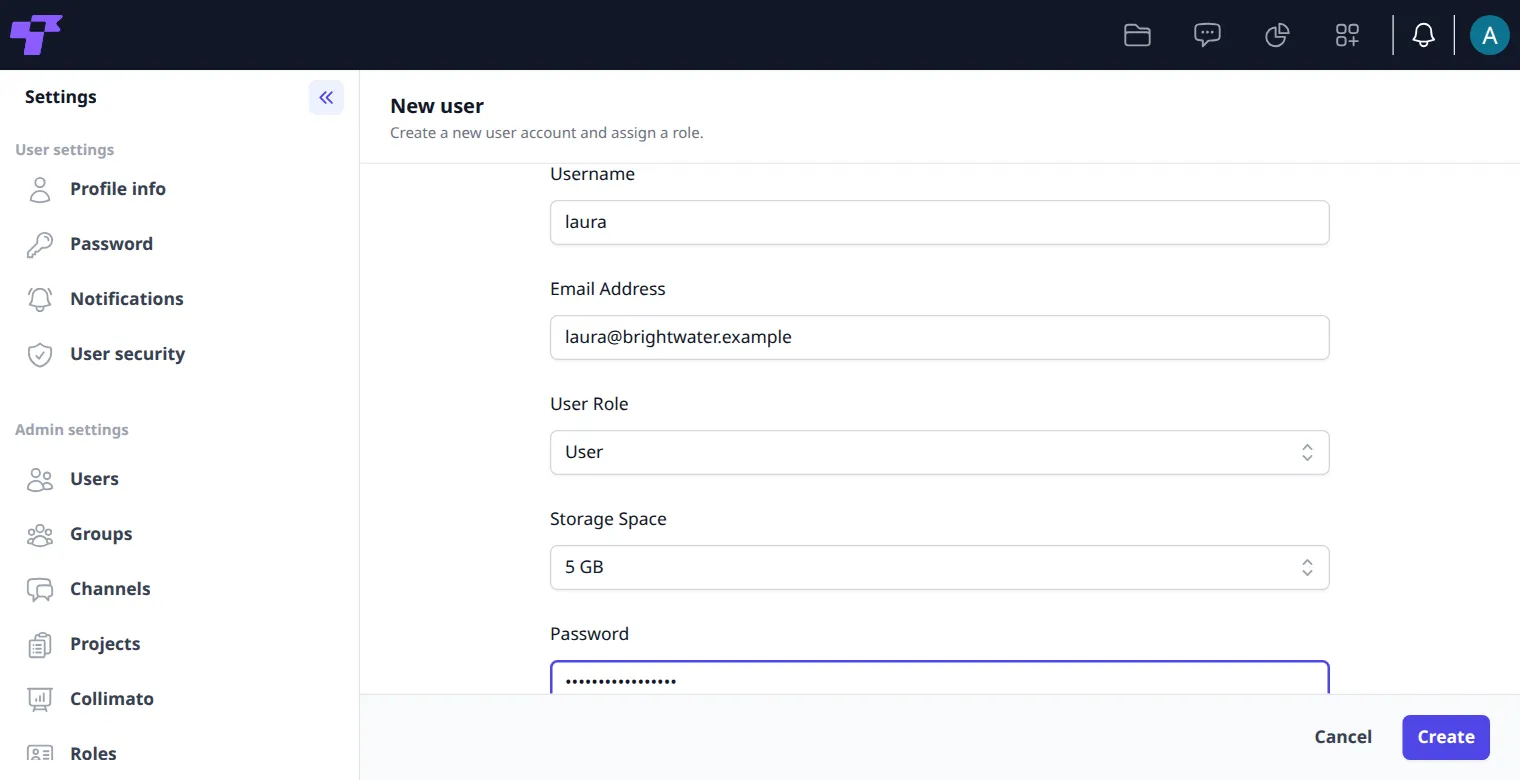
- Click Add User.
- Fill in First Name, Last Name, Username and Email Address.
- Choose the User Role, for example User or Administrator.
- Choose the Storage Space, for example 5 GB or Unlimited.
- Type a Password for the new account, or leave it empty. A password must follow the password policy under Security.
- Click Create.
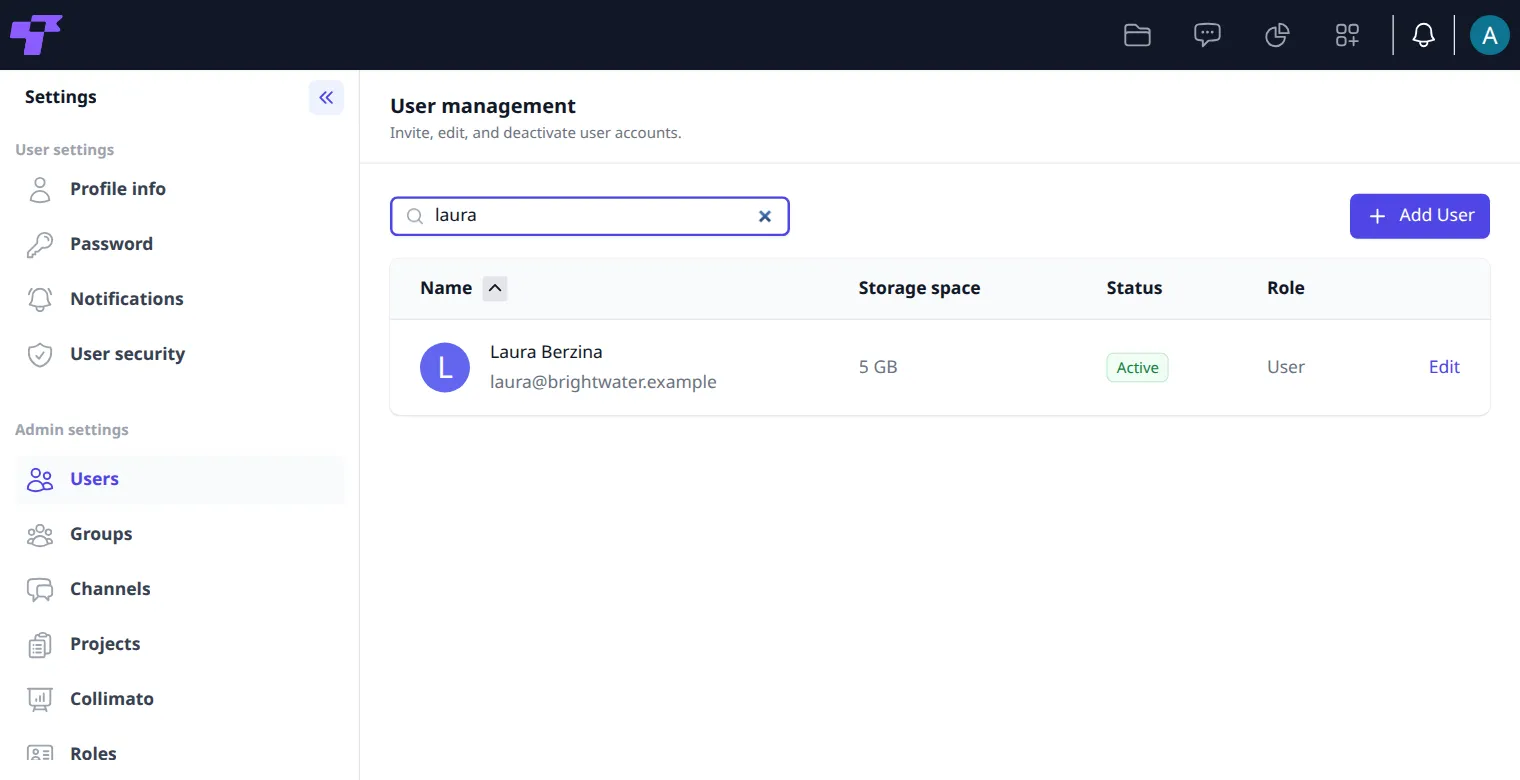
You're done when the new person is in the list with the status Active.
If you left Password empty, Twigex emails the person "Welcome to Twigex! Finish setting up your account!" with a Set Password button, and they choose their own password. This needs the mail server to be set up. Otherwise, give the person their username and password; they can change the password under Settings > Password.
Change or deactivate a user
- Click Edit next to the person.
- Change their details, role or storage space.
- Click Save.
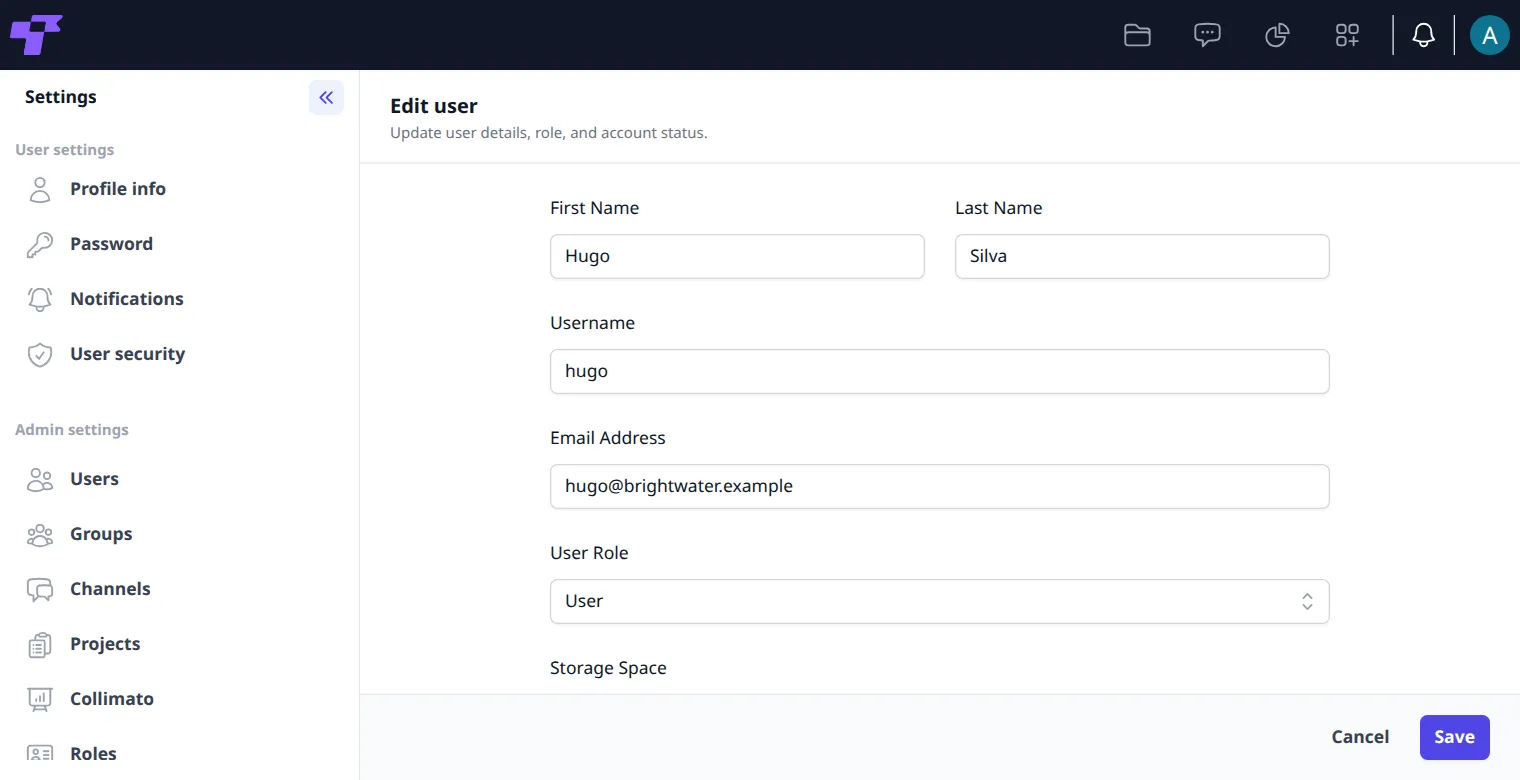
Under Account actions at the bottom of the page:
- Reset Password: sends the person a link to set a new password.
- Sign Out Everywhere: signs the person out on all their devices.
- Deactivate User: stops the person from signing in.
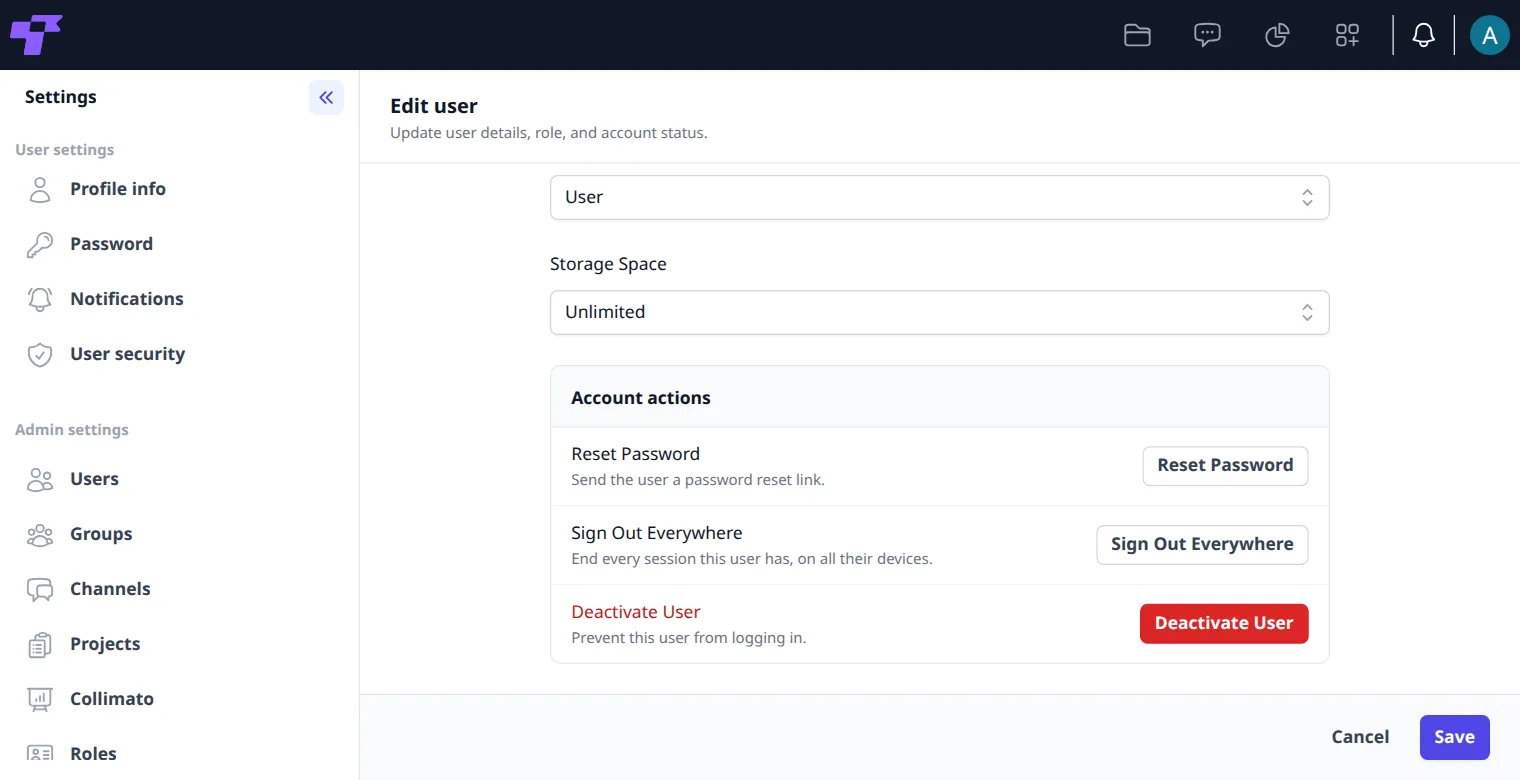
Deactivate User works right away, without asking. The person's status in the list becomes Deactivated, and signing in fails with "Enter a valid email or username and/or password."
To let them in again, click Edit next to them and then Activate User. The status goes back to Active.
Twigex can't delete user accounts. Deactivate people who have left.
Storage space
Storage Space is how much a person can upload in total: 5 GB, 10 GB, 20 GB, 50 GB, 100 GB or Unlimited. When an upload would go over it, the upload fails with "You have reached your storage limit. Please free up space and try again." The person can delete files and empty their Trash, or you can give them more space.
Licensed seats
With a Self-hosted license or Enterprise, the license sets how many active users you can have (Licensed seats on the License page). Deactivated users don't count.
- More users than seats: everything keeps working. Users and License show a warning, for example "You are using 101 of 100 licensed seats." It says that existing users are unaffected and at how many users adding new ones stops, for example 110.
- At the limit in that warning: Create and Activate User fail with "Your plan's user limit has been reached. Deactivate a user or upgrade to add more." Deactivate someone, or add a license with more seats.
Groups
This needs a Self-hosted license or Enterprise. See plans.
Groups let you add several people at once to files, channels and projects. A group can also give its members extra system roles (see Roles).
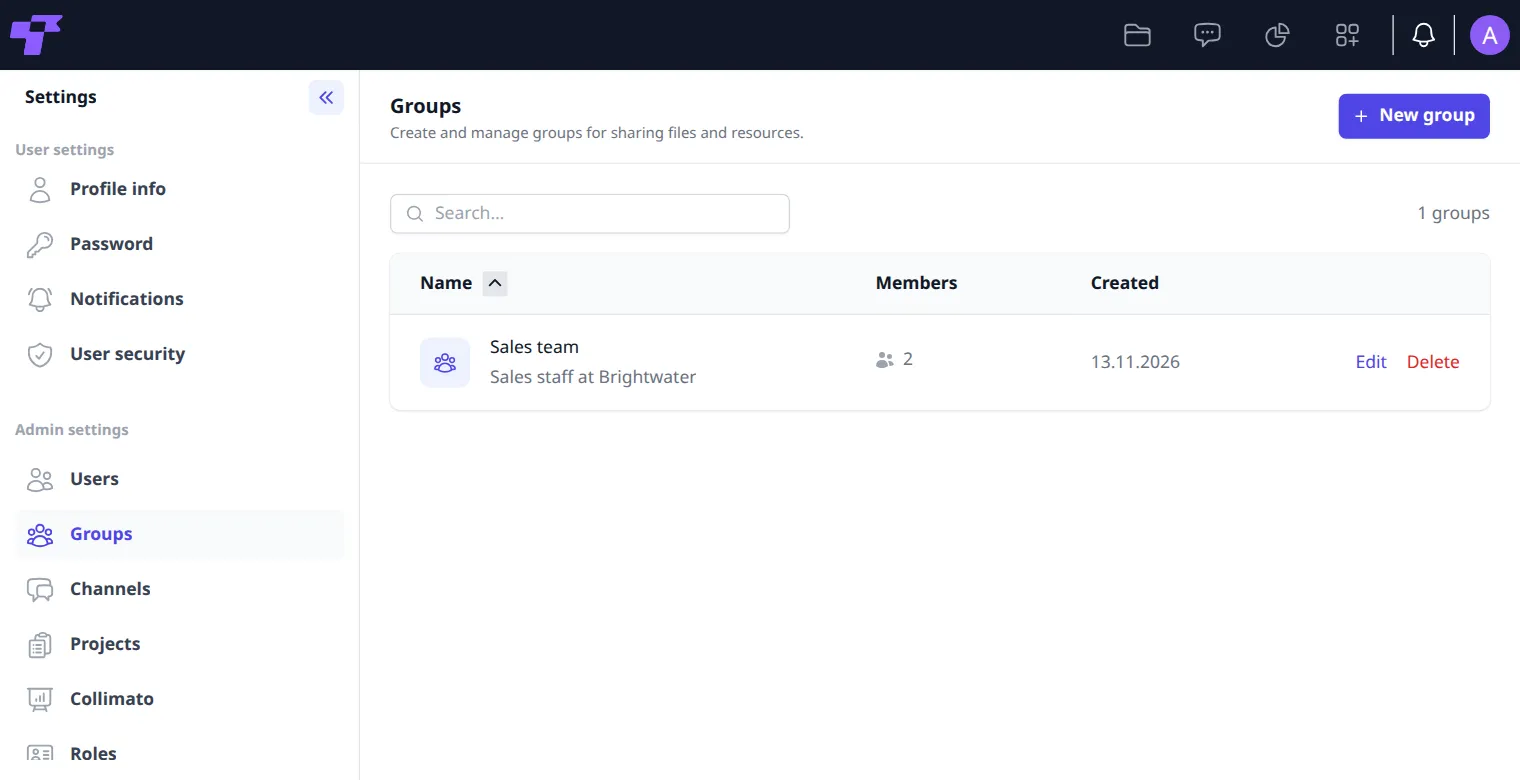
To create a group:
- Click New group.
- Type a Name and, optionally, a Description.
- Optionally, under System roles, tick the roles every member gets in addition to their own.
- Click Create. The group's page opens.
- Click Add members, search for people, click each one and click Add.
Members are saved as soon as you add them. To take someone out, click Remove next to them. To open a group again, click Edit next to it.
For example, a group with a role that has Manage channels gives its members Admin settings > Channels. When the group is deleted, they lose it again.
To delete a group, click Delete next to it and confirm with Delete. As the dialog says, files shared with the group are no longer shared with its members.
Roles
This needs a Self-hosted license or Enterprise. See plans.
Roles shows the roles people can have in Twigex and how many permissions each one has. There are two built-in roles:
- Administrator: full access. It isn't held back by any permission.
- User: the default role for everyone.
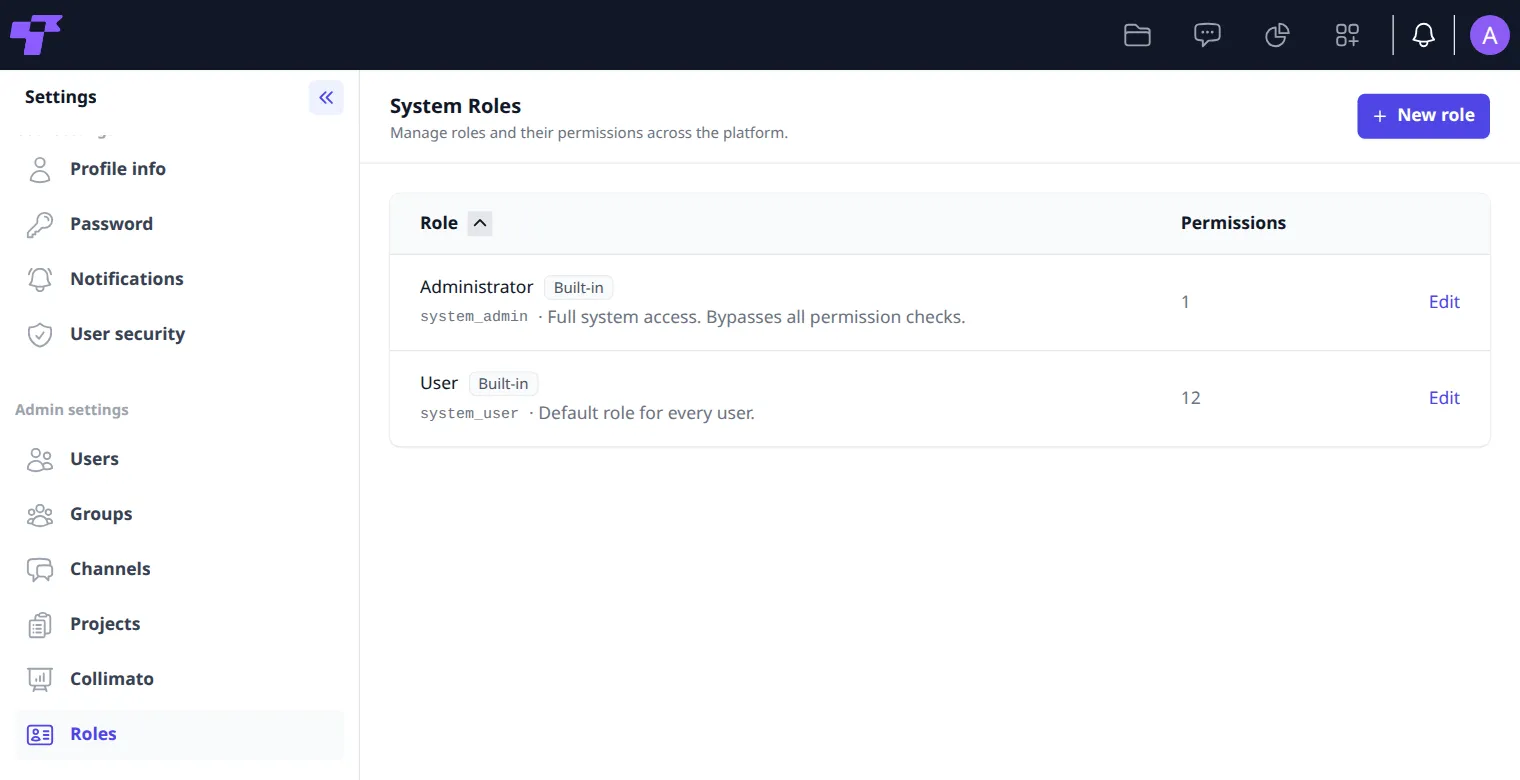
You can change the permissions of the built-in roles, but not rename or delete them.
Create a role
- Click New role.
- Type a Display name, for example
Limited user. - Type a Name (ID), for example
limited_user. Use only lowercase letters, numbers, underscores and hyphens. It can't be changed later. - Optionally, add a Description.
- Tick the permissions. Select all ticks a whole section.
- Click Create.
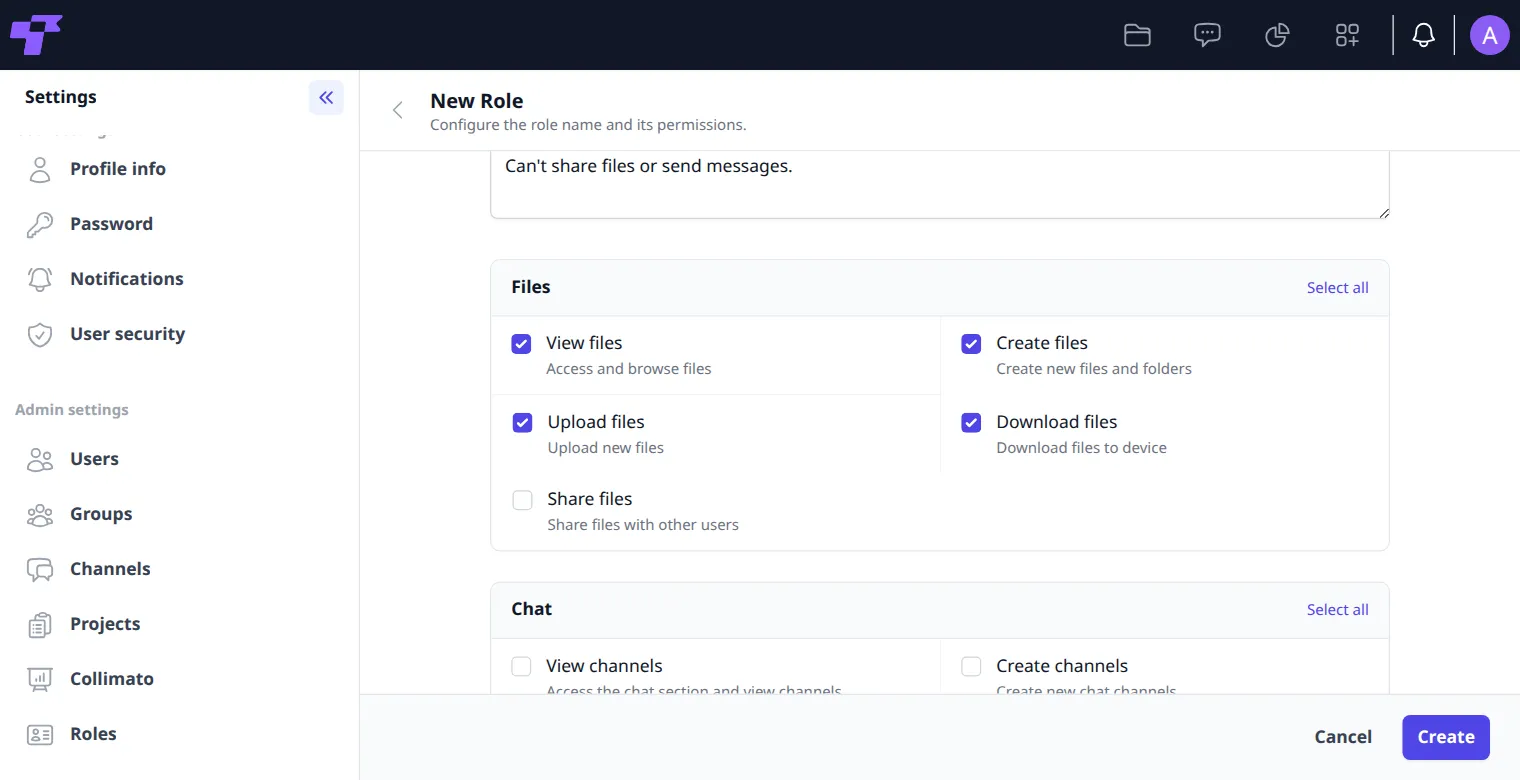
The permissions, section by section, as the form shows them:
- Files: View files, Create files, Upload files, Download files, Share files.
- Chat: View channels, Create channels, Send messages, Upload files in chat.
- Administration: Create users, Delete users, Edit users, Manage roles, Manage channels, Archive channels, Delete channels.
- Collimato (Analytics): View Collimato, Create workspace, Manage workspaces.
- Projects: View projects, Create project, Manage workspaces.
The User role has every Files and Chat permission, plus View Collimato, View projects and Create project. For example, a Limited user role with the same permissions except Share files and Send messages takes Share out of the person's right-click menu in Files.
Give someone a role
- Under Users, click Edit next to the person.
- Choose the role under User Role.
- Click Save.
A person has one role. To give someone more, add them to a group with extra system roles. A change reaches the person when they reload Twigex.
Change or delete a role
- Change: click Edit next to the role, change the permissions and click Update.
- Delete: click Delete next to the role and confirm with Delete.
Before you delete a role, give everyone who has it another role. People left with a deleted role lose all their permissions and see only their own settings.
Authorization
Authorization sets how people sign in.
- Email & Password: people sign in with their Twigex username or email and password.
- LDAP / Active Directory: sign in against your company directory. Needs a Self-hosted license or Enterprise.
- OpenID Connect (SSO): sign in with another provider, such as Google or GitLab. Needs a Self-hosted license or Enterprise.
- Show SSO Buttons First: on the sign-in page, show the provider buttons above the email and password form.
Tick the methods you want and click Save.
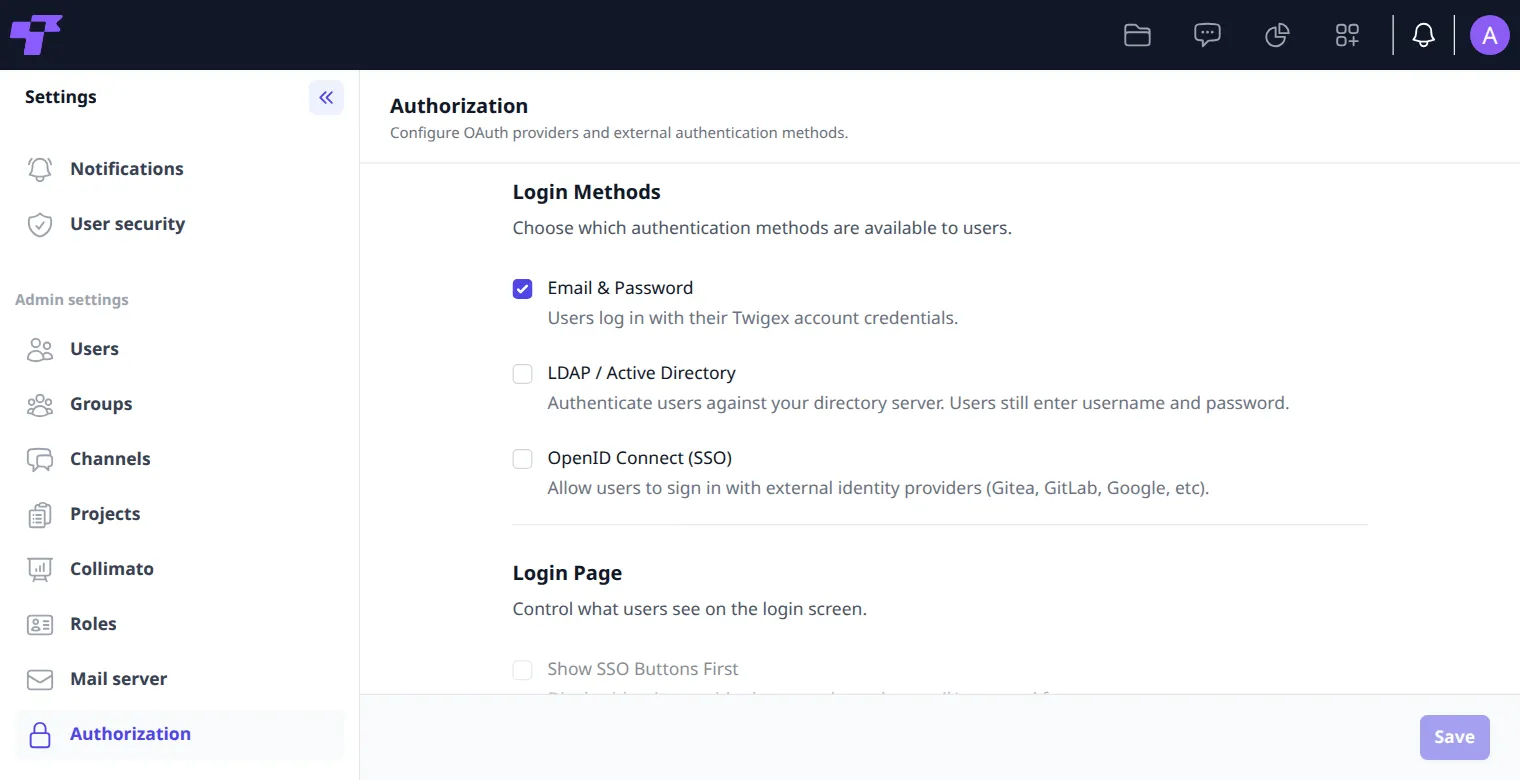
If you untick every method, the page warns "No login methods are enabled. Users will be locked out.", and Save fails with "At least one login method must be enabled."
Single sign-on (OpenID Connect)
This needs a Self-hosted license or Enterprise. See plans.
From your identity provider (for example Google, GitLab or Gitea), you need a client ID and secret for Twigex, and the provider's discovery URL. To get the client ID and secret, register Twigex's Redirect URL with the provider.
- Tick OpenID Connect (SSO).
- Click + Add Provider.
- Copy the Redirect URL with Copy and register it with your identity provider. It ends with the provider's own ID, for example
https://twigex.example.com/api/auth/oidc/callback/2f305fbb…. - Fill in the form:
- Name: shown in the list, for example
Brightwater SSO. - Discovery URL: the provider's
/.well-known/openid-configurationaddress. - Client ID and Client Secret: from your identity provider.
- Scopes: comma-separated. Leave
openid,profile,emailunless your provider needs others. - Button Text: the text on the sign-in page. Empty means "Login with" and the name.
- Button Color: the button's color.
- Enable provider: shows the button on the sign-in page.
- Name: shown in the list, for example
- Click Add Provider. The provider is saved at once and listed as Active.
- Click Save.
The sign-in page now shows the button below Or continue with (see Getting started). Each provider in the list has Disable, Edit and Delete. Delete asks you to confirm.
Twigex doesn't check the provider when you save. Sign in with the new button once to make sure it works.
LDAP / Active Directory
This needs a Self-hosted license or Enterprise. See plans.
From your directory administrator, you need the server's address, an account Twigex can search with (bind DN and password), the base DN to search under and the attribute names your directory uses.
- Tick LDAP / Active Directory.
- Fill in LDAP Configuration:
- Host and Port (389, or 636 for TLS) of the directory server, and Timeout (seconds) (10).
- Base DN: where to look for people, for example
dc=example,dc=com. - Bind DN and Bind Password: the account Twigex searches with.
- User Filter: how to find a person, for example
(uid={0}). - Username attribute (for example
uid) and Unique ID attribute (entryUUIDon OpenLDAP,objectGUIDon Active Directory). - Email Attribute, First Name Attribute and Last Name Attribute (for example
mail,givenName,sn). - Allowed Groups: only members of these groups can sign in. Separate several group DNs with
|. Leave empty to allow everyone. - Connection security: None (unencrypted), TLS (ldaps) or StartTLS.
- Click Test connection.
- Click Save.
People then sign in on the usual sign-in page with their directory username and password. Twigex accounts with a password keep working.
Synchronise users with the directory checks the directory on a schedule and deactivates accounts that are no longer in it. It never creates or deletes accounts, and reactivates people who come back. When you tick it:
- Every (minutes): how often to check, from 5 to 1440 (60).
- Deactivation limit (%): if one check would deactivate more than this share of your directory users (20), it stops and only logs it, since the search is more likely wrong than that many people left. At least 5 accounts are always allowed.
- Synchronise now starts a check.
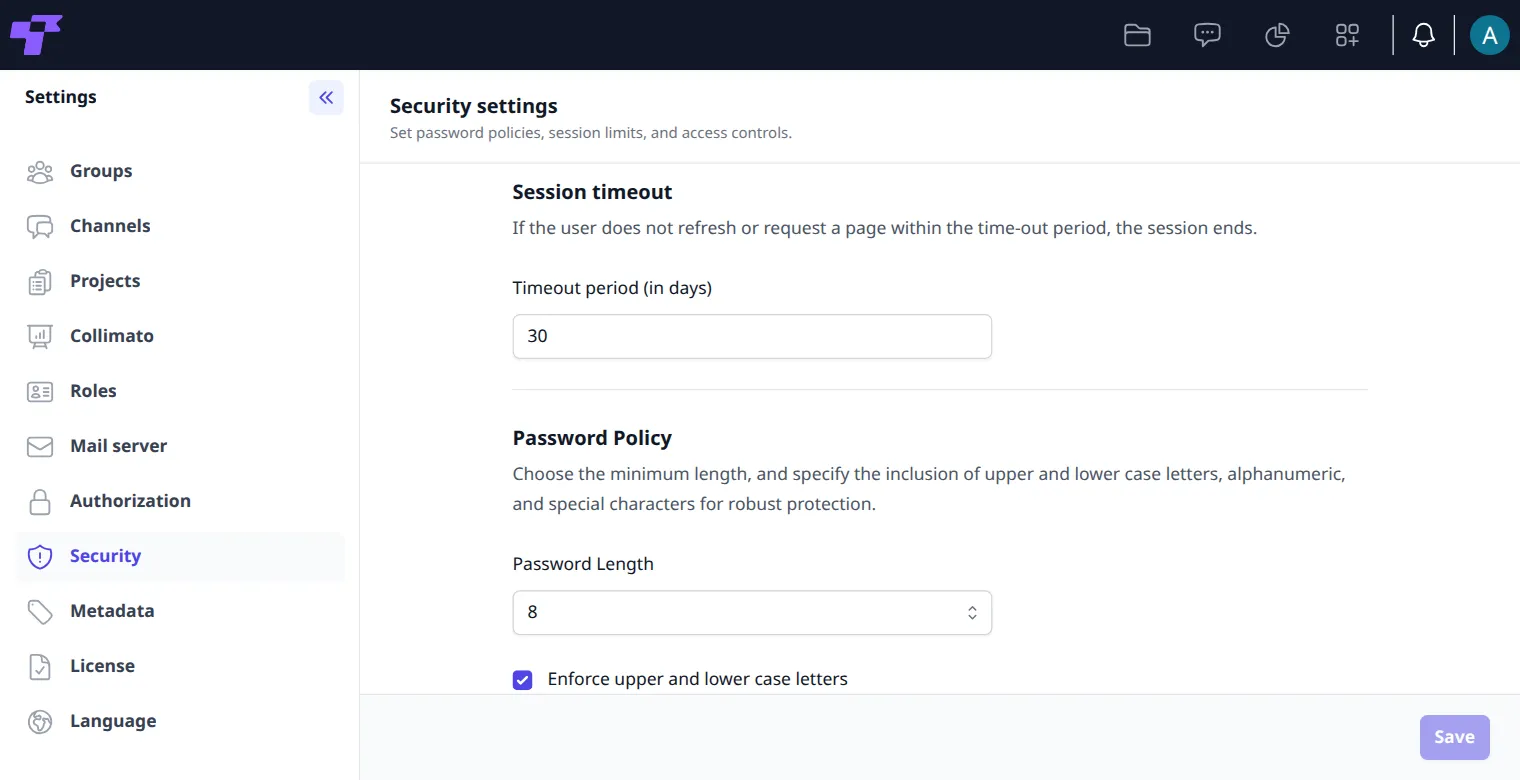
Security
Session length
Under Session timeout, the Timeout period (in days) is how long a person can stay away before they have to sign in again. Type the number of days and click Save.
Password policy
Under Password Policy, choose the minimum Password Length (8 to 30), and whether passwords need upper and lower case letters, digits and special characters. Click Save.
The rules apply to new passwords: on Settings > Password and on the page for setting a new password from a reset link, which lists them, for example "Password must be at least 12 characters long".
Apps
Settings for Chat, Projects, Analytics and file metadata.
Channels
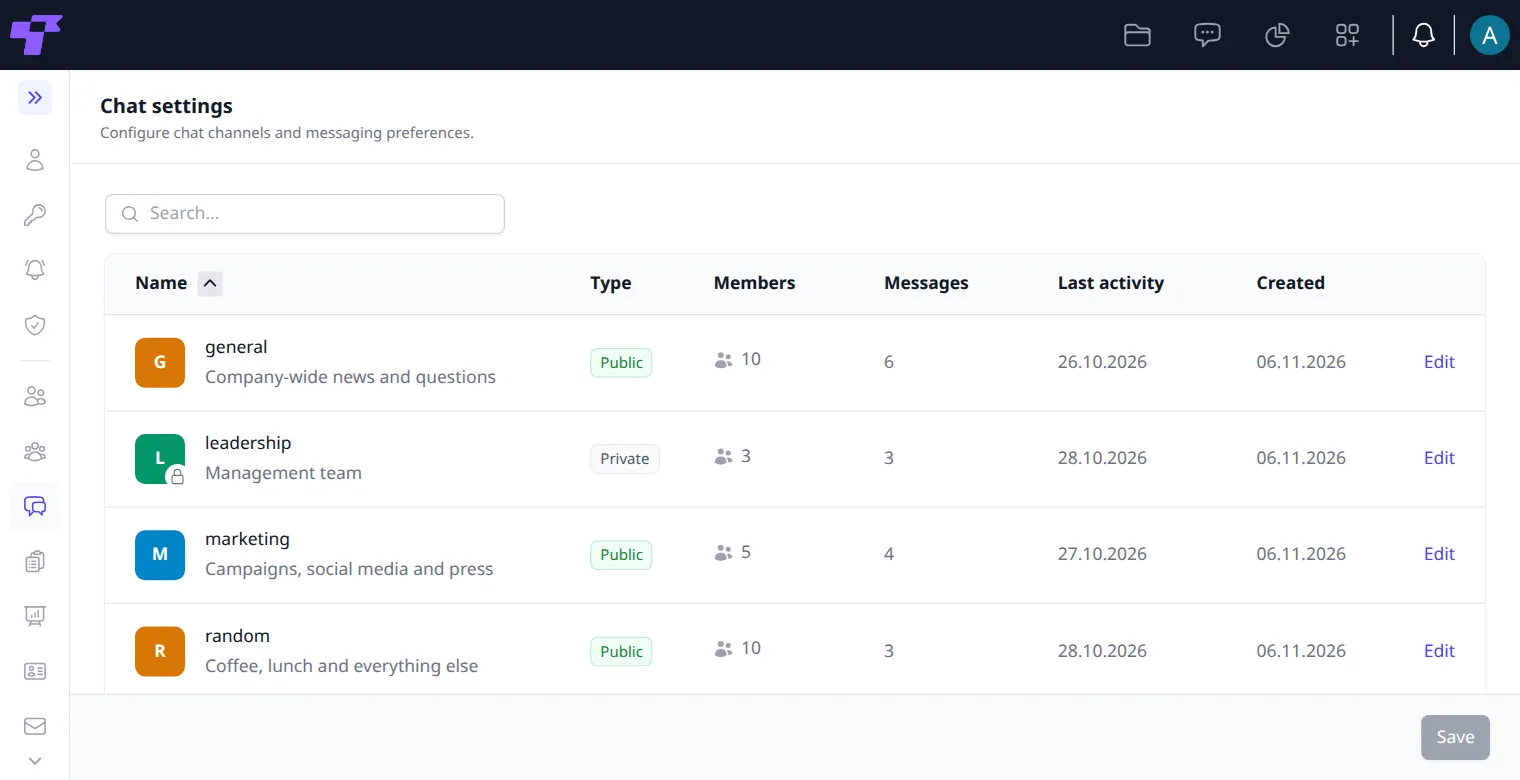
Channels opens Chat settings: every chat channel, with its type, members, number of messages, last activity and creation date. Type in Search… to find one.
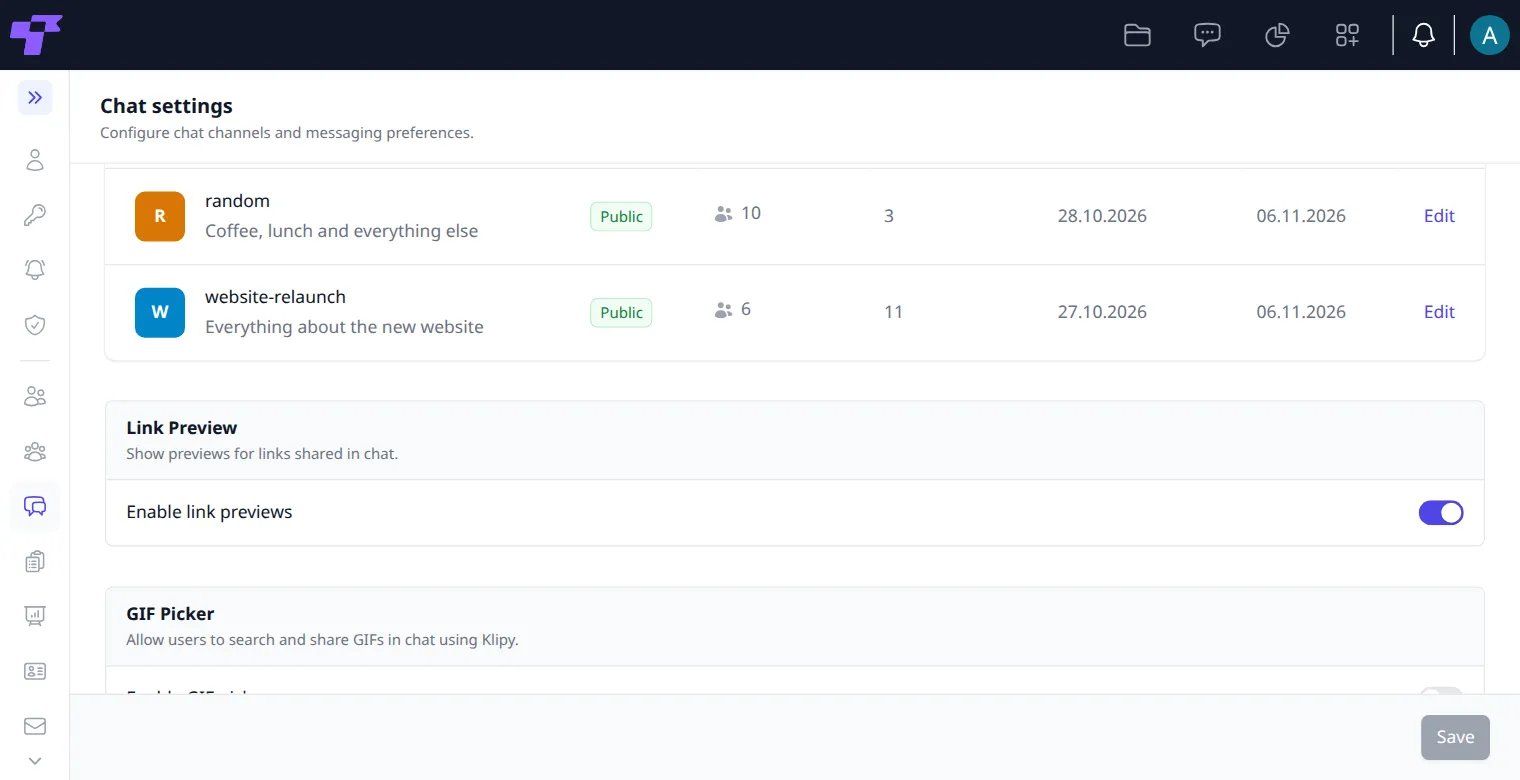
Further down the page are the settings for Chat as a whole:
- Link Preview: Enable link previews shows a preview of web pages people link to in Chat.
- GIF Picker: Enable GIF picker lets people search and send GIFs. It needs an API key from Klipy.
- Video Conferencing: the LiveKit server that runs video meetings and calls.
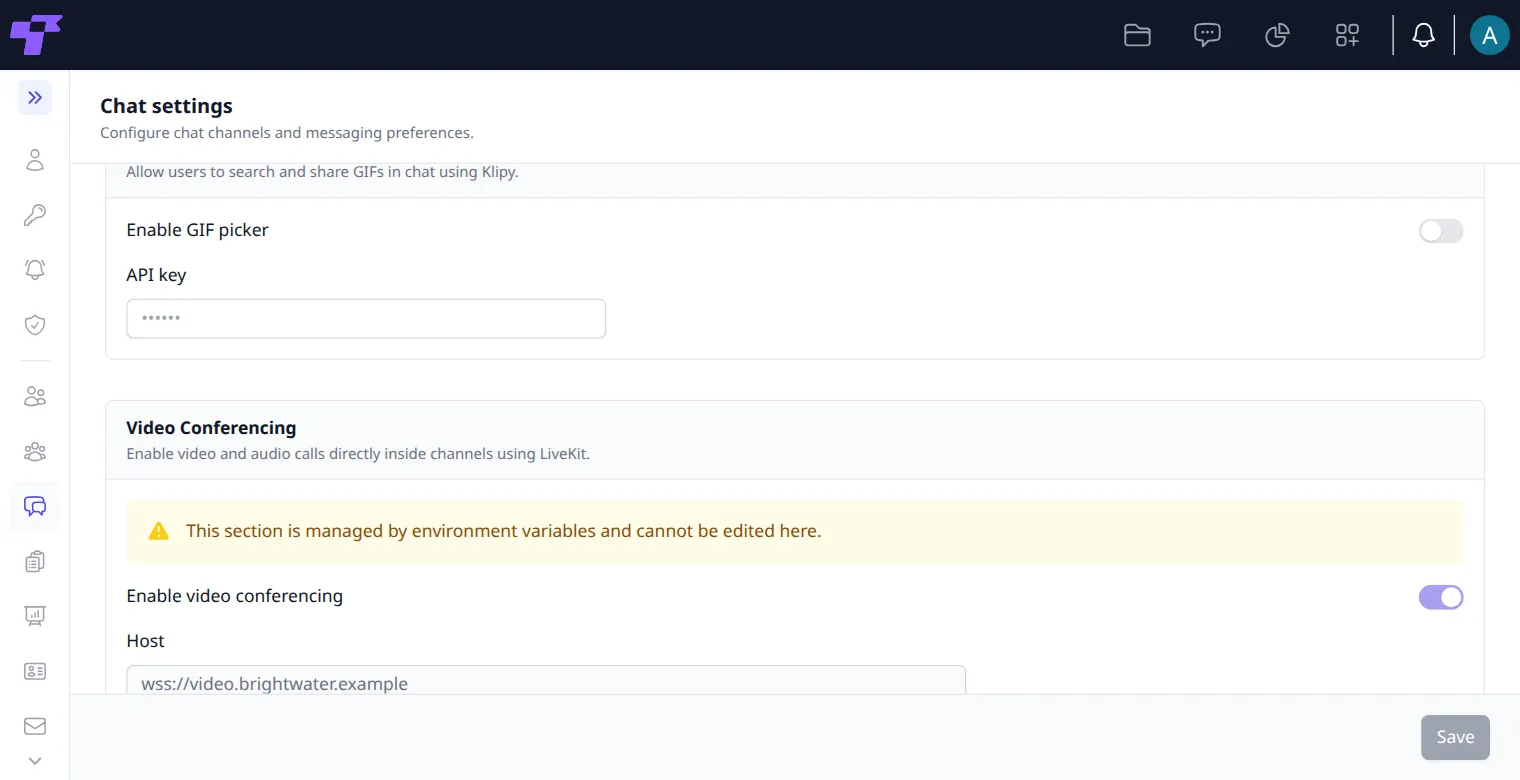
If a section says This section is managed by environment variables and cannot be edited here, its values come from the server's configuration. Change them there.
Manage a channel
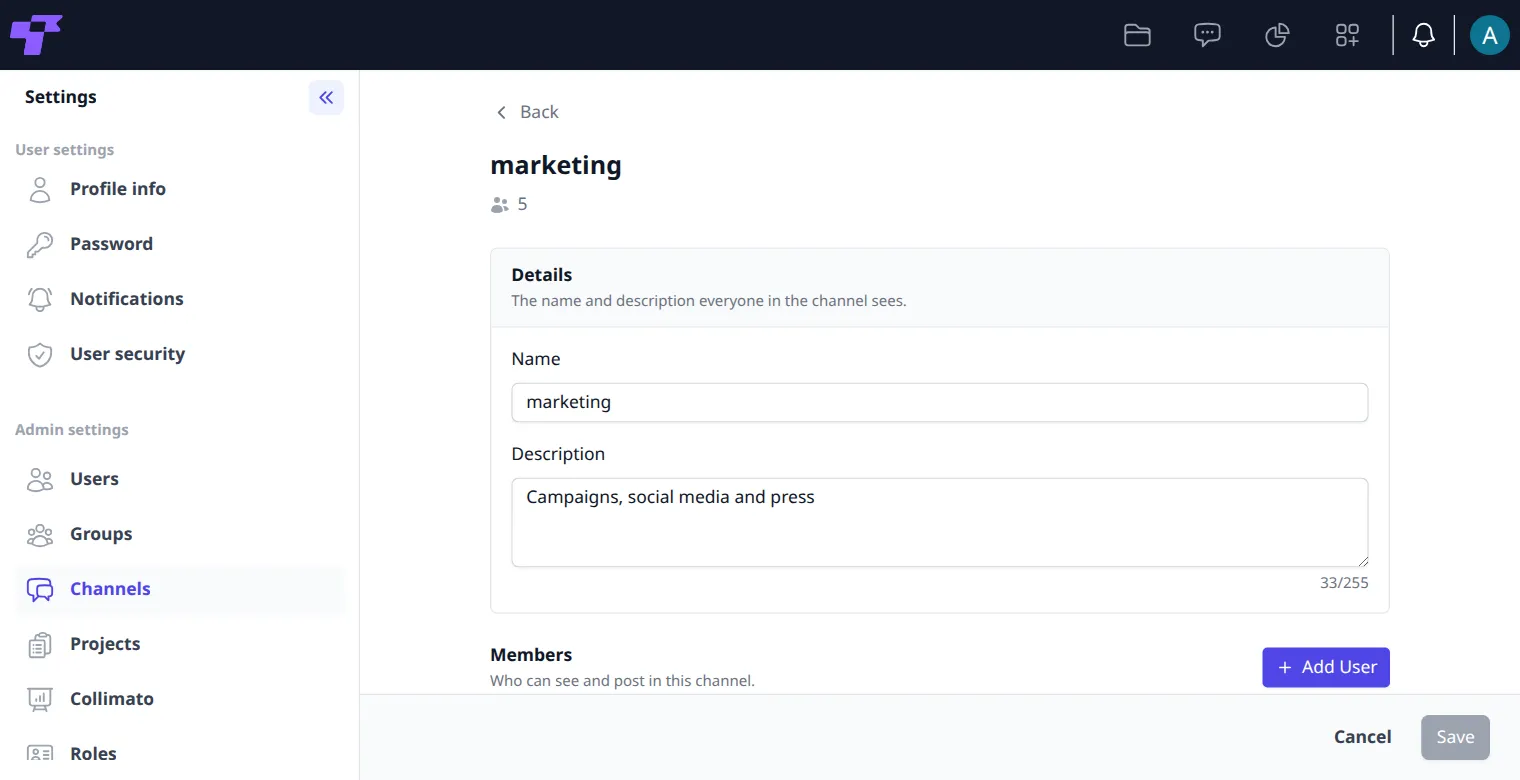
- Click Edit next to the channel.
- Under Details, change the Name or Description.
- Under Members, click Add User to add people, choose member or admin next to a person, or click Remove.
- Click Save.
At the bottom of the page, under Actions:
- Archive: closes the channel to new messages. Its history stays readable. Confirm with Archive channel. The channel is then marked Archived in the list.
- Unarchive: shown instead of Archive for an archived channel. Confirm with Unarchive channel. The channel is back in Chat for its members.
- Delete: removes the channel and everything posted in it. Confirm with Delete permanently.
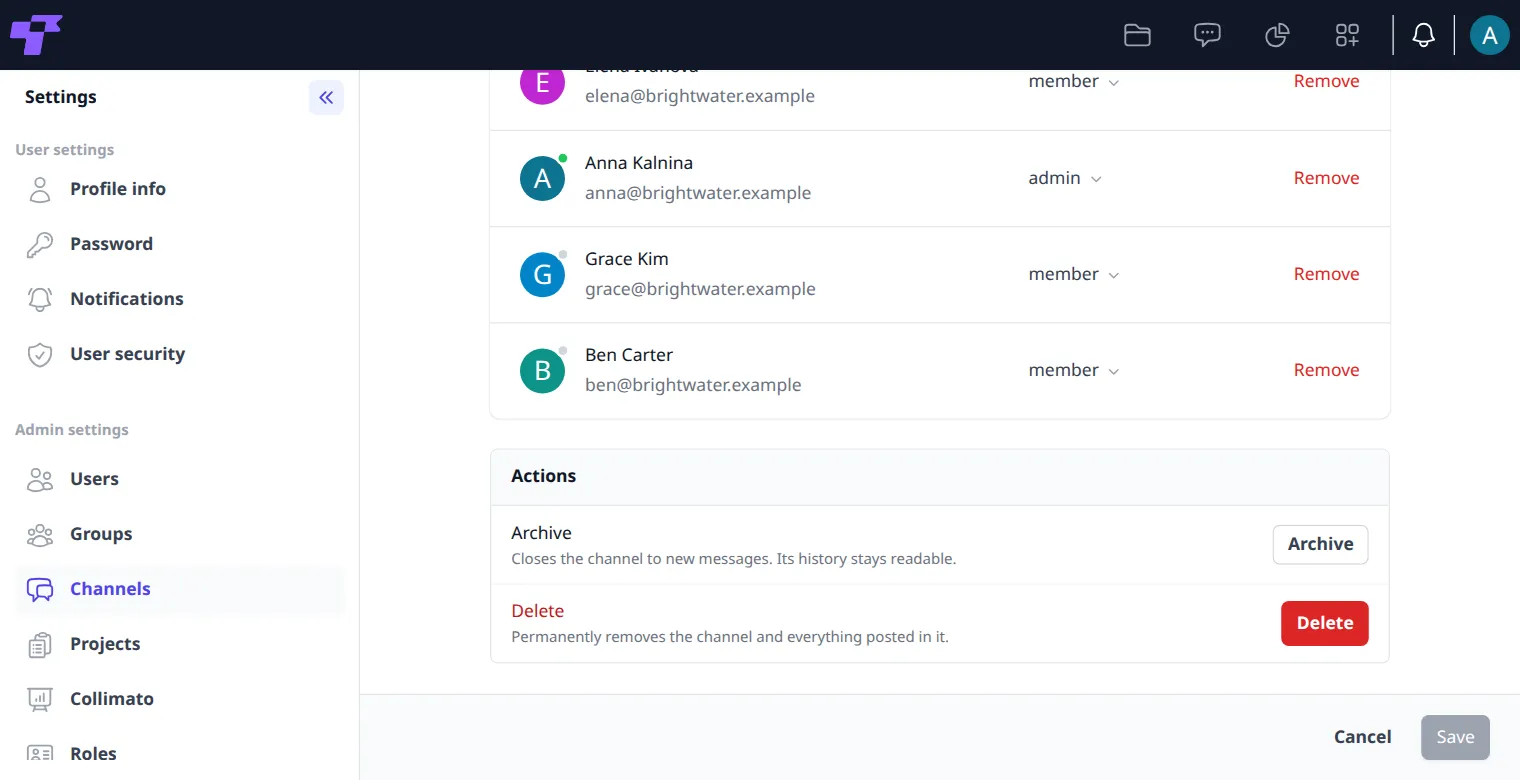
Deleting a channel removes every message and file in it for good.
Projects
Projects lists all projects with their members, groups, tables and creation date. Click Edit to change a project's name and description, add or remove members and change their roles.
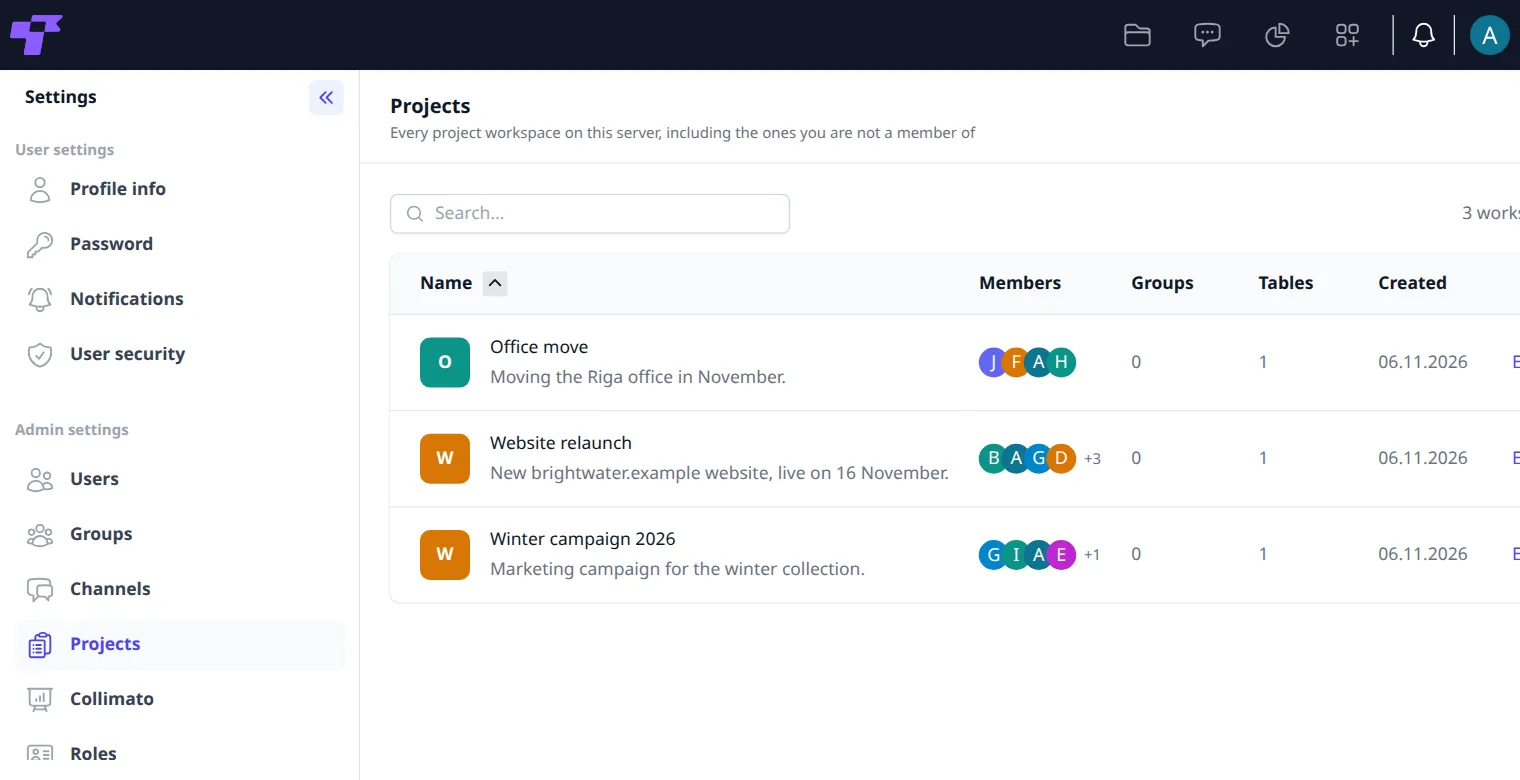
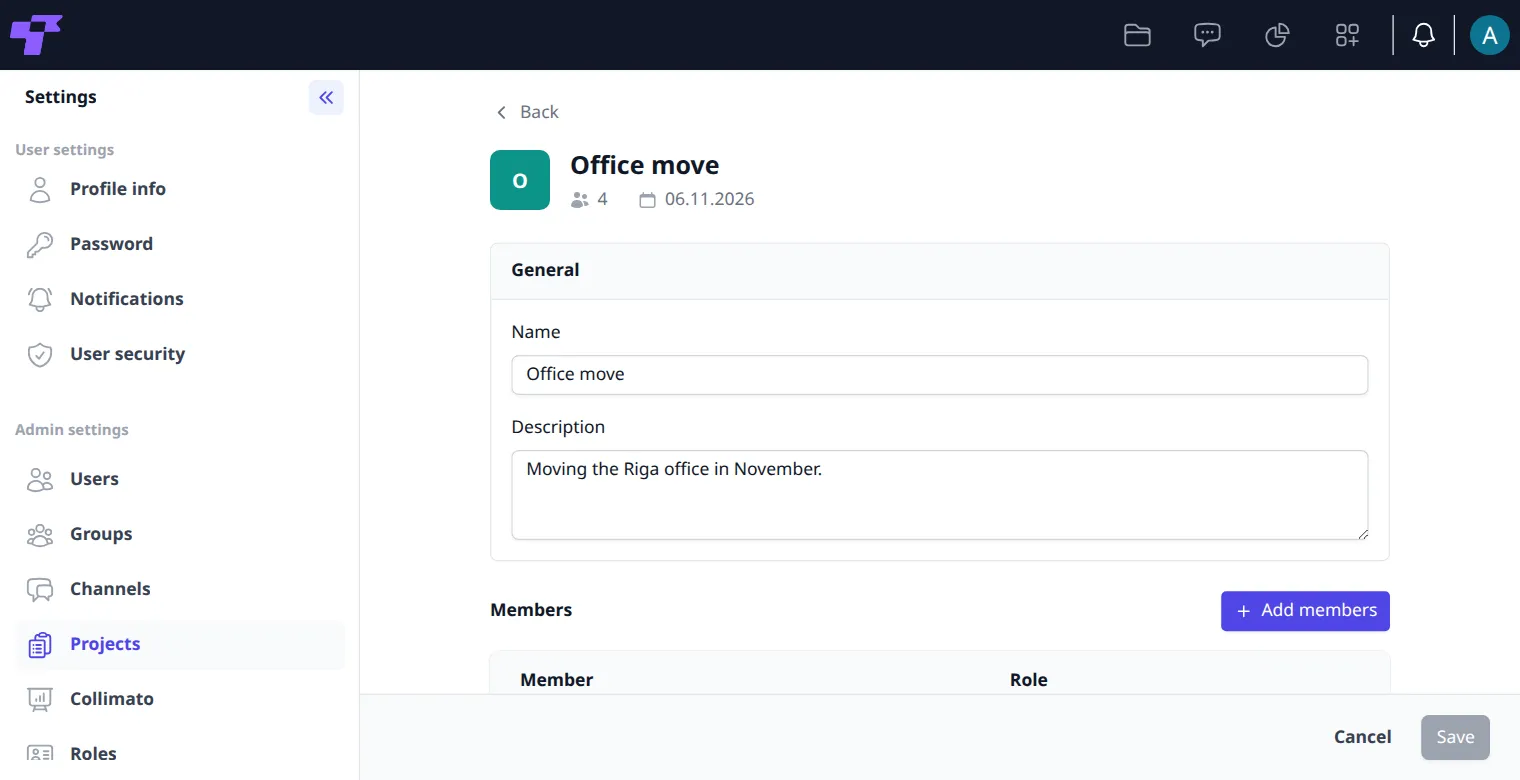
On a project's page:
- Name and Description: change them and click Save.
- Members: Add members adds people right away. Edit changes a member's role, and Remove takes them out.
- Groups: Add groups gives a whole group access.
Click Save before you add members. Adding a member is saved at once, and unsaved changes to the name and description are lost.
To delete the project, click Delete under Delete workspace at the bottom of the page and confirm with Delete. Its tables, tasks and files are deleted too.
Deleting a project can't be undone.
Analytics
Analytics (shown as Collimato in the menu) lists the Analytics workspaces with their members, including the ones you aren't a member of. Click Edit to change a workspace's name and description, manage its members and their roles, or delete it.
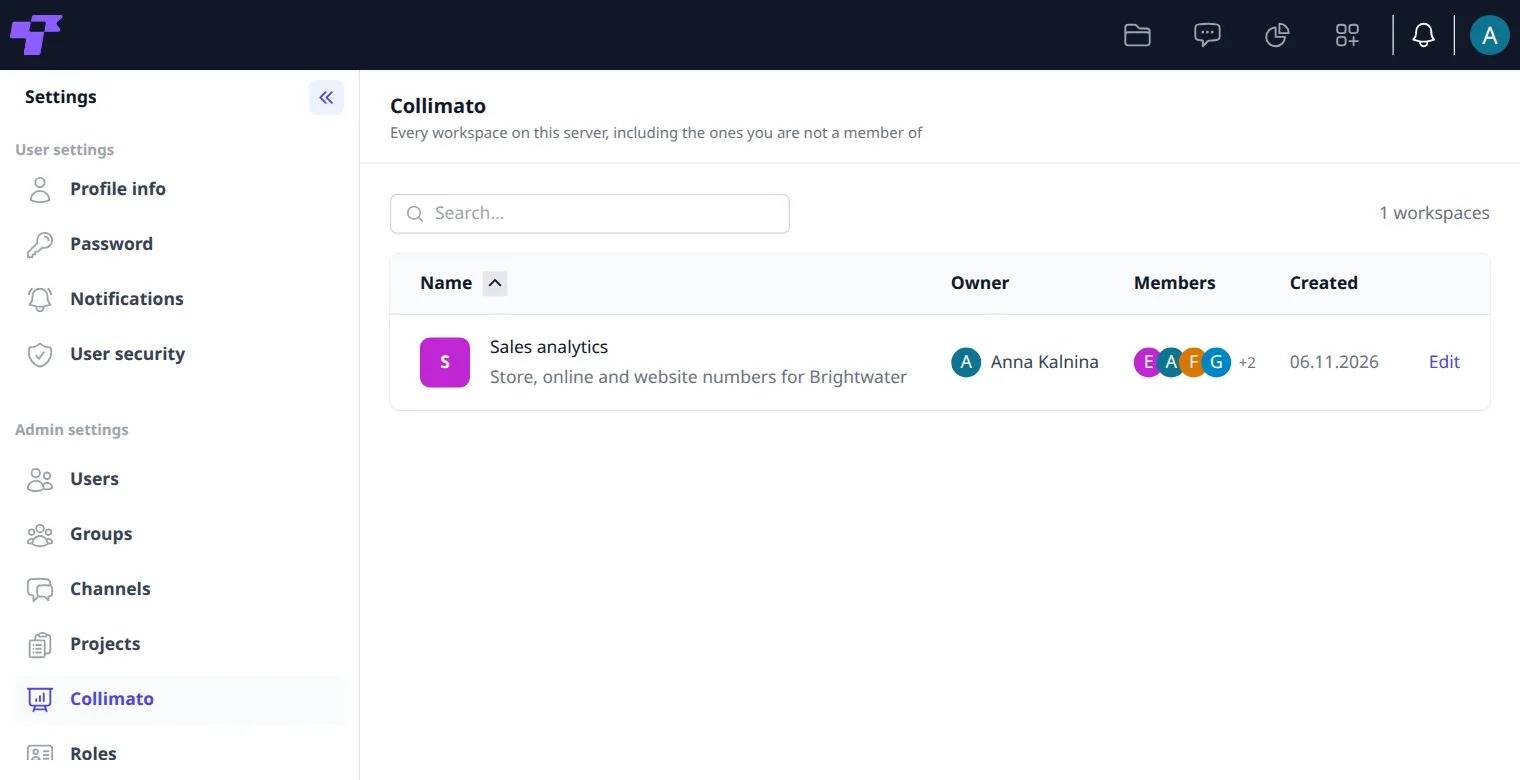
On a workspace's page:
- Name and Description: change them and click Save.
- Members: Add members, Edit a member's roles, or Remove them.
- Groups: Add groups gives a whole group access.
- Delete workspace: click Delete and confirm with Delete. Its connections, models, charts and dashboards are deleted too.
New workspaces are created in Analytics itself (see Set up Analytics).
Deleting a workspace can't be undone.
Metadata
Metadata are extra fields people can add to files, for example a project code or a colored label (see "Add metadata" in Files).
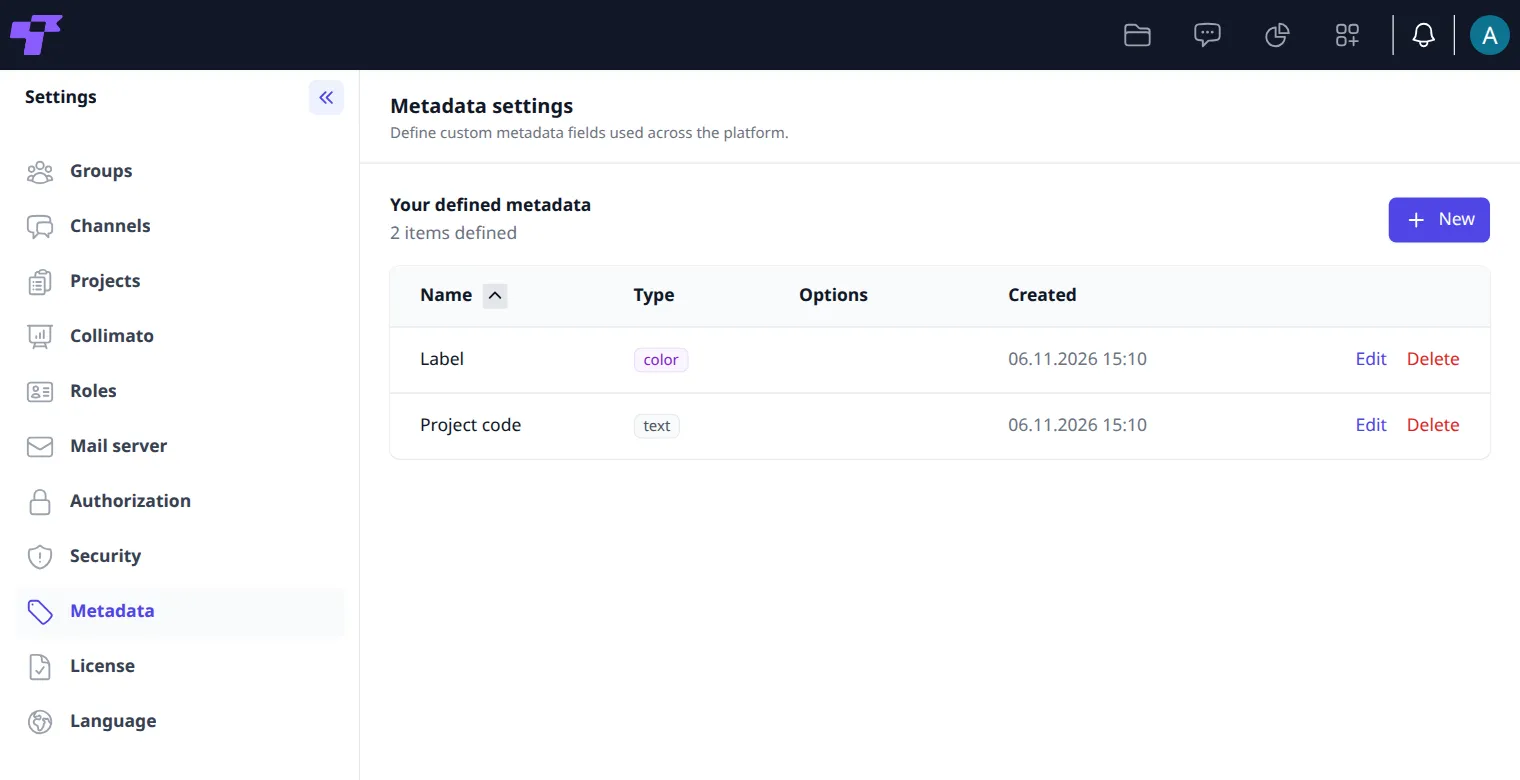
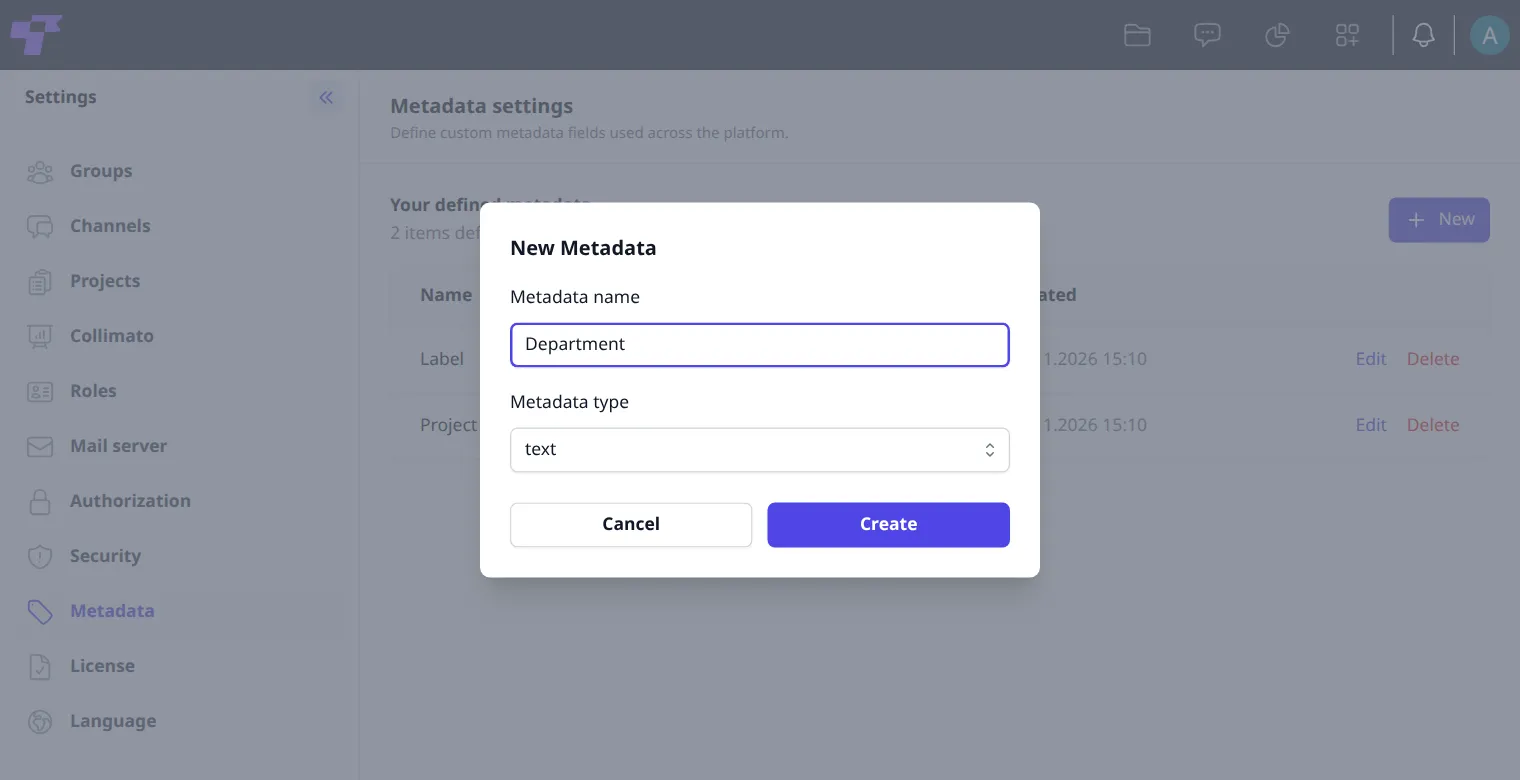
To add a field:
- Click New.
- Type the Metadata name, for example
Department. - Choose the Metadata type: text, selection (a list of options), date or color.
- For selection, type each option under Enter selection values and click Add. Click × next to an option to remove it.
- Click Create.
- Change a field: click Edit next to it, change the name or the options, and click Update.
- Delete a field: click Delete next to it and confirm with Delete.
Deleting a field removes it, and what people entered in it, from every file.
System
Email, document editing, storage, language and your license.
Mail server
Steps to configure SMTP
Twigex sends notifications, invitations and password reset links by email.
- Click Mail server.
- Make sure Send email is ticked.
- Fill in the SMTP Server and Port of your mail server, and choose the Connection type: TLS, STARTTLS or NONE.
- Fill in SMTP Server Username. If the server needs a sign-in, tick Enable SMTP authentication and fill in the SMTP Password.
- Fill in From Name and From Address, the sender people see. Optionally, add a Reply-To Address.
- Click Test connection to check the settings. It says "Connected successfully" when Twigex can reach the server. It doesn't send an email.
- Click Save.
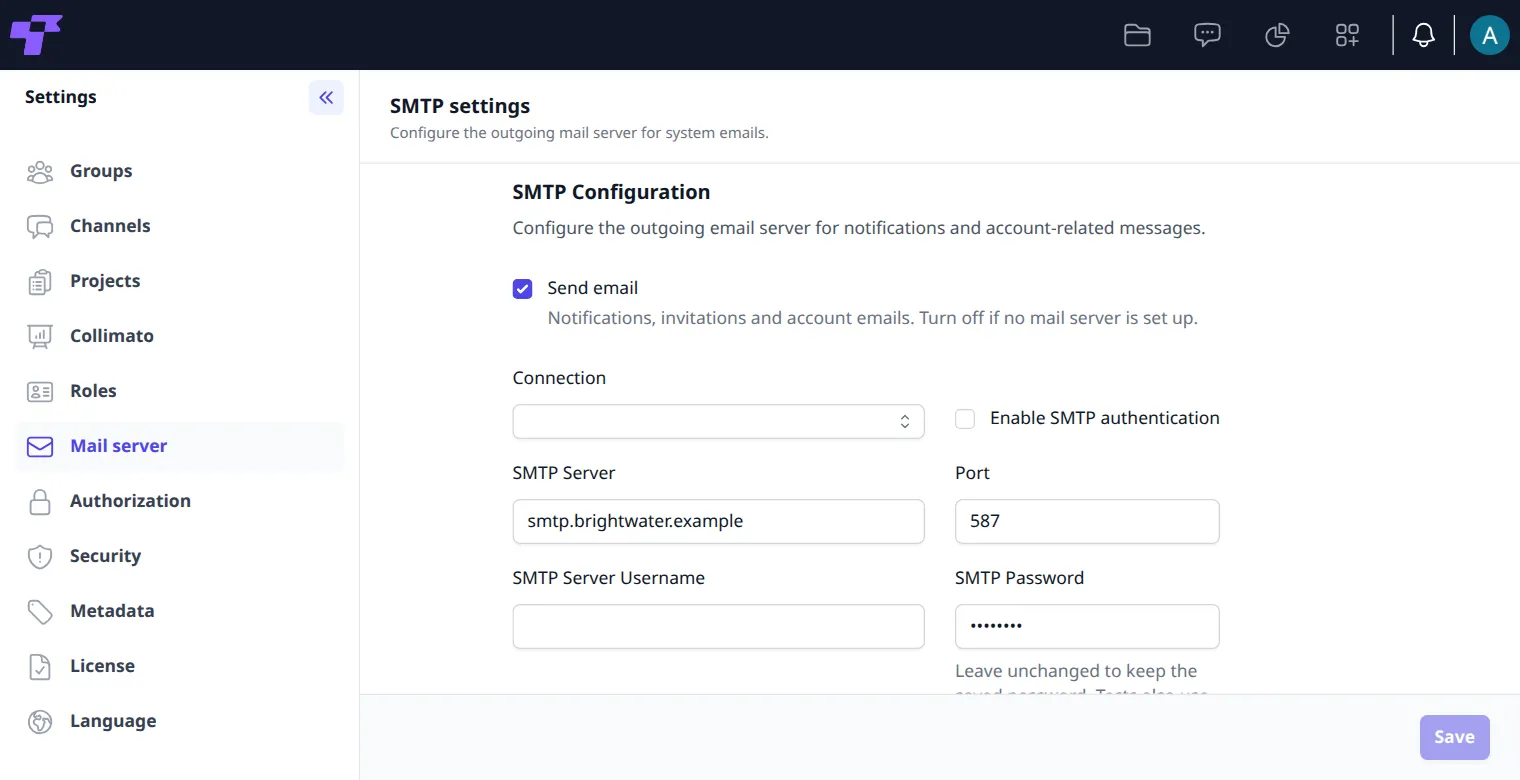
SMTP Server Username is needed even without authentication, and Twigex uses it as the sending address. If your server doesn't need a sign-in, type your From Address there.
To keep the saved SMTP password, leave the password field unchanged.
Office
Office connects Twigex to the online editor for documents, spreadsheets and presentations.
- Enable office editing: turns editing in the browser on or off.
- Office Type: Collabora Online or Euro Office.
- Office Host URL and Secret: the address of your office server and the secret shared with it.
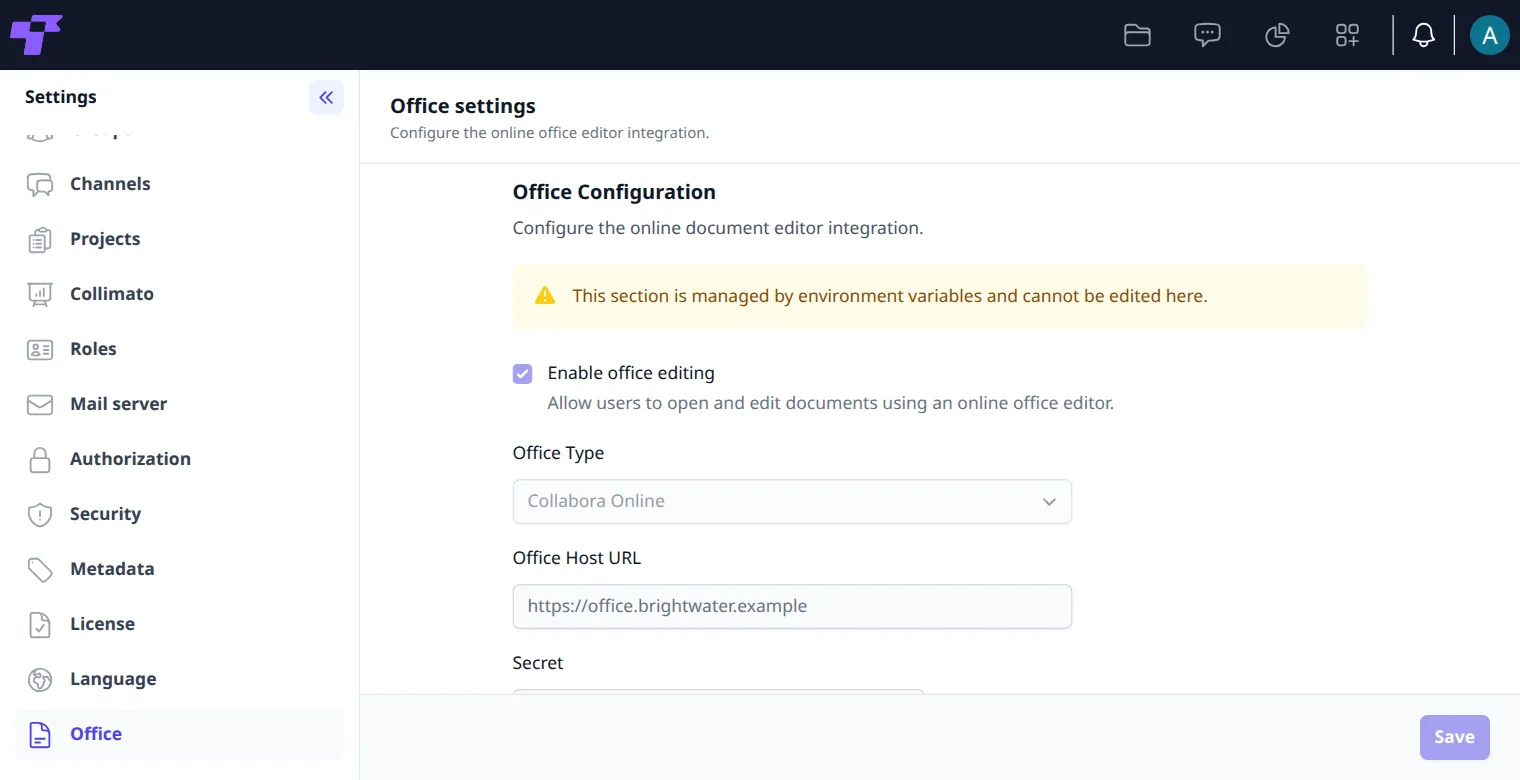
Change the values and click Save.
If the page says This section is managed by environment variables and cannot be edited here, nothing on it can be changed. The values come from the server's configuration: TWIGEX_OFFICE_ENABLE, TWIGEX_OFFICE_TYPE, TWIGEX_OFFICE_HOST and TWIGEX_OFFICE_SECRET. Change them where your server's environment variables are set, and restart Twigex. If any of the four is set, the whole page is locked.
Storage
Storage lists where Twigex keeps uploaded files. The Primary storage is where new chat attachments, project files and other uploads are saved. Only one storage can be primary.
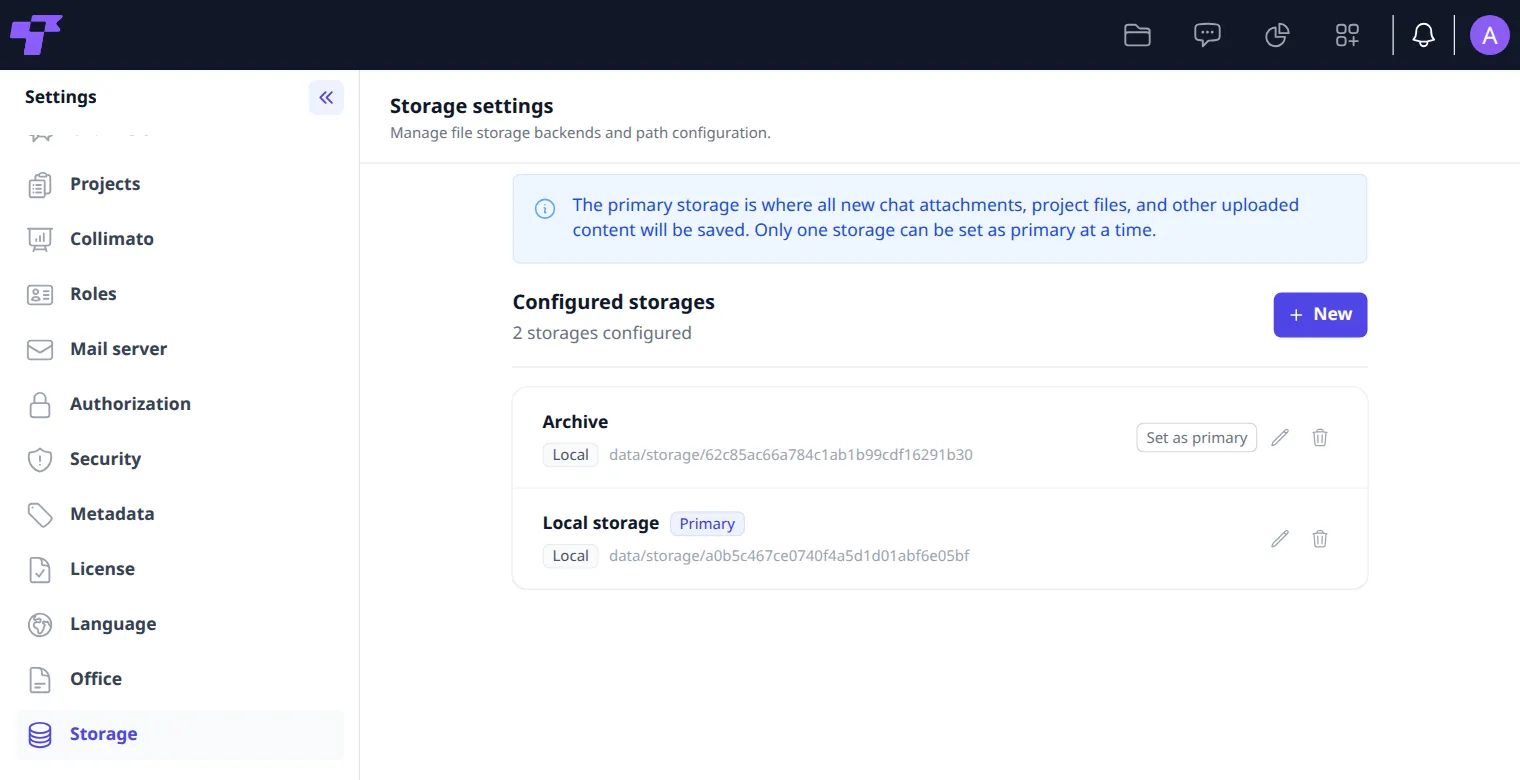
Click the pencil next to a storage to change its Name and Description, and click Save.
Add more storages
This needs a Self-hosted license or Enterprise. See plans.
- Click New.
- Choose the Type:
- Local: a folder on the Twigex server. Twigex creates it under
data/storage/. - S3: an S3-compatible bucket. Fill in the Endpoint (for example
s3.amazonaws.com), Bucket, Access key and Secret key, and leave Use SSL ticked.
- Local: a folder on the Twigex server. Twigex creates it under
- Type a Name and, optionally, a Description.
- Click Create.
The new storage shows in the list and, for people, under Your Drives in Files.
- Set as primary: makes the storage the primary one, right away.
- Pencil: for S3 you can also change the endpoint, bucket and keys. Leave Secret key empty to keep the saved one.
- Bin: removes the storage after you type its name and click Delete.
Twigex doesn't check the S3 details when you save. Make sure they're right before you set the storage as primary.
When you remove a storage, the files in it can no longer be opened in Twigex. The files themselves stay on the disk or in the bucket; clean them up there.
Language
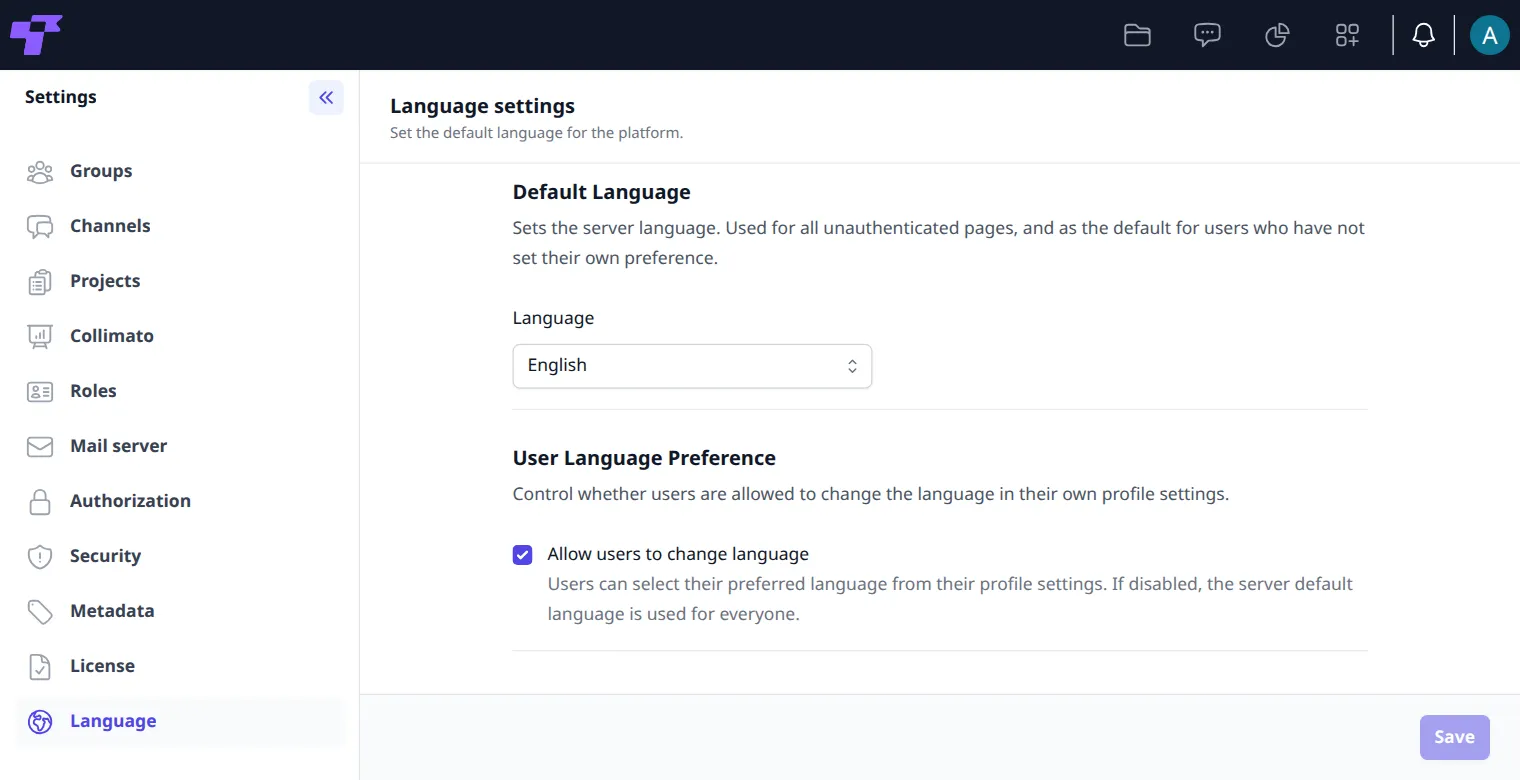
- Default Language: English, Latviešu, Қазақша or Polski. It's used on the sign-in page and for everyone who hasn't chosen their own language.
- Allow users to change language: lets people choose their own language under Profile info. Untick it to use the default language for everyone. People then see "Language is set by your administrator." under Language in Profile info.
Click Save after a change.
License
License shows your current plan. To add or change a license:
- Click Add new license.
- Choose the license file you received.
The page then shows your plan, for example Twigex enterprise, and under License details:
- Starts from and Expires at: when the license is valid.
- Issued at: when it was made.
- Licensed seats: active users out of the seats in the license, for example 11 of 100 (see Licensed seats).
- Edition, Name and Company.
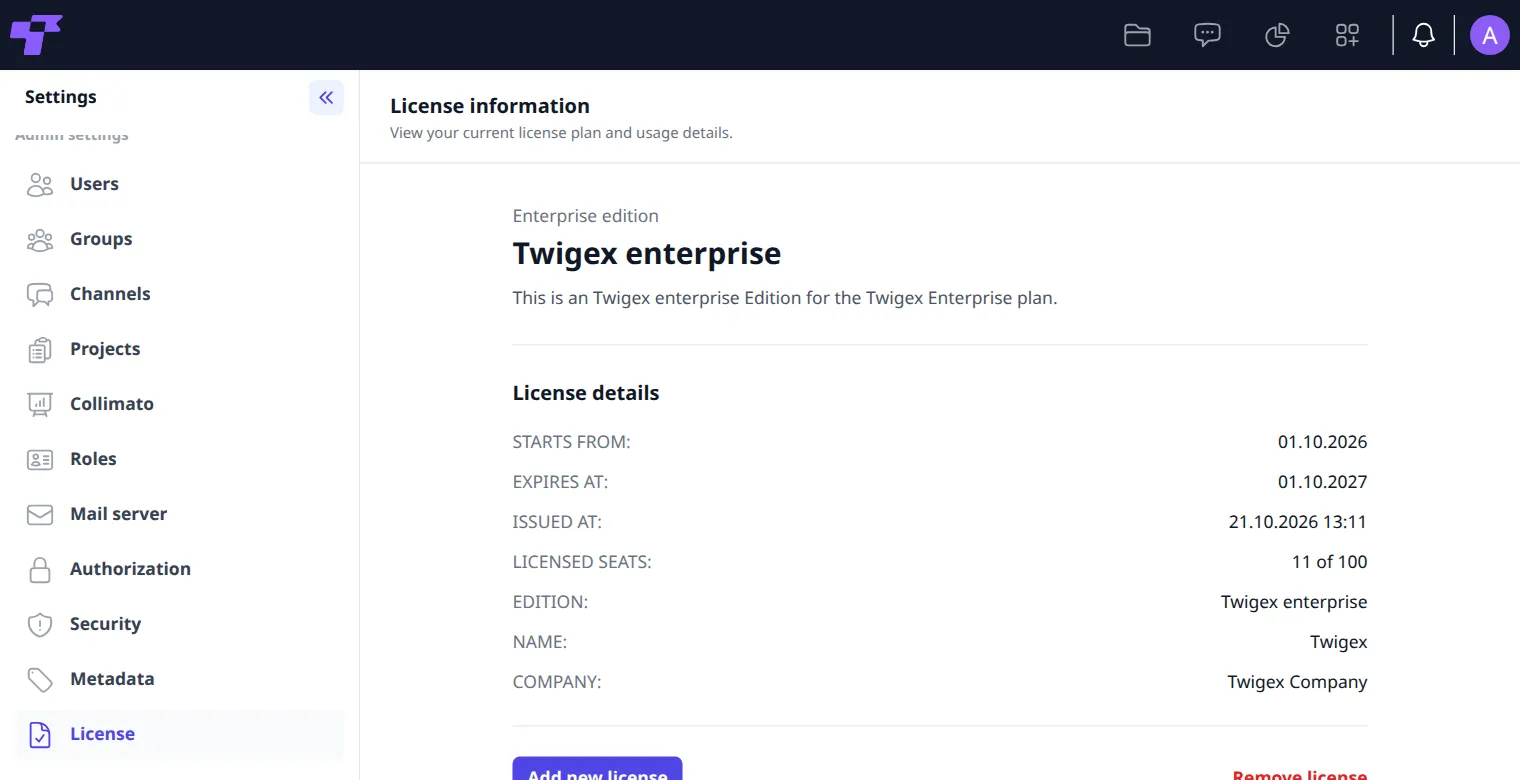
Remove license removes it after you confirm. As the confirmation says, Twigex then goes back to the Community Edition, and the features marked with a note stop working.