

Fields and calculations
On this page
A table in Projects is more than a task list. Each column is a field, and you choose what kind of information it holds: text, numbers, dates, choices, people, files, links to other tables, or values that Twigex calculates for you.
Add a field
- Open the table in Grid View.
- Click + at the right end of the column headings.
- Under Field type, choose the kind of field. See Field types below.
- Type the field's name, for example
Budget. - Click Create.
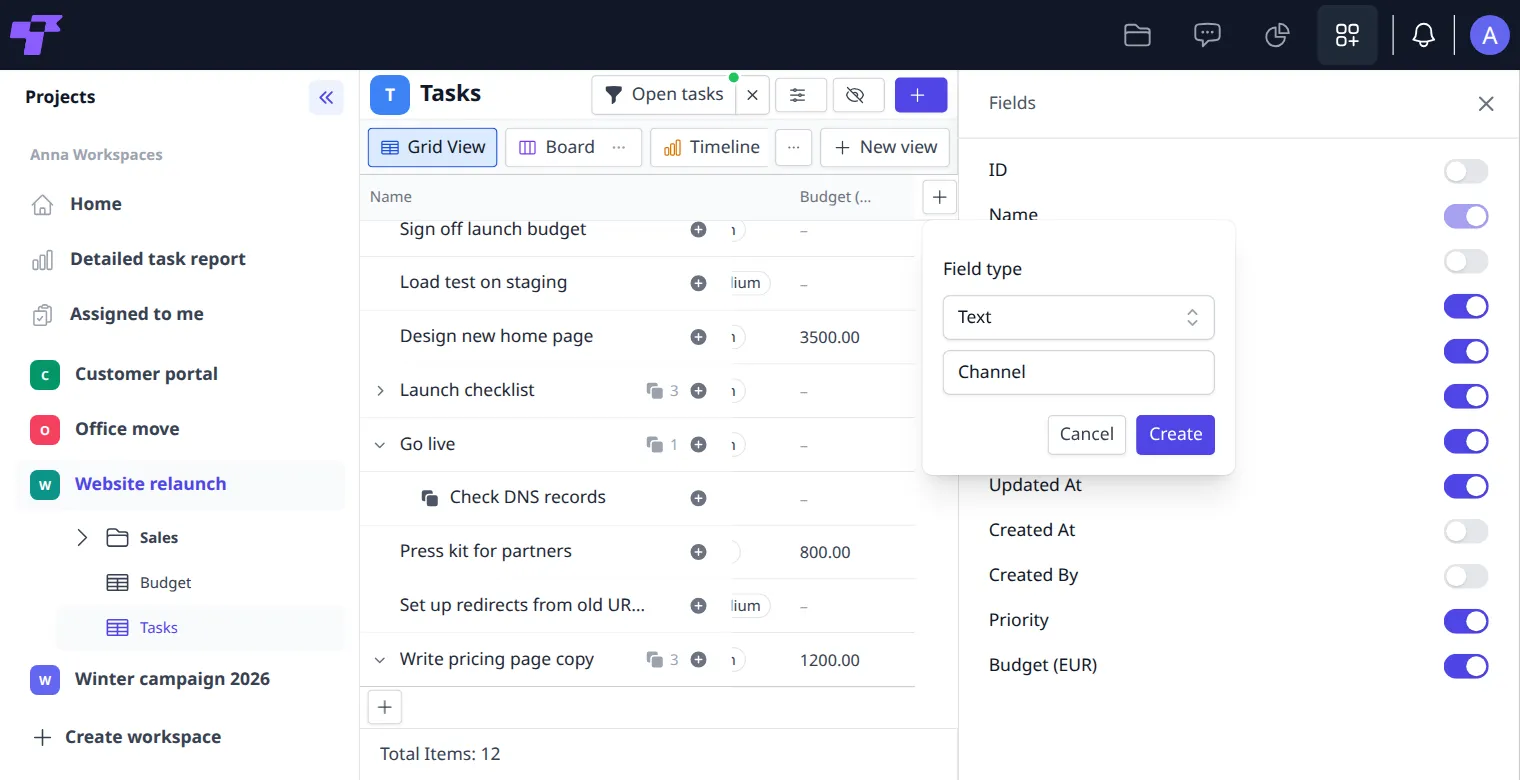
You're done when the new column is at the right end of the table.
The new field also shows in each task's details, under the standard fields.
Change or delete a field
- Rename a field: double-click its heading, type the new name and press Enter. Or point at its heading, click ⋯ and then Edit, type the new name and click Save.
- Edit a field: point at its heading, click ⋯ and then Edit field. Change the name and click Save. For a Calculations field, you can also choose another formula or other fields, and the values are calculated again. If you choose another formula, choose its fields again. The field type can't be changed.
- Delete a field: point at its heading, click ⋯ and then Delete. Delete Field asks you to confirm.
- Move a field: drag its heading left or right.
- Make it wider or narrower: drag the right edge of its heading.
- Hide a field without deleting it: click Fields at the top and turn its switch off.
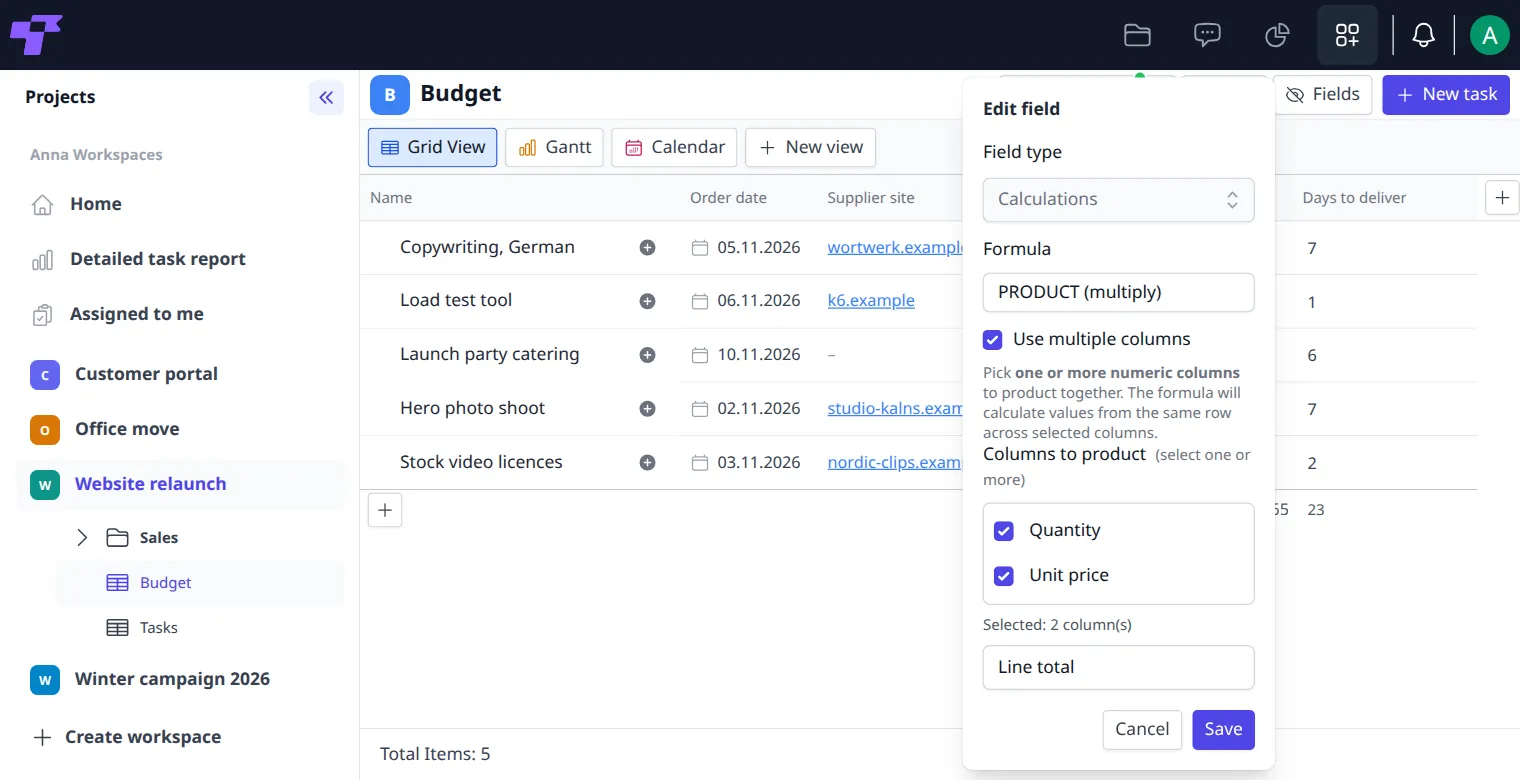
The standard fields, such as Name, Due Date and Status, have no ⋯ and can't be renamed.
Deleting a field deletes its values in every task of the table. It can't be undone.
Field types
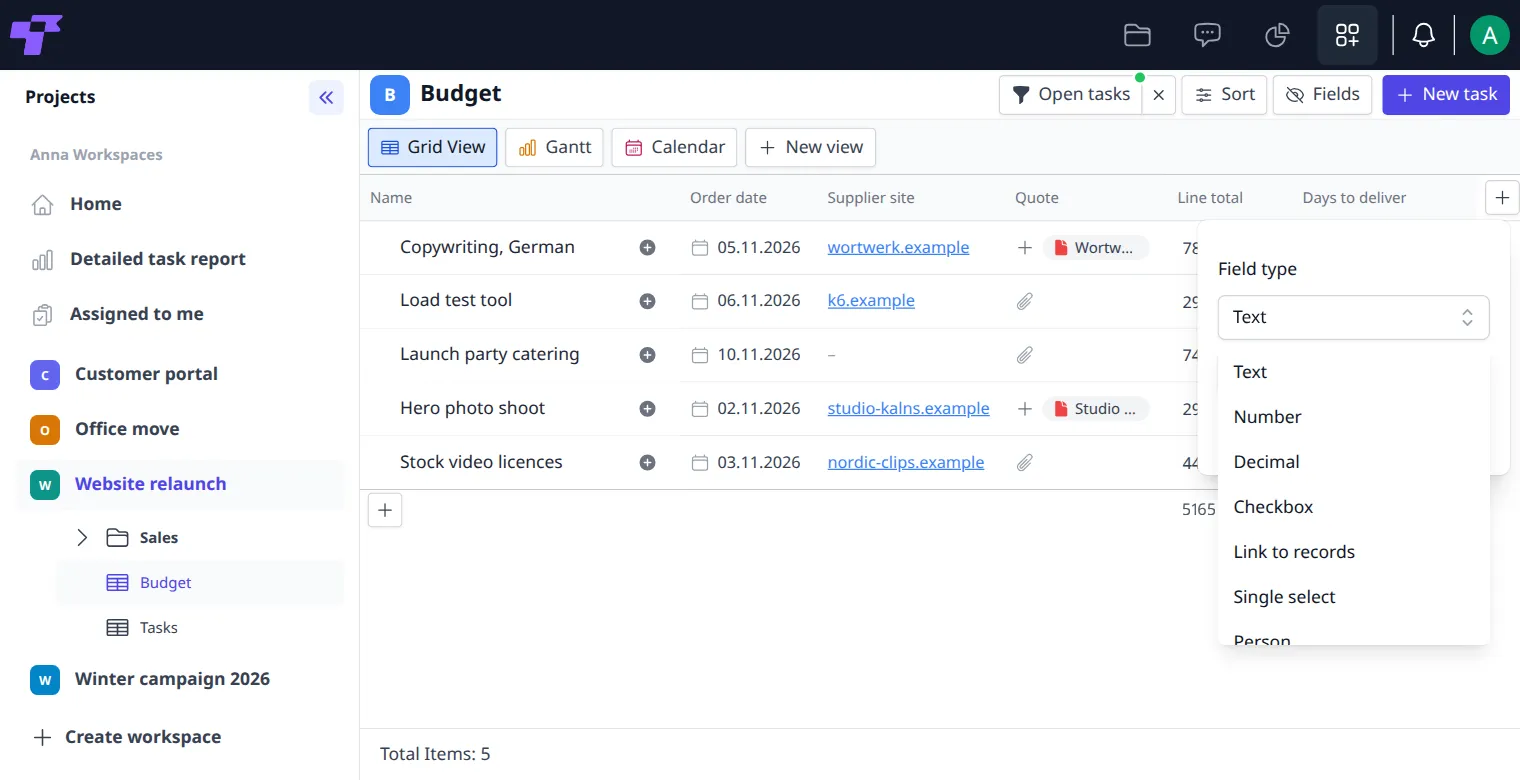
| Field type | What it holds | Good for |
|---|---|---|
| Text | Any text, short or long | Notes, codes, client names |
| Number | Whole numbers | Quantities, hours, counts |
| Decimal | Numbers with decimals | Prices, rates, measurements |
| Checkbox | A tick, on or off | Approved, invoice sent, yes or no steps |
| Single select | One option from a list you set up, each with a color | Priority, department, phase |
| Person | One member of the workspace | Reviewer, owner, approver |
| Date | A day from a calendar | Review dates, delivery dates, events |
| Website URL | A web address you can click | Links to designs, live pages, documents |
| File | One or more uploaded files | Attachments, contracts, images |
| Calculations | A value Twigex works out with a formula | Totals, averages, days until a deadline |
| Link to records | Rows from another table | Tasks of a project, contracts of a client |
| Link to table | A shortcut to a whole other table, chosen in each row | A reference table, such as a price list |
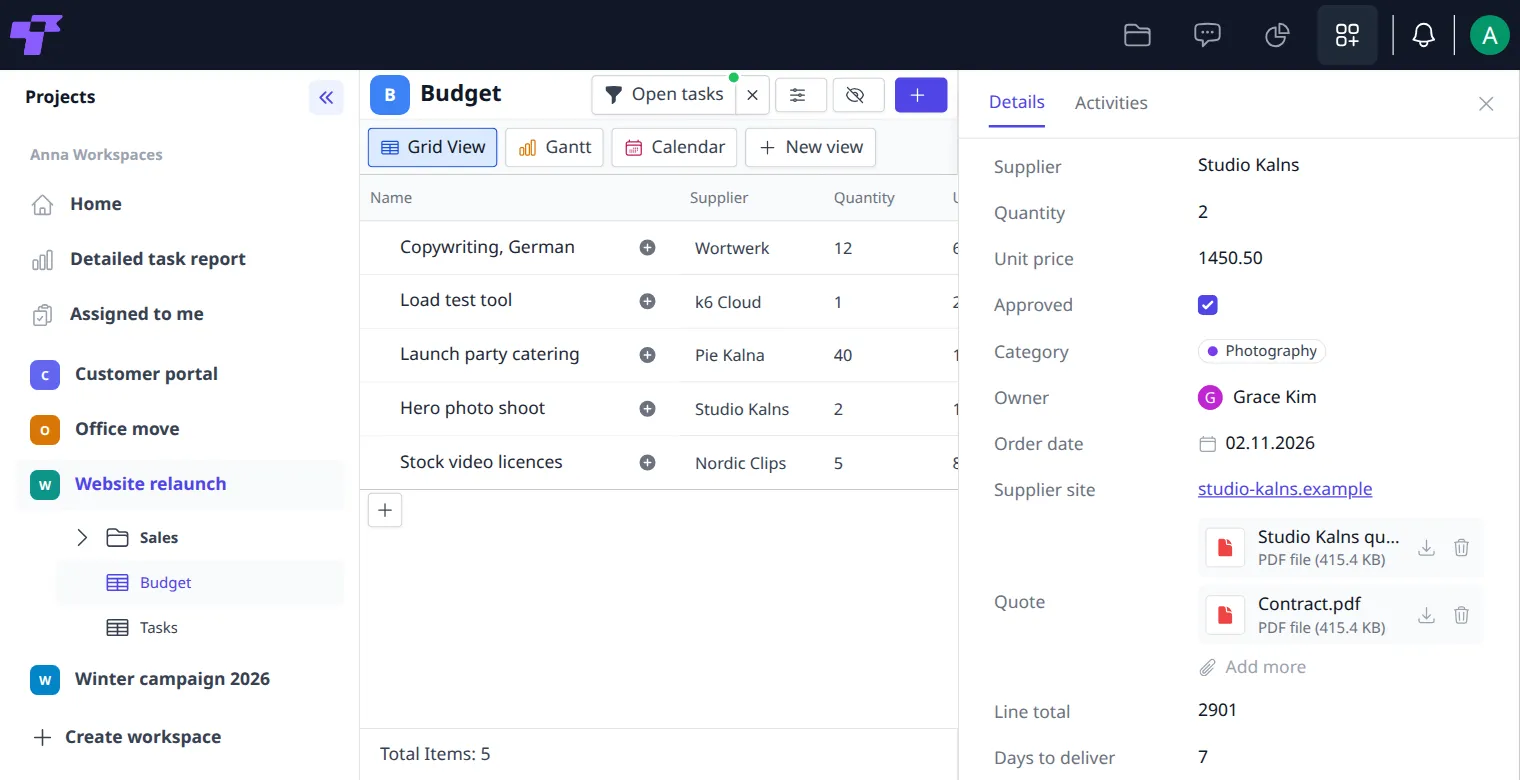
The Budget table of Website relaunch uses most of them:
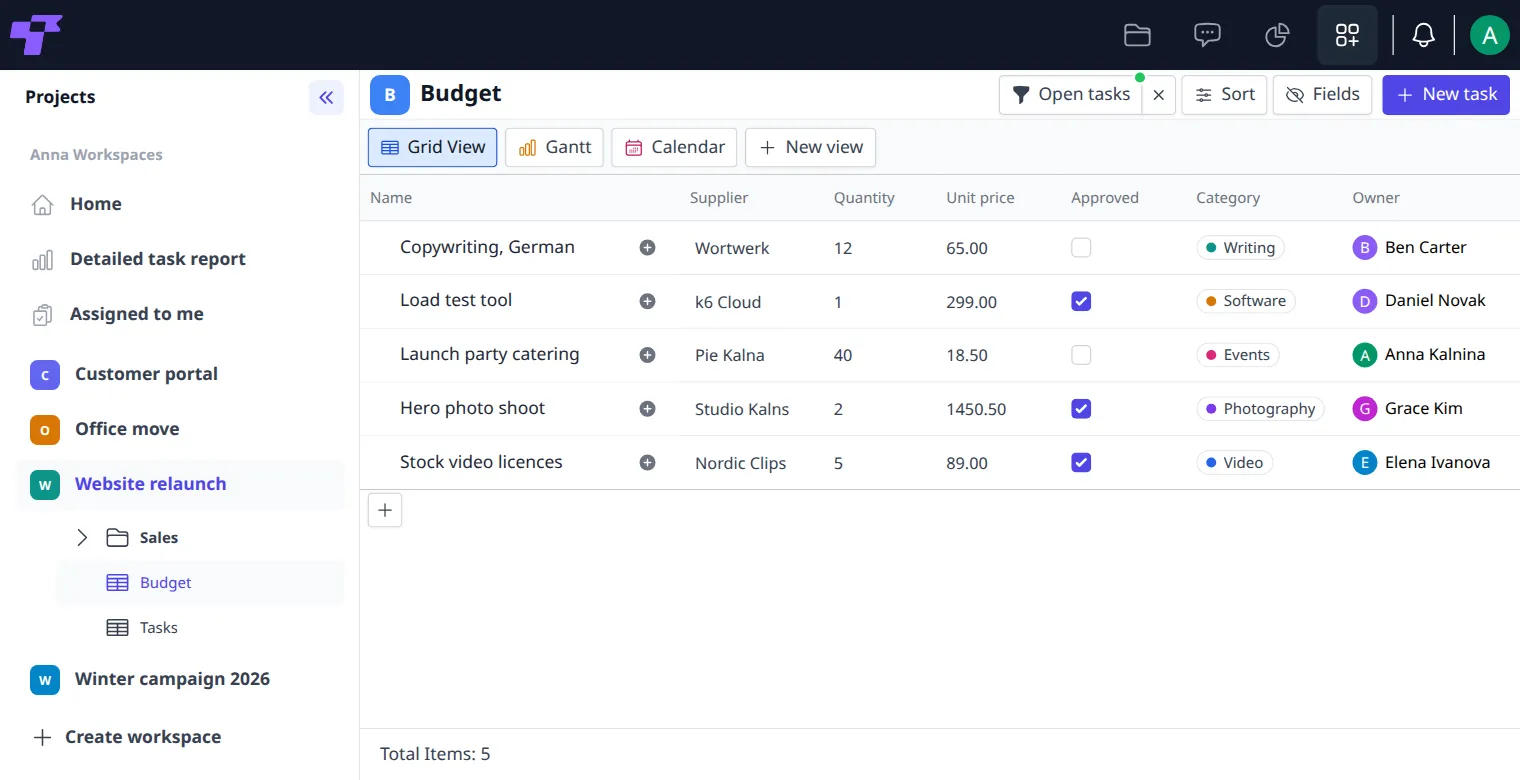
Fill in a field
Click a cell in the table, or the field in the task's details, and:
- Text, Number, Decimal, Website URL: type the value and press Enter. A Number field holds whole numbers; for decimals, use a Decimal field. A Website URL shows as a link.
- Checkbox: click to tick or untick it.
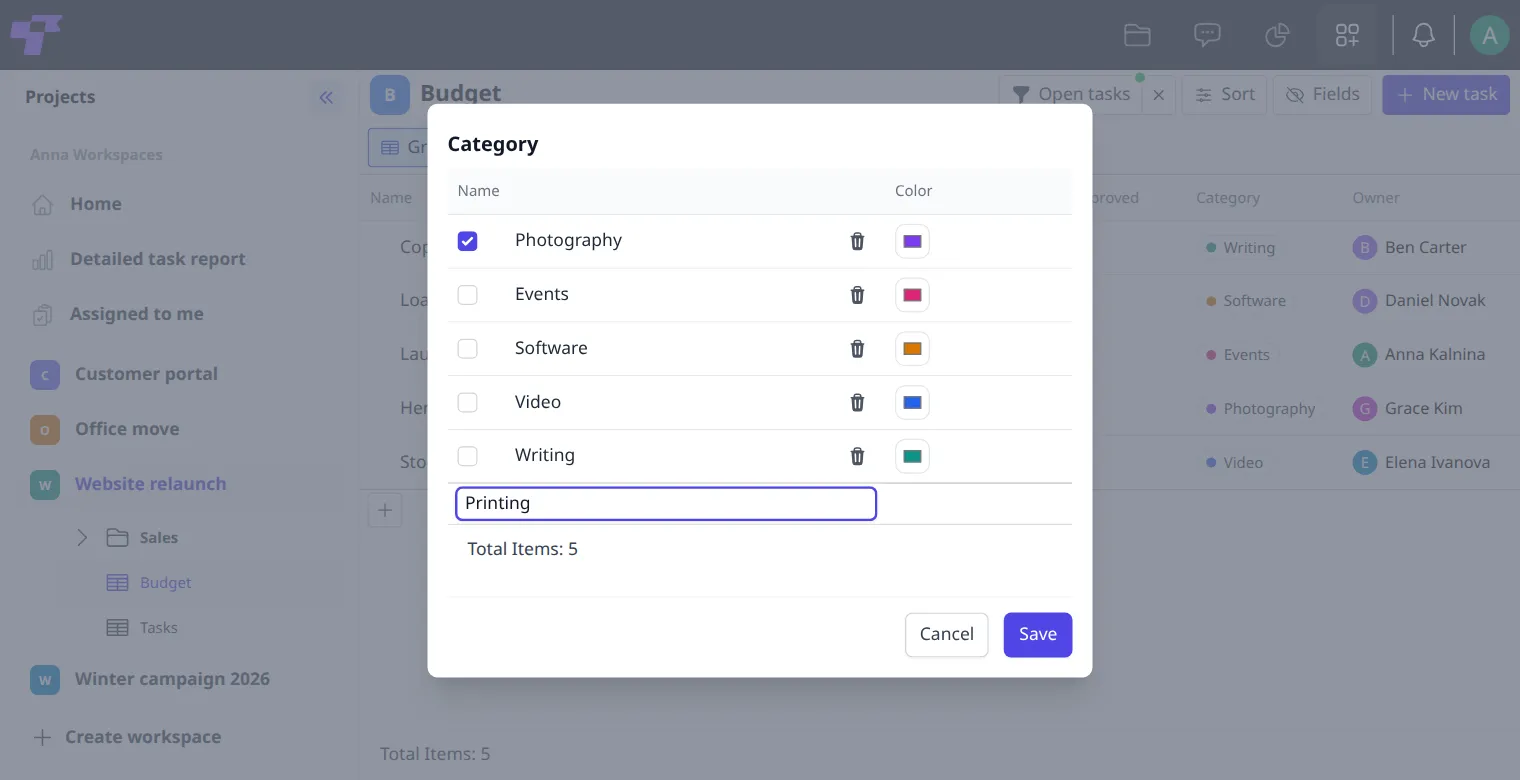
- Single select: a list of the options opens. Tick one and click Save. To add a new option, click + below the list, type its name and press Enter. A new Single select field has no options yet, so add them first. In the same list, click an option's name to rename it, the color square to change its color, or the trash can to delete it.
- Person: Assign task opens. Pick the person from the list and click Assign. To clear the field, click it again and then Remove Assignee.
- Date: pick a day in the calendar and click Save. Clear removes the date.
- File: click the paper clip in the cell, or Upload files in the task's details, and choose files on your computer. To add more files later, click Add more in the task's details. The cell shows the first file's name and +1 for each more. In the task's details, each file is listed with buttons to download or remove it.
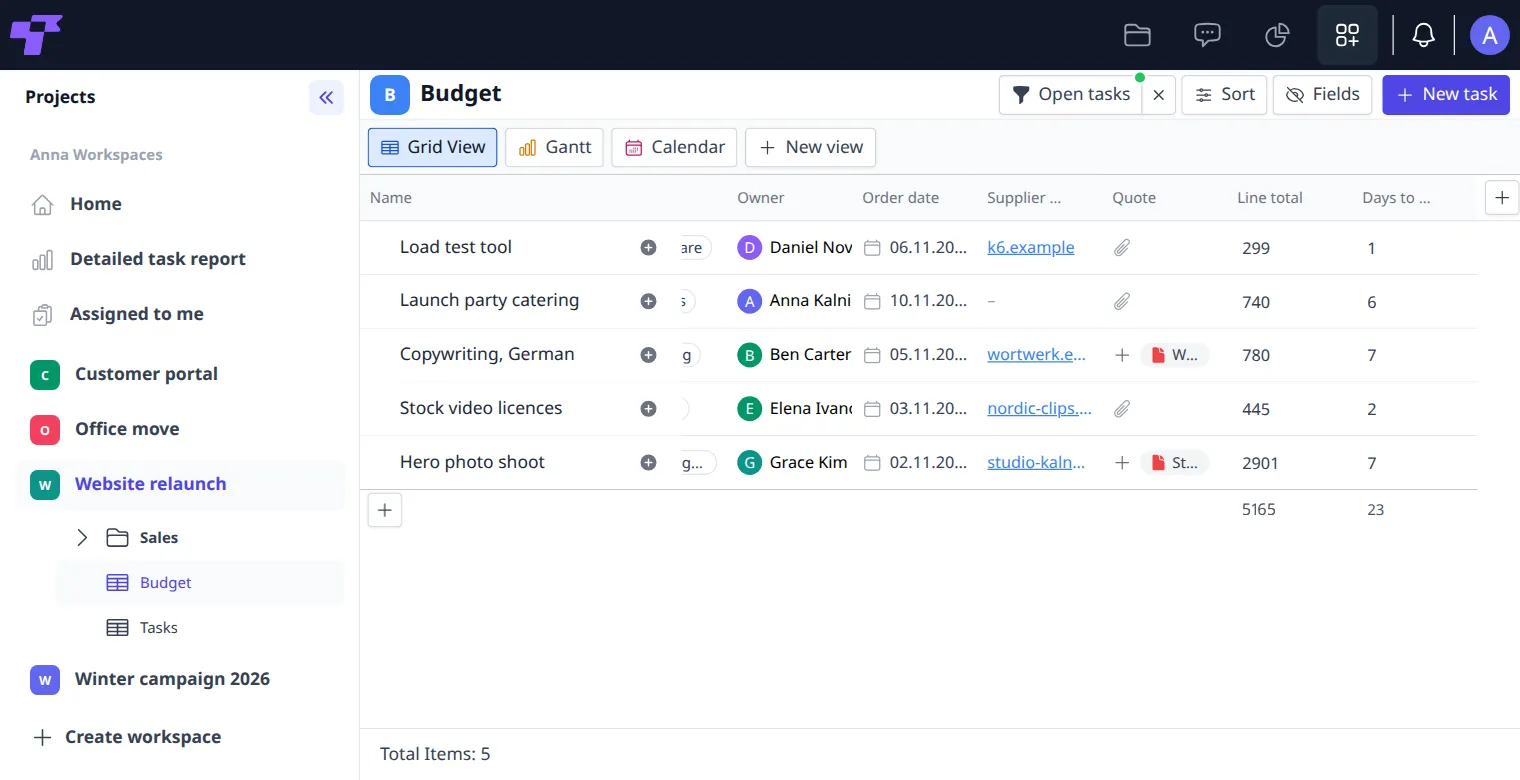
- Calculations: nothing to fill in. Twigex calculates the value and updates it when the fields it uses change.
Calculations
A Calculations field works out its value from other fields, like a formula in a spreadsheet.
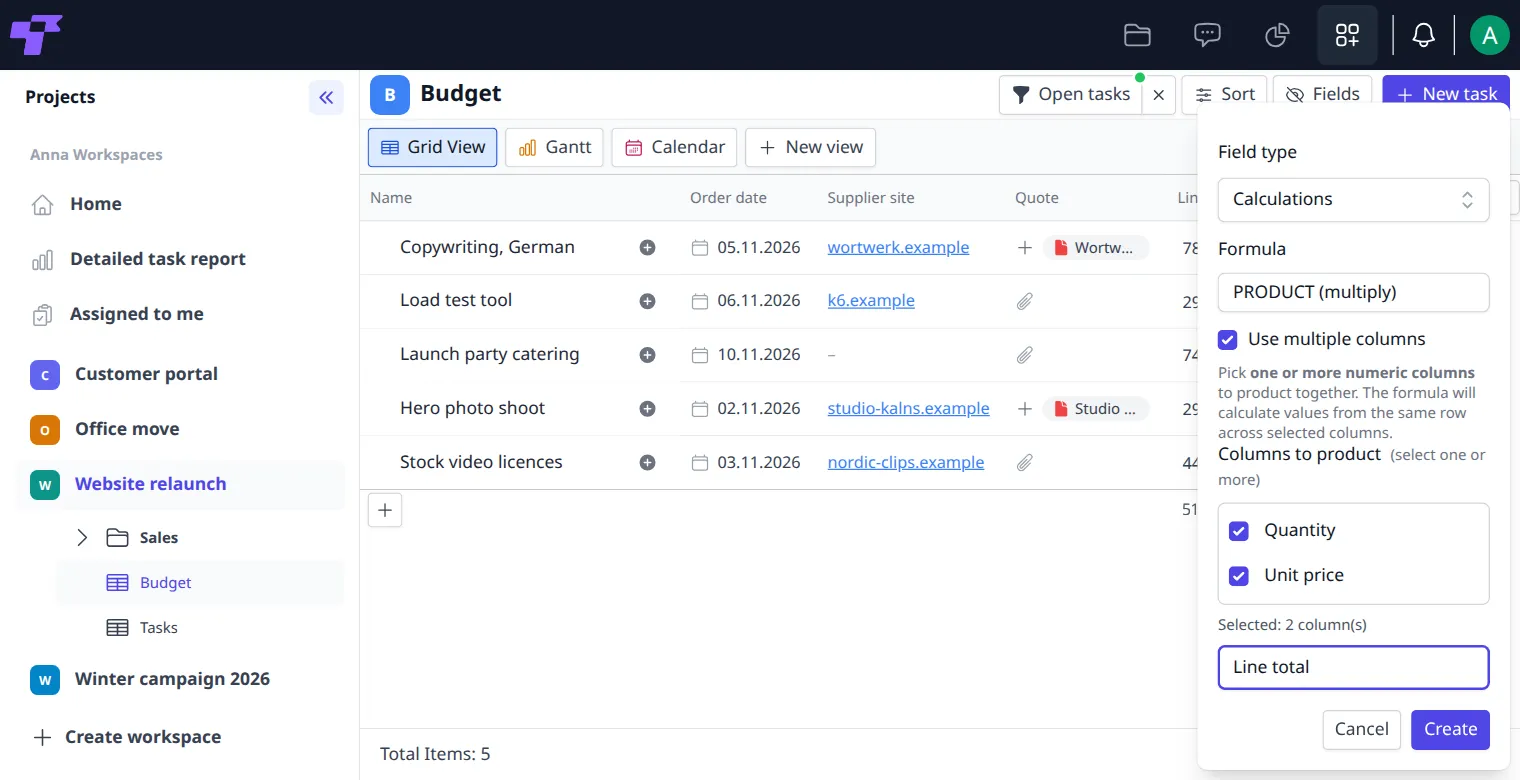
- Click + at the right end of the column headings.
- Under Field type, choose Calculations.
- Under Formula, choose a formula, for example SUM (add numbers).
- Choose the fields the formula uses. The options depend on the formula; see below.
- Type the field's name, for example
Total cost, and click Create.
If a field the formula uses is empty, it's left out. A formula on one field shows – when the field is empty, and SUM of empty fields gives 0.
The line at the bottom of the table shows the total of each calculation column that gives a number, for example the total of all line totals.
Add, average and compare numbers
For SUM, AVERAGE, PRODUCT, MIN and MAX, tick Use multiple columns and pick one or more Number or Decimal fields. Each task gets its own result from its own values, for example Quantity × Unit price = Line total.
| Formula | What it does | Example |
|---|---|---|
| SUM | Adds the numbers | Design hours + Writing hours = total hours |
| AVERAGE | The average of the numbers | Average of three supplier quotes |
| PRODUCT | Multiplies the numbers | Quantity × Unit price = line total |
| MIN | The smallest number | Lowest quote |
| MAX | The largest number | Highest estimate |
Round and change numbers
| Formula | What it does | Example |
|---|---|---|
| ROUND(number, digits) | Rounds to the number of decimals you choose | ROUND(Price, 0): 19.60 becomes 20, 2.50 becomes 3 |
| ROUNDUP(number, digits) | Always rounds away from zero | ROUNDUP(Price, 0): 2.50 becomes 3, -2.10 becomes -3 |
| ROUNDDOWN(number, digits) | Always rounds toward zero | ROUNDDOWN(Price, 0): 19.60 becomes 19, -2.10 becomes -2 |
| ABS(number) | Removes the minus sign | -2.10 becomes 2.1 |
| POWER(base, exponent) | Raises a number to a power | POWER(Price, 2): 19.60 becomes 384.16 |
For rounding, pick the field under Number (field) and type the number of Digits (0 for whole numbers). It's best to put the rounded result in its own field, such as Rounded price.
Work with dates
| Formula | What it does | Example |
|---|---|---|
| TODAY() | Today's date | 11.11.2026 |
| NOW() | The date and time right now | 11.11.2026 22:18 |
| DATE(year, month, day) | A date made from three numbers | DATE(2026, 12, 31): 31.12.2026 |
| YEAR(date) | The year of a date | 2026 |
| MONTH(date) | The month of a date, 1 to 12 | 11 for November |
| DAY(date) | The day of the month, 1 to 31 | 15 |
| DATEDIF(start, end, unit) | The time between two dates. Type the Unit: D for days, M for months or Y for years. | DATEDIF(Order date, Due Date, "D"): days from order to delivery |
| WEEKDAY(date, type) | The day of the week as a number. With type 1 (the default), Sunday is 1 and Saturday is 7. With type 2, Monday is 1 and Sunday is 7. | Spot deadlines that fall on a weekend |
TODAY() and NOW() are worked out each time the table is shown, so they always show the current date and time when you open or reload the table.
Link tables together
Links connect information that lives in different tables, for example clients and their projects, or projects and their tasks. There are two kinds:
- Link to records: connects rows. Each task (or client, or project) can point to specific rows in another table.
- Link to table: gives each row a shortcut to a whole table. You can't add or change rows through it.
Link to records
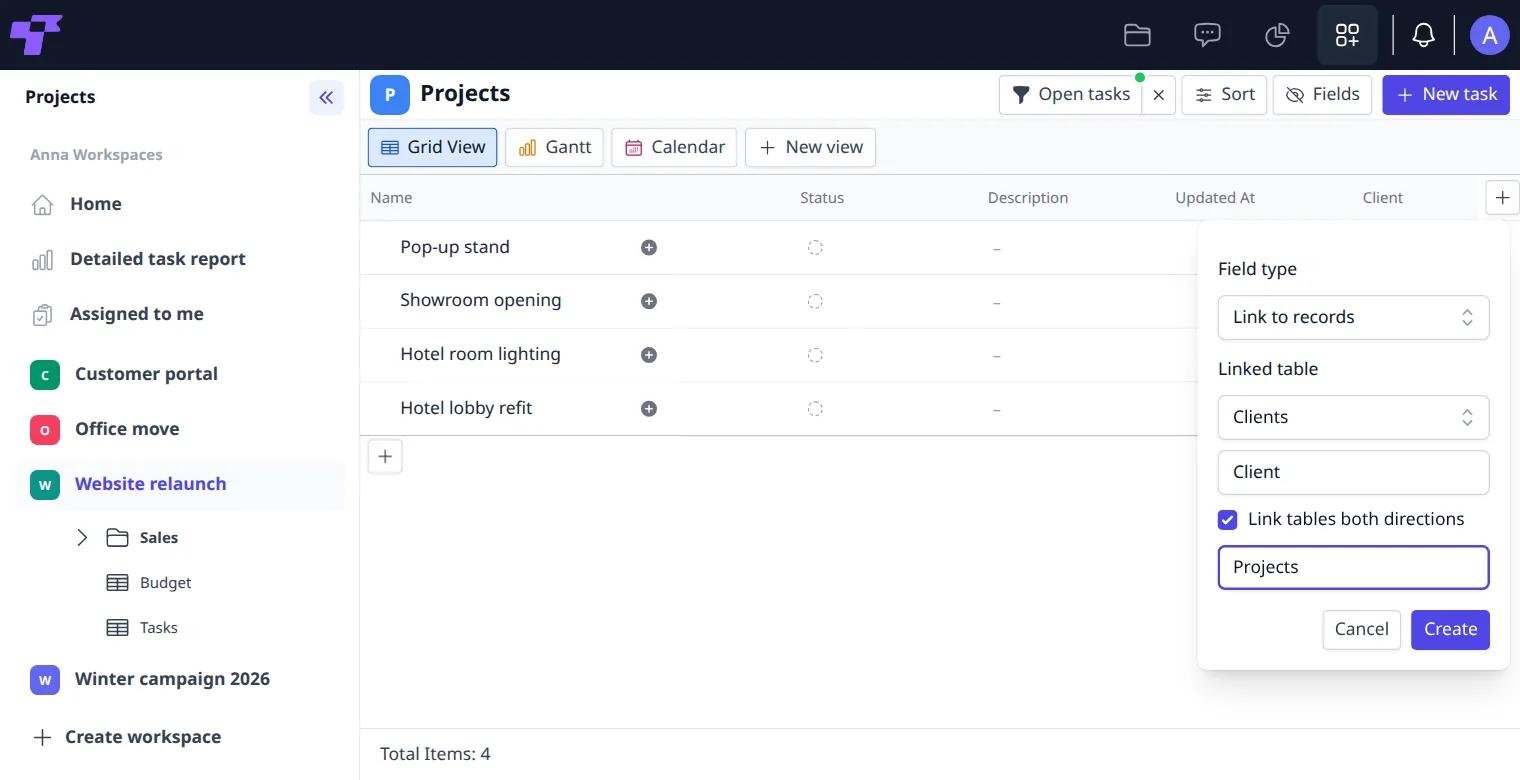
- Click + at the right end of the column headings.
- Under Field type, choose Link to records.
- Under Linked table, choose the table to link to.
- Type the field's name, for example
Client. - To see the link from the other table as well, tick Link tables both directions and type the name of the field in the other table, for example
Projects. - Click Create.
To link rows, click + in the field's cell. A small table of the other table's rows opens:
- Tick the rows to link and click Save.
- To add a new row to the other table, click + below the rows, type its name and press Enter.
- To open the other table, click the arrow next to its name at the top.
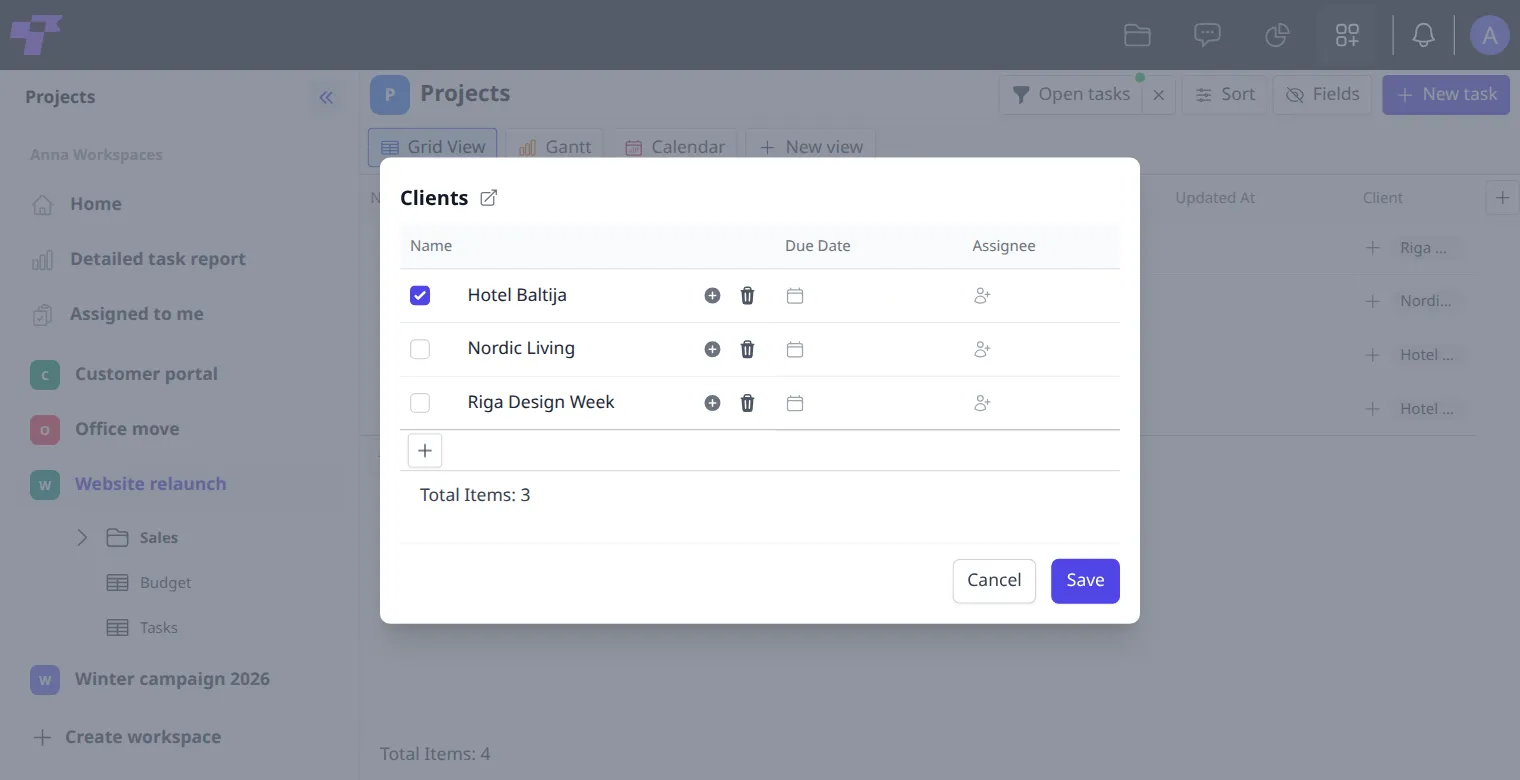
The cell shows the linked rows by name, and +1 for each more than fits. Click a name to open that row. With Link tables both directions, the field in the other table shows the same links from its side: Hotel Baltija lists its projects under Projects.
Link to table
- Click + at the right end of the column headings.
- Under Field type, choose Link to table.
- Type the field's name, for example
Price list, and click Create. - In a row, click the field's cell. In Link to table, choose the table and click Link.
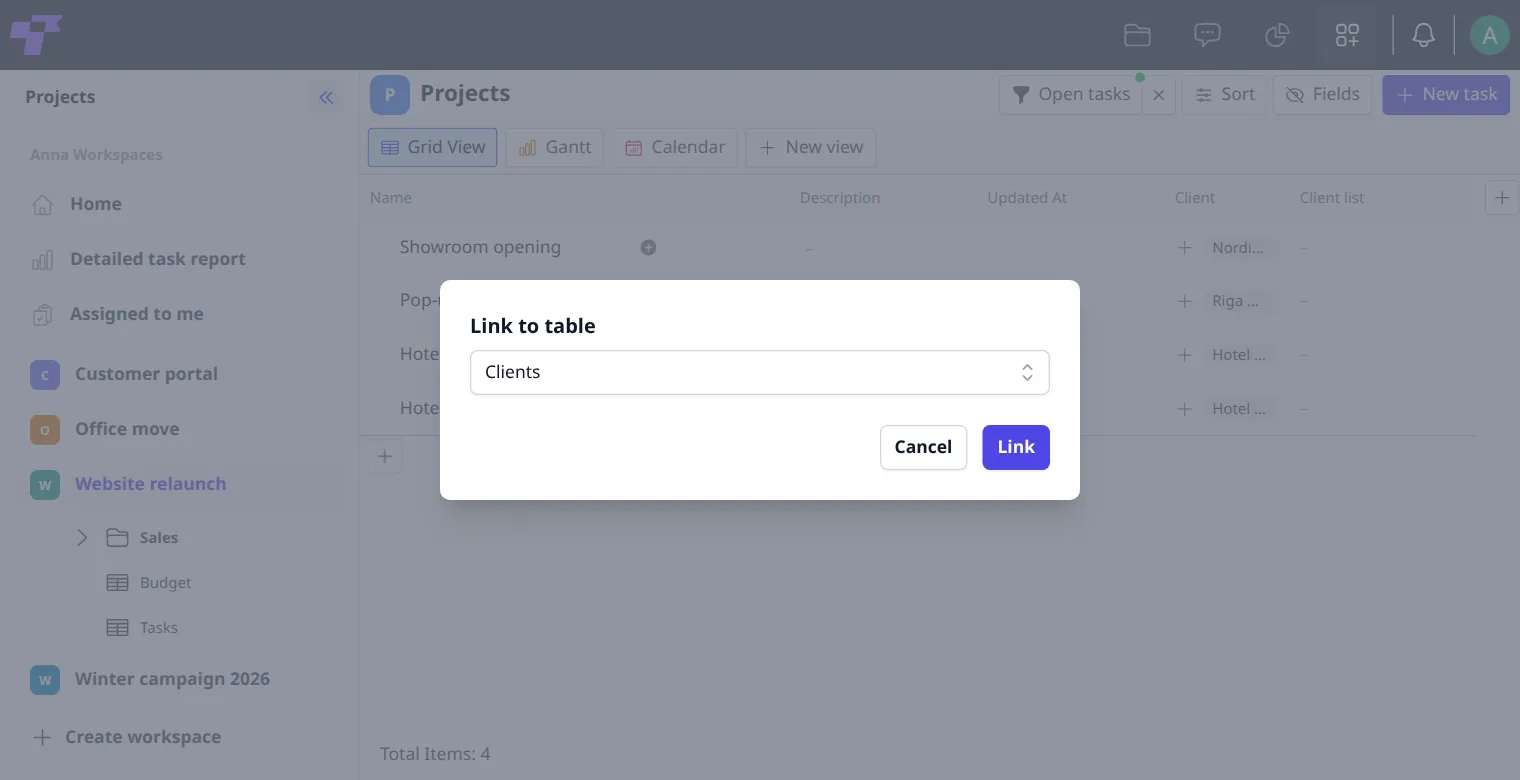
The cell shows the table's name. Click it to open that table.
Ways to set up linked tables
- One set of tables for everything: all projects share one Projects table and one Tasks table. Best when every project works the same way.
- Shared project list, own task tables: one Projects table, and each project links to its own Tasks table. Best when projects need different task fields.
- Separate tables per project: each project has its own set of tables. The most flexible, but harder to keep an overview.
If something doesn't work
- There's no + at the end of the headings, or you can't edit a field: your role in the workspace doesn't allow it. Ask a workspace admin.
- A calculation shows –: the fields it uses are empty in that row.
- A field you need isn't in the formula's list: only fields of the right type are offered, for example only date fields for DATEDIF.